
Asus Q551LN-BBI7T09 Laptop Hard Drive Replacement

What you need

  1. Asus Q551LN-BBI7T09 Laptop Hard Drive Replacement, Hard Drive: step 1, image 1 of 2 Asus Q551LN-BBI7T09 Laptop Hard Drive Replacement, Hard Drive: step 1, image 2 of 2
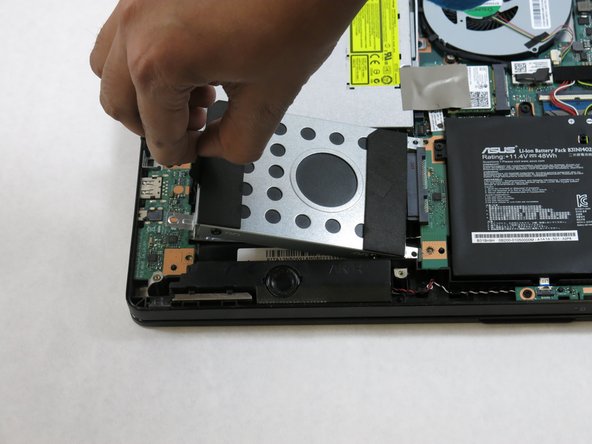
    • Use a T5 (Torx 5) screwdriver to remove the ten 3.0 mm Torx screws from the base plate of the laptop.

  2. Asus Q551LN-BBI7T09 Laptop Hard Drive Replacement: step 2, image 1 of 2 Asus Q551LN-BBI7T09 Laptop Hard Drive Replacement: step 2, image 2 of 2
    • Slowly and carefully pry open the base plate going around the edge.

    • A card can be used to make the process easier.

    • Grab the base plate and lift away from the laptop.

  3. Asus Q551LN-BBI7T09 Laptop Hard Drive Replacement: step 3, image 1 of 3 Asus Q551LN-BBI7T09 Laptop Hard Drive Replacement: step 3, image 2 of 3 Asus Q551LN-BBI7T09 Laptop Hard Drive Replacement: step 3, image 3 of 3
    • Use a Phillips #1 screwdriver to remove the four 3.0 mm Phillips screws around the hard drive.

  4. Asus Q551LN-BBI7T09 Laptop Hard Drive Replacement: step 4, image 1 of 2 Asus Q551LN-BBI7T09 Laptop Hard Drive Replacement: step 4, image 2 of 2
    • Remove the hard drive from its port by sliding the hard drive left.

  5. Asus Q551LN-BBI7T09 Laptop Hard Drive Replacement: step 5, image 1 of 3 Asus Q551LN-BBI7T09 Laptop Hard Drive Replacement: step 5, image 2 of 3 Asus Q551LN-BBI7T09 Laptop Hard Drive Replacement: step 5, image 3 of 3
    • Lift the hard drive out upwards.

    • Refrain from touching the green circuit boards.

  6. Asus Q551LN-BBI7T09 Laptop Hard Drive Replacement: step 6, image 1 of 3 Asus Q551LN-BBI7T09 Laptop Hard Drive Replacement: step 6, image 2 of 3 Asus Q551LN-BBI7T09 Laptop Hard Drive Replacement: step 6, image 3 of 3
    • Use a Phillips #1 screwdriver to remove the four 2.0 mm Phillips screws that secure the hard drive to its casing.

  7. Asus Q551LN-BBI7T09 Laptop Hard Drive Replacement: step 7, image 1 of 1
    • Place the new hard drive in the casing with the connection on the right side.

    • Screw everything back together.

Conclusion

To reassemble your device, follow these instructions in reverse order.

One other person completed this guide.

Thomas

Member since: 10/31/17

125 Reputation

1 Guide authored

0 Comments

Add Comment

View Statistics:

Past 24 Hours: 0

Past 7 Days: 0

Past 30 Days: 2

All Time: 1,310