
Asus G750JW-BBI7N05 RAM Replacement

What you need

  1. Asus G750JW-BBI7N05 RAM Replacement, Battery: step 1, image 1 of 1
    • Power off and unplug your laptop, then turn it over.

  2. Asus G750JW-BBI7N05 RAM Replacement: step 2, image 1 of 1
    • Slide the battery release latch all the way to the right. This will cause the battery to "pop" out slightly.

  3. Asus G750JW-BBI7N05 RAM Replacement: step 3, image 1 of 1
    • Remove the battery from its compartment.

  4. Asus G750JW-BBI7N05 RAM Replacement, RAM: step 4, image 1 of 2 Asus G750JW-BBI7N05 RAM Replacement, RAM: step 4, image 2 of 2
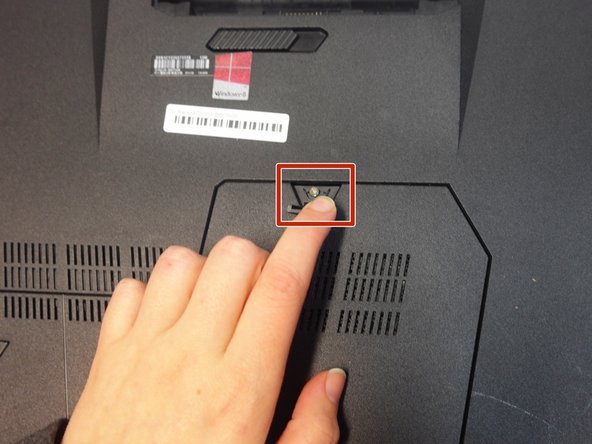
    • Lift up the rubber stopper on the backplate to expose one Phillips screw. Unscrew it until it becomes loose.

    • This screw is permanently connected to the backplate and cannot be removed. Unscrewing it only allows you to remove the backplate from the laptop.

    • The backpate is the plastic plate on the underside of the laptop that covers some of its easily accessible internal components.

  5. Asus G750JW-BBI7N05 RAM Replacement: step 5, image 1 of 1
    • Use an opening tool to pry up the backplate along its edges, then remove it.

    • You may need to apply some force when prying up the backplate.

    • Keep in mind: During reassembly, replace the backplate starting from the bottom.

  6. Asus G750JW-BBI7N05 RAM Replacement: step 6, image 1 of 2 Asus G750JW-BBI7N05 RAM Replacement: step 6, image 2 of 2
    • During the recycling process, this laptop lost some of its parts. In this step, its top two RAM modules are missing.

    • Remove each RAM module one at a time by sliding them downward out of their slots.

Conclusion

To reassemble your device, follow these instructions in reverse order.

One other person completed this guide.

One Comment

What about how to remove the other two internal RAM Modules?

Latiron London - Reply

Add Comment

View Statistics:

Past 24 Hours: 0

Past 7 Days: 1

Past 30 Days: 3

All Time: 718