
Astro A50 2016 Headset Motherboard Replacement

What you need

  1. Astro A50 2016 Headset Motherboard Replacement, Headset Speakers: step 1, image 1 of 2 Astro A50 2016 Headset Motherboard Replacement, Headset Speakers: step 1, image 2 of 2
    • Remove the magnetic ear pads by gently pulling up away from the head set.

  2. Astro A50 2016 Headset Motherboard Replacement: step 2, image 1 of 1
    • Squeeze the plastic opening tool between the black plastic and foam pad on non mic side and then pry upwards to remove the felt pads covering the speaker.

  3. Astro A50 2016 Headset Motherboard Replacement: step 3, image 1 of 1
    • Remove the four 6mm Phillips 1 screws.

  4. Astro A50 2016 Headset Motherboard Replacement: step 4, image 1 of 1
    • Lift the speaker module up off the device.

  5. Astro A50 2016 Headset Motherboard Replacement, Headset Motherboard: step 5, image 1 of 1
    • Remove the four 6mm Phillips 1 screws.

  6. Astro A50 2016 Headset Motherboard Replacement: step 6, image 1 of 2 Astro A50 2016 Headset Motherboard Replacement: step 6, image 2 of 2
    • Use a soldering iron to desolder the black and yellow wires from the two metal plates near the bottom of the device.

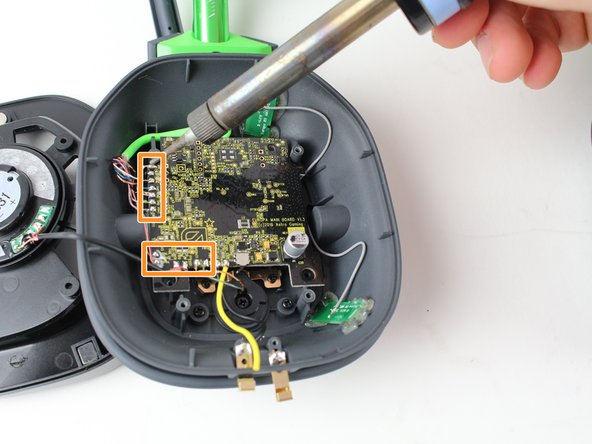
    • Use a soldering iron to desolder the 13 wires in rows along the left and bottom sides of the headset motherboard.

    • How To Solder and Desolder Connections

  7. Astro A50 2016 Headset Motherboard Replacement: step 7, image 1 of 1
    • Use the plastic opening tool to pry off the black tape covering the gray wires

    Thank god I have been looking for this one for a while thank you guys.

    i have i problem with my microphone see in step 7 there are two wires for the microphone ( green and copper color)near the microphone screw, in my headset the copper one dose not connected with the green any idea how to connect them together?

    Yousef Abdulla - Reply

  8. Astro A50 2016 Headset Motherboard Replacement: step 8, image 1 of 1
    • Lift the motherboard out of the headset and gently disconnect the gray wires from the motherboard.

Conclusion

To reassemble your device, follow these instructions in reverse order.

3 other people completed this guide.

Brian Menard

Member since: 10/01/17

288 Reputation

1 Guide authored

Team

Cal Poly, Team S15-G1, Livingston Fall 2017 Member of Cal Poly, Team S15-G1, Livingston Fall 2017

CPSU-LIVINGSTON-F17S15G1

3 Members

10 Guides authored

2 Comments

Any chance I could get the E250336. USB board part from you guys? I need one.

Theron Miller - Reply

I am having a very tough time finding this Part online. Thanks!

Theron Miller - Reply

Add Comment

View Statistics:

Past 24 Hours: 4

Past 7 Days: 13

Past 30 Days: 38

All Time: 4,037