
Apple Watch SE Opening Procedure

What you need

  1. Apple Watch SE Opening Procedure, Power down your watch: step 1, image 1 of 2 Apple Watch SE Opening Procedure, Power down your watch: step 1, image 2 of 2
  2. Apple Watch SE Opening Procedure, Safety requirements: step 2, image 1 of 3 Apple Watch SE Opening Procedure, Safety requirements: step 2, image 2 of 3 Apple Watch SE Opening Procedure, Safety requirements: step 2, image 3 of 3
    Tool used on this step:
    Safety Glasses
    $3.19
    Buy
    • Because the gap between the screen and watch body is so thin, a sharp blade is needed to separate the two. Read the following warnings carefully before proceeding.

    • Protect your fingers by keeping them completely clear of the knife. If in doubt, protect your free hand with a heavy glove, such as a leather shop glove or gardening glove.

    • Be careful not to apply too much pressure, as this might cause the knife to slip and cut you, or damage the watch.

    • Wear eye protection. The knife or glass may break, sending pieces flying.

    • Attach or remove the watch band as needed to provide more control as you make repairs.

  3. Apple Watch SE Opening Procedure, Soften the display adhesive: step 3, image 1 of 1
    • Prepare an iOpener (or use a hair dryer or heat gun) and heat the face of the watch to loosen the display adhesive.

    • Leave the iOpener on the watch for at least two minutes to fully heat the screen and soften the adhesive holding it to the case.

    • You may need to reheat the iOpener and repeat this procedure several times until the display adhesive softens.

  4. Apple Watch SE Opening Procedure, Display opening: step 4, image 1 of 3 Apple Watch SE Opening Procedure, Display opening: step 4, image 2 of 3 Apple Watch SE Opening Procedure, Display opening: step 4, image 3 of 3
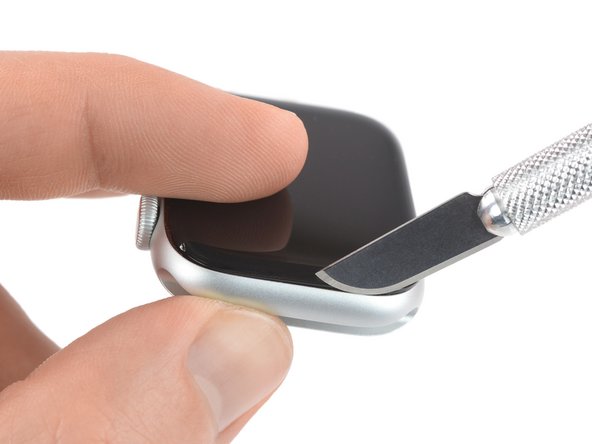
    • Place the edge of a curved blade into the thin gap between the display and the outer case. Start at the short side of the display, closest to the digital crown.

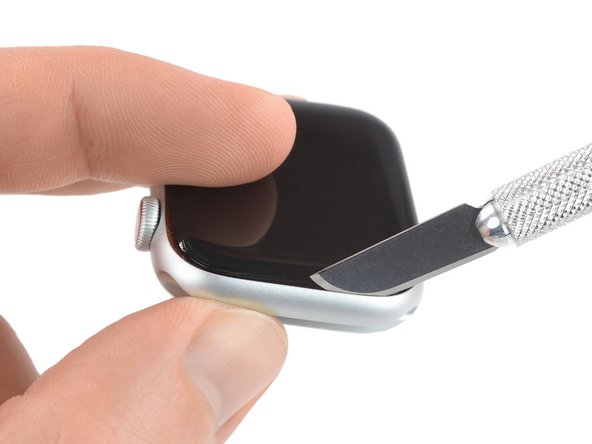
    • Press firmly straight down into the gap.

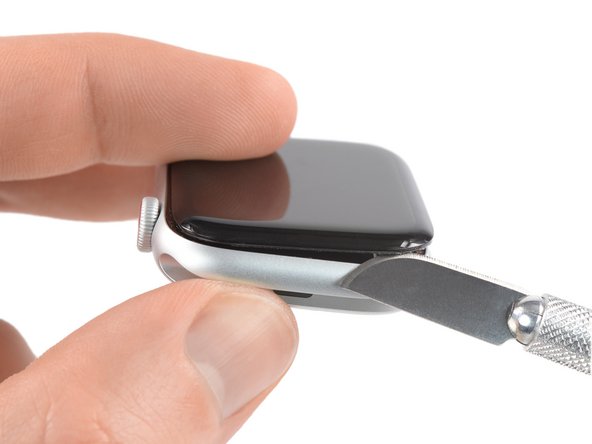
    • Once inserted, tilt the blade to pry the display open slightly.

  5. Apple Watch SE Opening Procedure: step 5, image 1 of 3 Apple Watch SE Opening Procedure: step 5, image 2 of 3 Apple Watch SE Opening Procedure: step 5, image 3 of 3
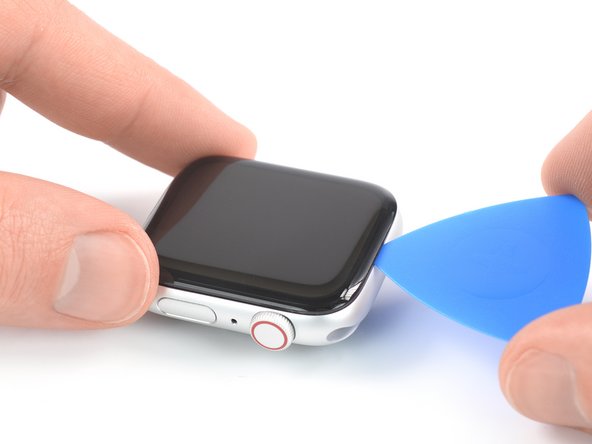
    • Insert an opening pick in the gap you've created.

    • Slide the opening pick along the short edge of the watch to cut the adhesive.

  6. Apple Watch SE Opening Procedure: step 6, image 1 of 2 Apple Watch SE Opening Procedure: step 6, image 2 of 2
    • When slicing near the crown, don't insert the opening pick deeper than 1/16th of an inch (~2 mm).

    • Slide the opening pick around the corner and along the long edge where the crown is located to cut the display adhesive.

  7. Apple Watch SE Opening Procedure: step 7, image 1 of 2 Apple Watch SE Opening Procedure: step 7, image 2 of 2
    • Slide the opening pick around the corner to cut the remaining adhesive on the short edge farthest away from the crown.

  8. Apple Watch SE Opening Procedure: step 8, image 1 of 2 Apple Watch SE Opening Procedure: step 8, image 2 of 2
    • Place the watch on a flat surface and use an opening pick to slice through any remaining adhesive.

    • When slicing near the crown, don't insert the opening pick deeper than 1/16th of an inch (~2 mm).

    • Slide an opening pick under the opposite display edge of the watch crown.

  9. Apple Watch SE Opening Procedure: step 9, image 1 of 2 Apple Watch SE Opening Procedure: step 9, image 2 of 2
    • Reinsert the opening pick on the short edge of the watch, next to the watch crown.

    • Twist the opening pick to loosen the display off the watch case.

    • Don't try to remove the display. It is still connected to the watch assembly.

  10. Apple Watch SE Opening Procedure: step 10, image 1 of 3 Apple Watch SE Opening Procedure: step 10, image 2 of 3 Apple Watch SE Opening Procedure: step 10, image 3 of 3
    • Be careful not to strain the display cables when you fold the display to the side.

    • Lift the display and carefully pull it in direction of the short edge farthest away from the crown.

    • Swing the display open to an upward position.

Dominik Schnabelrauch

Member since: 11/23/16

203,220 Reputation

682 Guides authored

Team

iFixit Member of iFixit

Staff

135 Members

16,816 Guides authored

View Statistics:

Past 24 Hours: 6

Past 7 Days: 58

Past 30 Days: 232

All Time: 6,576