Introduction
If the base station does not turn on, the battery may need to be replaced.
What you need
-
-
First start by peeling off the outer rubbery covering on the bottom of the device.
-
-
-
-
Remove the outer casing.
-
The exposed logic board should look like this.
Remove the 3 connectors from the logic board to the antennas before removing the logic board from the metal surround.
-
-
-
Remove the metal casing by gently prying the logic board away with you hands.
-
This should be pretty easy, you already removed the screws holding these pieces together.
-
-
-
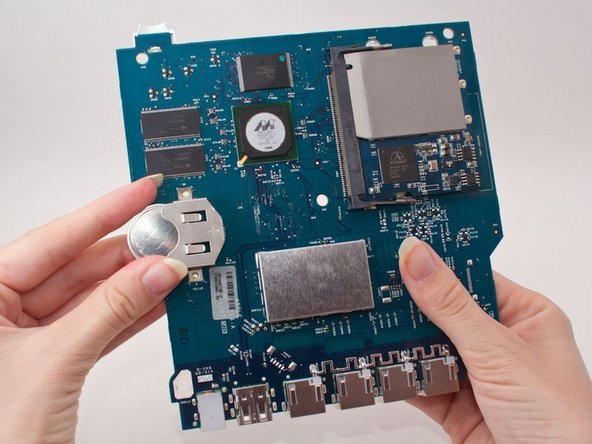
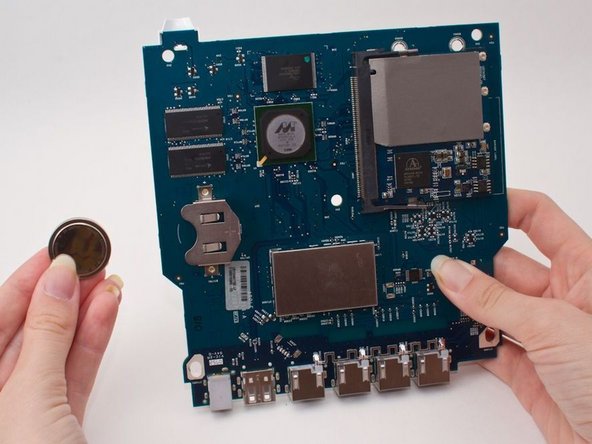
Remove the battery by gently "shoving" it out with the plastic tool.
Be sure to replace the plastic casing removed in steps 2 and 3 in its original orientation.
There is a little shield molded into the plastic casing that should line up with the security slot at the far right of the back panel. The shield serves (I presume) to keep stuff from getting through the slot and into the inside of the AirPort where it could cause mischief. Also, if it is in the wrong place, one or more of the screws may not be possible to screw in and/or the casing will be distorted if you force the screw(s) in.
-


To reassemble your device, follow these instructions in reverse order.
To reassemble your device, follow these instructions in reverse order.
Cancel: I did not complete this guide.
7 other people completed this guide.
Team

Cal Poly, Team 5-2, Forte Spring 2012 Member of Cal Poly, Team 5-2, Forte Spring 2012
CPSU-FORTE-S12S5G2
5 Members
12 Guides authored
5 Comments
Hi! How to know i need to change battery? What the symptoms of dead battery? My Airport Extreme worked well 6 years, and now its have the problems, missing pings, can it be symptom of dead battery?
By the time I needed to open my AirPort Extreme in mid-2019, the adhesive bond to the covering had weakened to the point that the covering readily peeled away cleanly without the application of heat. I just worked slowly and carefully.
The covering had no residue of adhesive on it after removal, but there was a sheet of adhesive clinging to the plastic surface of the body of the unit. I had to poke holes in it to reach the screws, but that was no big deal and easily done.
When finished, the rubbery covering adhered to the body of the unit again adequately without the use of additional adhesive or (as I had planned to use) double-sided tape.
BTW I was not disassembling the unit to replace the battery, but rather to reset the device by bridging the contacts that a broken reset switch failed to connect. (The switch had become detached from the circuit board and was literally hanging by a thread when I opened the case and fell off altogether as I examined it.)
Thanks for the clear disassembly instructions!
gambaguru+fb - Reply
When I performed this, the rubber had deteriorated(?) and tore quite easily, particularly around the model number label.
Steve I - Reply