
Acer Aspire V5-571-6891 Hard Disk Drive (HDD) Replacement

What you need

  1. Acer Aspire V5-571-6891 Hard Disk Drive (HDD) Replacement, Battery: step 1, image 1 of 1
    • Use the pointed end of the spudger to slide the battery lock until the battery pops loose.

  2. Acer Aspire V5-571-6891 Hard Disk Drive (HDD) Replacement: step 2, image 1 of 2 Acer Aspire V5-571-6891 Hard Disk Drive (HDD) Replacement: step 2, image 2 of 2
    • Slide the battery out of the battery slot.

  3. Acer Aspire V5-571-6891 Hard Disk Drive (HDD) Replacement, Keyboard: step 3, image 1 of 1
    • Remove the two 6mm PH1 screws from the bottom of the laptop.

  4. Acer Aspire V5-571-6891 Hard Disk Drive (HDD) Replacement: step 4, image 1 of 1
    • Use the spudger, push the two tabs, located in the battery slot, through their slots to release the keyboard.

    • Do this with the computer slightly open for ease.

  5. Acer Aspire V5-571-6891 Hard Disk Drive (HDD) Replacement: step 5, image 1 of 2 Acer Aspire V5-571-6891 Hard Disk Drive (HDD) Replacement: step 5, image 2 of 2
    • Open the laptop.

    • Start top of the keyboard and use the opening tool to pop the remaining tabs around the keyboard loose.

    • The keyboard can be flipped onto its face once removed.

  6. Acer Aspire V5-571-6891 Hard Disk Drive (HDD) Replacement: step 6, image 1 of 1
    • Use the spudger and slide the grey tabs on either side of the keyboard wires away from the white plastic.

  7. Acer Aspire V5-571-6891 Hard Disk Drive (HDD) Replacement: step 7, image 1 of 1
    • Disconnect the keyboard by pulling the blue tape on the wire strip.

  8. Acer Aspire V5-571-6891 Hard Disk Drive (HDD) Replacement, Hard Disk Drive (HDD): step 8, image 1 of 1
    • Remove the five 6mm PH1 screws beneath the keyboard.

  9. Acer Aspire V5-571-6891 Hard Disk Drive (HDD) Replacement: step 9, image 1 of 2 Acer Aspire V5-571-6891 Hard Disk Drive (HDD) Replacement: step 9, image 2 of 2
    • Use the spudger to pop the gray tab up and away from the far left wire strip.

    • Disconnect the wire strip by pulling the blue tab loose.

  10. Acer Aspire V5-571-6891 Hard Disk Drive (HDD) Replacement: step 10, image 1 of 2 Acer Aspire V5-571-6891 Hard Disk Drive (HDD) Replacement: step 10, image 2 of 2
    • Use the spudger to pop the white tab up away from the wire strip located at the top left corner of the mouse pad.

    • Disconnect the wire strip by pulling the blue tab.

  11. Acer Aspire V5-571-6891 Hard Disk Drive (HDD) Replacement: step 11, image 1 of 1
    • Close the laptop.

    • Remove the remaining 18 6mm PH1 screws from the bottom cover of the laptop.

  12. Acer Aspire V5-571-6891 Hard Disk Drive (HDD) Replacement: step 12, image 1 of 3 Acer Aspire V5-571-6891 Hard Disk Drive (HDD) Replacement: step 12, image 2 of 3 Acer Aspire V5-571-6891 Hard Disk Drive (HDD) Replacement: step 12, image 3 of 3
    • Use the opening tool to separate the back of the laptop from the inside cover.

    • Open the computer and remove the inside cover.

  13. Acer Aspire V5-571-6891 Hard Disk Drive (HDD) Replacement: step 13, image 1 of 3 Acer Aspire V5-571-6891 Hard Disk Drive (HDD) Replacement: step 13, image 2 of 3 Acer Aspire V5-571-6891 Hard Disk Drive (HDD) Replacement: step 13, image 3 of 3
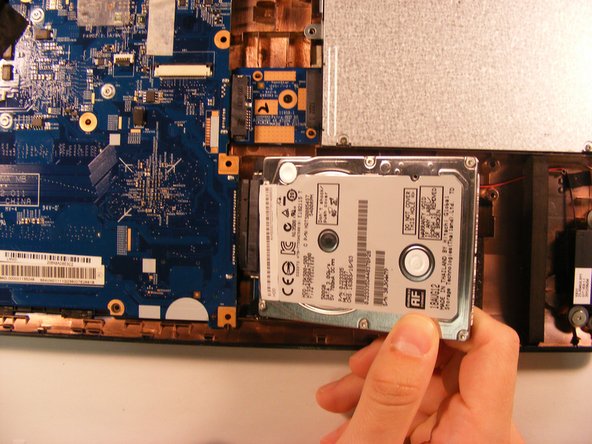
    • Lift the HDD out of the base and use the opening tool to disconnect the HDD from the motherboard wire.

View Statistics:

Past 24 Hours: 0

Past 7 Days: 1

Past 30 Days: 8

All Time: 535