
Acer Aspire V5-571 CMOS / Bios Battery Replacement

What you need

Video Overview

  1. Acer Aspire V5-571 CMOS / Bios Battery Replacement, Keyboard: step 1, image 1 of 3 Acer Aspire V5-571 CMOS / Bios Battery Replacement, Keyboard: step 1, image 2 of 3 Acer Aspire V5-571 CMOS / Bios Battery Replacement, Keyboard: step 1, image 3 of 3
    • Turn off the laptop and remove the battery.

    • Remove two screws securing the Keyboard.

    • The Keyboard is held by two locking clips, under the battery. Use the sharp tip of a plastic tool to release the keyboard.

    The two clips push toward the space-bar part of the keyboard. There are further clips around the edge of the keyboard, but it can be removed by careful prying with a thin blade screwdriver.

    ENT - Reply

  2. Acer Aspire V5-571 CMOS / Bios Battery Replacement: step 2, image 1 of 3 Acer Aspire V5-571 CMOS / Bios Battery Replacement: step 2, image 2 of 3 Acer Aspire V5-571 CMOS / Bios Battery Replacement: step 2, image 3 of 3

    It would be helpful to have more info on how to remove the two cables. The larger one has a couple of clips that slide, but what exactly comes off? Do the plastic strips lift, or do the flat cables just pull out of them? Don't want to break something!

    ENT - Reply

    I watched several videos, many of which had the action hidden behind the keyboard. The larger ribbon pulls out of the strip after the two white clips on the end are moved. The smaller one has a black strip which lifts from the ribbon side, releasing the cable.

    ENT - Reply

  3. Acer Aspire V5-571 CMOS / Bios Battery Replacement, Optical Drive: step 3, image 1 of 3 Acer Aspire V5-571 CMOS / Bios Battery Replacement, Optical Drive: step 3, image 2 of 3 Acer Aspire V5-571 CMOS / Bios Battery Replacement, Optical Drive: step 3, image 3 of 3
    • Remove the screw securing the Optical drive and gently press the drive to show slightly as at the second pic.

    • Slide the drive to the left and remove it.

  4. Acer Aspire V5-571 CMOS / Bios Battery Replacement, Upper  Cover: step 4, image 1 of 3 Acer Aspire V5-571 CMOS / Bios Battery Replacement, Upper  Cover: step 4, image 2 of 3 Acer Aspire V5-571 CMOS / Bios Battery Replacement, Upper  Cover: step 4, image 3 of 3
    • Remove 4x phillips screws and disconnect:

    • Power On button flex cable

    • Touch pad flex cable

    • Remove 18x Phillips screws from the bottom cover.

    • Remove any memory SD Card from the Card reader.

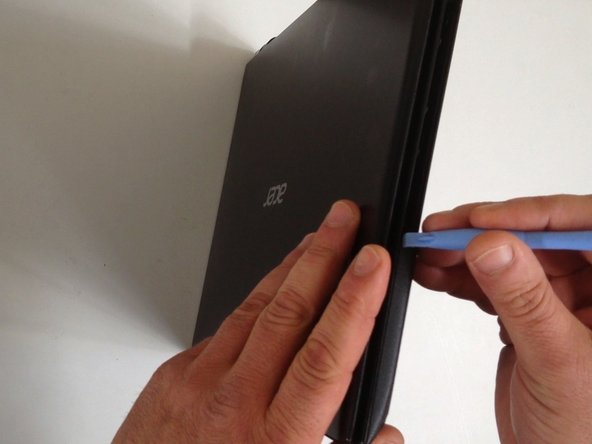
    • Start opening with a plastic opening tool.

    After removing the 18x Phillips screws, the laptop is VERY fragile in the hinge area. The bottom cover will easily crack or break in the hinge area when opening the laptop with no screws, particularly the left side near the power button. Possibly this step should be revised to recommend opening the laptop 90 degrees before removing the 18x screws. Or, advise extreme caution when opening the laptop with no screws.

    jonnyquest - Reply

    Hi, do you know where buy screws that you mention in step 4? “Remove 18x Phillips screws from the bottom cover.”

    I am italian. Thank you anyway.

    Sara Caruso - Reply

    The laptop I have included 6x screws from inside and 16x screws from the bottom. This seems to be a minor variation from model to model.

    William Fulton - Reply

    Same with my model @sara Caruso. The six of them, and the two to release the keyboard, are shorter than the 18. All the screws had blue locktite on them.

    ENT - Reply

  5. Acer Aspire V5-571 CMOS / Bios Battery Replacement: step 5, image 1 of 3 Acer Aspire V5-571 CMOS / Bios Battery Replacement: step 5, image 2 of 3 Acer Aspire V5-571 CMOS / Bios Battery Replacement: step 5, image 3 of 3
    • Carefully separate the upper cover and remove it.

    In my unit, there was also a screw holding the DVD drive in place, just toward the center from the drive itself. This screw also had to be removed to be able to remove the upper cover

    Ken Hill - Reply

  6. Acer Aspire V5-571 CMOS / Bios Battery Replacement, HDD (Hard Disk Drive): step 6, image 1 of 3 Acer Aspire V5-571 CMOS / Bios Battery Replacement, HDD (Hard Disk Drive): step 6, image 2 of 3 Acer Aspire V5-571 CMOS / Bios Battery Replacement, HDD (Hard Disk Drive): step 6, image 3 of 3
  7. Acer Aspire V5-571 CMOS / Bios Battery Replacement, Wi-Fi Half Mini PCIe card: step 7, image 1 of 2 Acer Aspire V5-571 CMOS / Bios Battery Replacement, Wi-Fi Half Mini PCIe card: step 7, image 2 of 2
    • Remove one Phillips screw, securing th WLan card and disconnect the two coaxial antenna cables.

    • Remove the Wi-Fi card.

  8. Acer Aspire V5-571 CMOS / Bios Battery Replacement, Mother Board: step 8, image 1 of 3 Acer Aspire V5-571 CMOS / Bios Battery Replacement, Mother Board: step 8, image 2 of 3 Acer Aspire V5-571 CMOS / Bios Battery Replacement, Mother Board: step 8, image 3 of 3
    • Remove the Memory Cover.

    • Disconnect the Loudspeaker cable connector.

  9. Acer Aspire V5-571 CMOS / Bios Battery Replacement: step 9, image 1 of 3 Acer Aspire V5-571 CMOS / Bios Battery Replacement: step 9, image 2 of 3 Acer Aspire V5-571 CMOS / Bios Battery Replacement: step 9, image 3 of 3
    • Remove two Phillips screw from the Mother board and from the Optical drive SATA adapter.

    • Disconnect the LCD Display flex cable.

    • Disconnect the DC Jack cable.

    • Carefully remove the Optical drive SATA adapter.

    • We will disconnect the battery cable when we pick up the board.

  10. Acer Aspire V5-571 CMOS / Bios Battery Replacement: step 10, image 1 of 3 Acer Aspire V5-571 CMOS / Bios Battery Replacement: step 10, image 2 of 3 Acer Aspire V5-571 CMOS / Bios Battery Replacement: step 10, image 3 of 3
    • Carefully pick up the Mother board and disconnect the Battery cable.

  11. Acer Aspire V5-571 CMOS / Bios Battery Replacement, CMOS / BIOS Battery: step 11, image 1 of 3 Acer Aspire V5-571 CMOS / Bios Battery Replacement, CMOS / BIOS Battery: step 11, image 2 of 3 Acer Aspire V5-571 CMOS / Bios Battery Replacement, CMOS / BIOS Battery: step 11, image 3 of 3
    • Use sharp plastic tool and remove the CMOS Battery.

    • CR2032 - button cell lithium battery rated at 3.0 volts.

    • .

    • .

    • .

    • .

    • .

    • Did you do it successfully?

Conclusion

To reassemble your device, follow these instructions in reverse order.

7 other people completed this guide.

ZFix

Member since: 12/09/13

191,182 Reputation

330 Guides authored

Team

Master Techs Member of Master Techs

Community

322 Members

2,519 Guides authored

7 Comments

I need assistance with the G2201 Hardware Gap, Im attempting to remove a HHD password for a customers machine on this same model

chemanemelton - Reply

I have same problem with same mother board please help me

Mohammad Osman -

Hi. Thanks a lot. I manage to remove the CMOS battery, and I kept the laptop pc idle without the battery for nearly 7hrs. But still, when connected, I am asked for password/unlock key. Could you please help me how to discharge the CMOS.

amantaj - Reply

Hi.

Thanks so much.

I manage to remove the CMOS battery, and I kept the laptop pc idle without the battery for nearly 3hrs.

But still, when connected, I am asked for password/unlock key. Could you please help me how to discharge the CMOS.

Omit Z - Reply

Please help me.

Omit Z - Reply

I need assistance with the G2201 Hardware Gap, please help me

I want to solve bios password

It the message: system locked

Mohammad Osman - Reply

Perfect! Thank you for the instructions. Thought I'd bricked my laptop, but I followed your instructions and left the battery out for 5 mins. Re-assembled and it's as good as new.

Dan Slade - Reply

Add Comment

View Statistics:

Past 24 Hours: 7

Past 7 Days: 35

Past 30 Days: 163

All Time: 33,559