
Acer Aspire 5734z-4836 Fan Replacement

What you need

  1. Acer Aspire 5734z-4836 Fan Replacement, Battery: step 1, image 1 of 1
    • Before removing the battery, power off your laptop and disconnect the AC adapter.

    • Flip your laptop on its back so the battery is facing up and the hinges are facing away from you.

  2. Acer Aspire 5734z-4836 Fan Replacement: step 2, image 1 of 1
    • Slide the right latch down to unlock the battery.

  3. Acer Aspire 5734z-4836 Fan Replacement: step 3, image 1 of 2 Acer Aspire 5734z-4836 Fan Replacement: step 3, image 2 of 2
    • Slide and hold the left latch below the battery.

    • While holding this latch in place, pry the battery up from its bottom edge.

    • Lift the old battery out of its compartment.

  4. Acer Aspire 5734z-4836 Fan Replacement, Keyboard: step 4, image 1 of 3 Acer Aspire 5734z-4836 Fan Replacement, Keyboard: step 4, image 2 of 3 Acer Aspire 5734z-4836 Fan Replacement, Keyboard: step 4, image 3 of 3
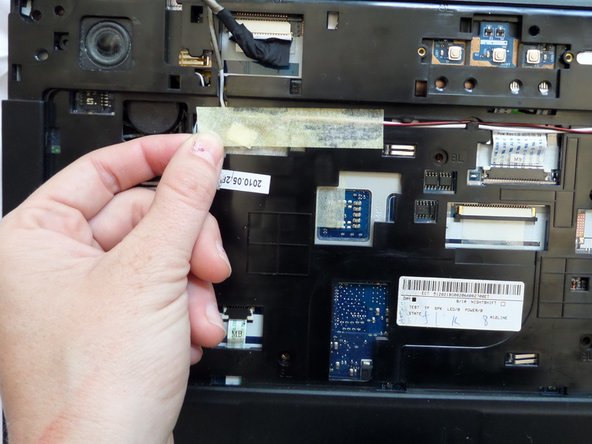
    • Pinch the edges of the plastic covering above the keyboard, and pull away from the laptop until the covering pops off.

    • By using a bit of force some clicks will be heard when removing the cover.

  5. Acer Aspire 5734z-4836 Fan Replacement: step 5, image 1 of 2 Acer Aspire 5734z-4836 Fan Replacement: step 5, image 2 of 2
    • Pull the keyboard off gently so not to damage the keyboard ribbon cable.

    • Multiple clicks may be heard as you pull the keyboard off.

  6. Acer Aspire 5734z-4836 Fan Replacement: step 6, image 1 of 3 Acer Aspire 5734z-4836 Fan Replacement: step 6, image 2 of 3 Acer Aspire 5734z-4836 Fan Replacement: step 6, image 3 of 3
    • Using a spudger or your finger, unlock the ZIF connector holding the keyboard ribbon in place by lifting the black locking lever.

    • Pull the blue keyboard ribbon cable from the ZIF connector.

    • When reinstalling a new keyboard, insert the ribbon in the same way the old keyboard's ribbon was removed.

  7. Acer Aspire 5734z-4836 Fan Replacement, Base Assembly: step 7, image 1 of 1
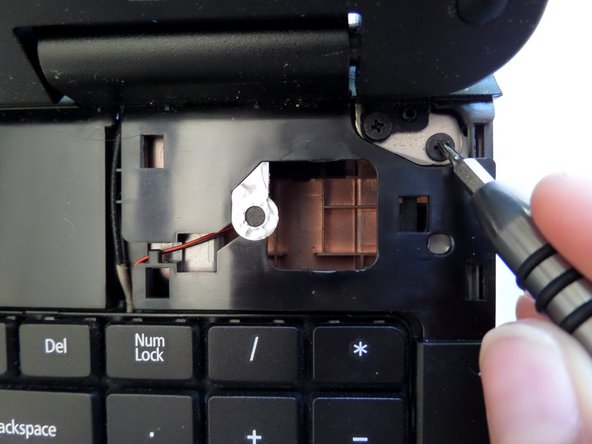
    • Begin with the laptop placed on its bottom and the empty keyboard space facing you.

  8. Acer Aspire 5734z-4836 Fan Replacement: step 8, image 1 of 3 Acer Aspire 5734z-4836 Fan Replacement: step 8, image 2 of 3 Acer Aspire 5734z-4836 Fan Replacement: step 8, image 3 of 3
    • Disconnect the screen connector in the upper left of the laptop.

  9. Acer Aspire 5734z-4836 Fan Replacement: step 9, image 1 of 3 Acer Aspire 5734z-4836 Fan Replacement: step 9, image 2 of 3 Acer Aspire 5734z-4836 Fan Replacement: step 9, image 3 of 3
    • Locate the tape on the upper left of the laptop.

    • Peel off the tape, covering the red-and-black wire connector and the white-and-black speaker wires.

  10. Acer Aspire 5734z-4836 Fan Replacement: step 10, image 1 of 2 Acer Aspire 5734z-4836 Fan Replacement: step 10, image 2 of 2
    • Gently disconnect the red-and-black wire connector and the white-and-black speaker wires from the upper-left.

  11. Acer Aspire 5734z-4836 Fan Replacement: step 11, image 1 of 1
    • Remove the 5 screws in the middle of the laptop using a #00 Phillips Screwdriver.

    • In order to access the screw in the upper left corner, you may have to gently move the red and white wires.

  12. Acer Aspire 5734z-4836 Fan Replacement: step 12, image 1 of 3 Acer Aspire 5734z-4836 Fan Replacement: step 12, image 2 of 3 Acer Aspire 5734z-4836 Fan Replacement: step 12, image 3 of 3
    • Disconnect the two blue and white ribbons by applying pressure downward and pushing them out of their sockets.

  13. Acer Aspire 5734z-4836 Fan Replacement: step 13, image 1 of 2 Acer Aspire 5734z-4836 Fan Replacement: step 13, image 2 of 2
    • Remove the four screws from the upper corners of the laptop using a Phillips #00 screwdriver.

    • The two metal and two plastic connectors will come free. Save them in a safe place.

  14. Acer Aspire 5734z-4836 Fan Replacement: step 14, image 1 of 2 Acer Aspire 5734z-4836 Fan Replacement: step 14, image 2 of 2
    • Pop off the black plastic hinge coverings.

  15. Acer Aspire 5734z-4836 Fan Replacement: step 15, image 1 of 2 Acer Aspire 5734z-4836 Fan Replacement: step 15, image 2 of 2
    • Peel away the sticky plastic coverings with tweezers.

  16. Acer Aspire 5734z-4836 Fan Replacement: step 16, image 1 of 2 Acer Aspire 5734z-4836 Fan Replacement: step 16, image 2 of 2
    • Remove the three screws with a #00 Philips Screwdriver.

  17. Acer Aspire 5734z-4836 Fan Replacement: step 17, image 1 of 1
    • Remove the single screw next to the right hinge with a #00 Phillips Screwdriver.

  18. Acer Aspire 5734z-4836 Fan Replacement: step 18, image 1 of 1
    • Flip the device so the bottom of the laptop is face-up.

  19. Acer Aspire 5734z-4836 Fan Replacement: step 19, image 1 of 3 Acer Aspire 5734z-4836 Fan Replacement: step 19, image 2 of 3 Acer Aspire 5734z-4836 Fan Replacement: step 19, image 3 of 3
    • Remove the fifteen screws from the back of the laptop with a Phillips #00 Screwdriver.

  20. Acer Aspire 5734z-4836 Fan Replacement: step 20, image 1 of 2 Acer Aspire 5734z-4836 Fan Replacement: step 20, image 2 of 2
    • Pry mid-back panel off.

    • Use a plastic opening tool.

  21. Acer Aspire 5734z-4836 Fan Replacement: step 21, image 1 of 1
    • Lift the hard-drive cover in the bottom right corner off the laptop.

  22. Acer Aspire 5734z-4836 Fan Replacement: step 22, image 1 of 2 Acer Aspire 5734z-4836 Fan Replacement: step 22, image 2 of 2
    • Slide down the hard-drive out of the laptop.

  23. Acer Aspire 5734z-4836 Fan Replacement: step 23, image 1 of 2 Acer Aspire 5734z-4836 Fan Replacement: step 23, image 2 of 2
    • Peel away the black plastic covering under the mid-back panel.

  24. Acer Aspire 5734z-4836 Fan Replacement: step 24, image 1 of 2 Acer Aspire 5734z-4836 Fan Replacement: step 24, image 2 of 2
    • Remove the two screws on the left and bottom of the circuit board with a #00 Phillips Screwdriver.

  25. Acer Aspire 5734z-4836 Fan Replacement: step 25, image 1 of 2 Acer Aspire 5734z-4836 Fan Replacement: step 25, image 2 of 2
    • Disconnect the black and white wires on the small circuit board by gently pulling them out of their sockets.

  26. Acer Aspire 5734z-4836 Fan Replacement: step 26, image 1 of 2 Acer Aspire 5734z-4836 Fan Replacement: step 26, image 2 of 2
    • Remove the four screws from the metal piece beneath the circuit with a Phillips #000 Screwdriver.

  27. Acer Aspire 5734z-4836 Fan Replacement: step 27, image 1 of 1
    • Life the metal plate free and place it somewhere for safe-keeping.

  28. Acer Aspire 5734z-4836 Fan Replacement: step 28, image 1 of 1
    • The small circuit board will pop up easily. Carefully remove it

  29. Acer Aspire 5734z-4836 Fan Replacement: step 29, image 1 of 1
    • Gently extract the black and white wires. They will pull free from the base through the hole in the upper left corner.

  30. Acer Aspire 5734z-4836 Fan Replacement: step 30, image 1 of 3 Acer Aspire 5734z-4836 Fan Replacement: step 30, image 2 of 3 Acer Aspire 5734z-4836 Fan Replacement: step 30, image 3 of 3
    • Flip to the front and gently lift the front of the laptop off of the base.

    • Some wires will be pulled up from the base so be careful not to pull it away too quickly.

  31. Acer Aspire 5734z-4836 Fan Replacement, Fan: step 31, image 1 of 1
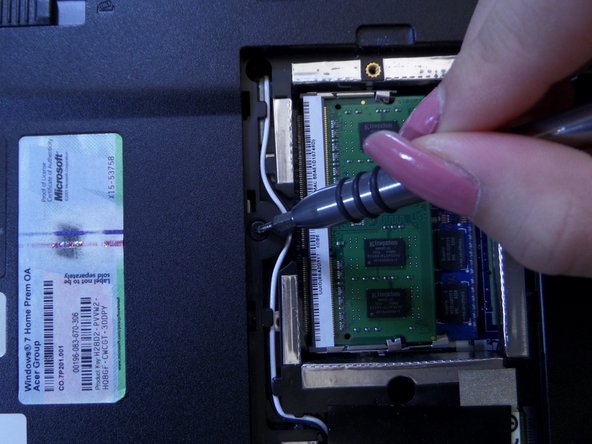
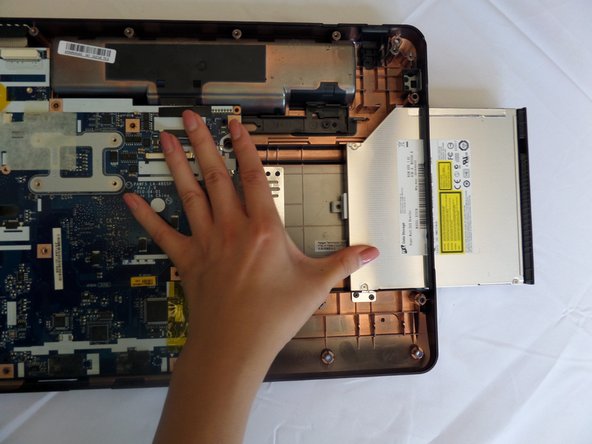
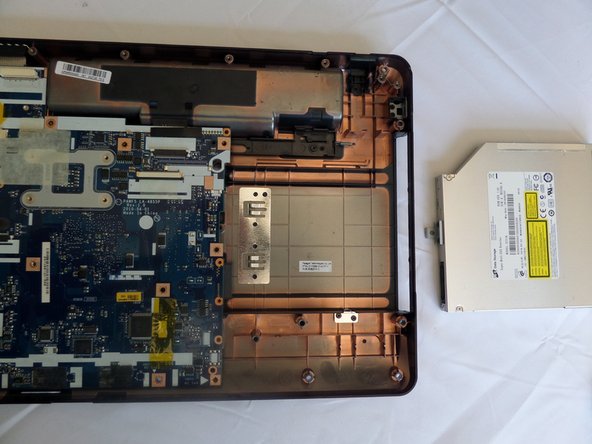
    • Position the back panel so that the circuit board is face-up.

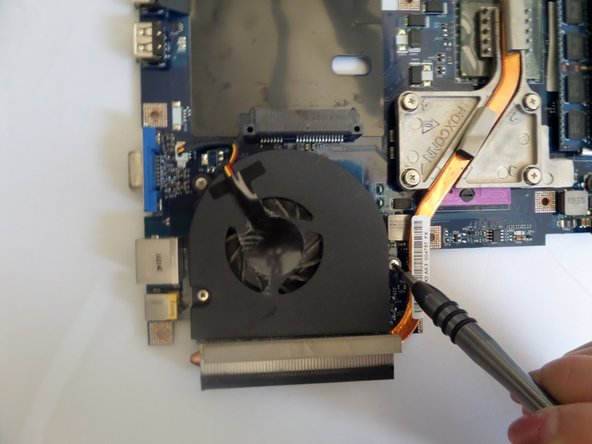
    • Location of the fan is in the upper-left corner.

  32. Acer Aspire 5734z-4836 Fan Replacement: step 32, image 1 of 1
    • Unscrew five screws from the circuit board using a #00 Phillips screwdriver.

    • Two screws are located below the fan, and three are along the circuit board's right edge.

    • Take note of the one black screw that goes in the lower-right corner.

  33. Acer Aspire 5734z-4836 Fan Replacement: step 33, image 1 of 3 Acer Aspire 5734z-4836 Fan Replacement: step 33, image 2 of 3 Acer Aspire 5734z-4836 Fan Replacement: step 33, image 3 of 3
    • The large, silver box next to the circuit board is the optical disk drive, gently slide to the right to remove it.

    • Do not apply too much pressure on the optical disk drive, as you may risk damaging the disk drive's connector.

  34. Acer Aspire 5734z-4836 Fan Replacement: step 34, image 1 of 3 Acer Aspire 5734z-4836 Fan Replacement: step 34, image 2 of 3 Acer Aspire 5734z-4836 Fan Replacement: step 34, image 3 of 3
    • Lift the circuit board out of the back panel and turn it over so the fan is facing up.

  35. Acer Aspire 5734z-4836 Fan Replacement: step 35, image 1 of 2 Acer Aspire 5734z-4836 Fan Replacement: step 35, image 2 of 2
    • Locate the three screws around the fan

    • Gently extract three fan screws using #0 Phillips.

  36. Acer Aspire 5734z-4836 Fan Replacement: step 36, image 1 of 3 Acer Aspire 5734z-4836 Fan Replacement: step 36, image 2 of 3 Acer Aspire 5734z-4836 Fan Replacement: step 36, image 3 of 3
    • Disconnect the white fan connector.

    • Grip gently the wire and pull the wires up toward you.

  37. Acer Aspire 5734z-4836 Fan Replacement: step 37, image 1 of 1
    • Remove the fan from the circuit board.

    • Due to the accumulated dust inside the fan, you may want to use a small brush to clean off dust.

Conclusion

To reassemble your device, follow these instructions in reverse order.

2 other people completed this guide.

Steven Loon

Member since: 09/12/16

291 Reputation

2 Guides authored

Team

CSU Fullerton, Team 2-3, Bruce Fall 2016 Member of CSU Fullerton, Team 2-3, Bruce Fall 2016

CSUF-BRUCE-F16S2G3

4 Members

6 Guides authored

0 Comments

Add Comment

View Statistics:

Past 24 Hours: 0

Past 7 Days: 2

Past 30 Days: 3

All Time: 1,176