
ASUS Transformer Book Flip TP500LA Fan Replacement

What you need

  1. ASUS Transformer Book Flip TP500LA Fan Replacement, Back Case: step 1, image 1 of 3 ASUS Transformer Book Flip TP500LA Fan Replacement, Back Case: step 1, image 2 of 3 ASUS Transformer Book Flip TP500LA Fan Replacement, Back Case: step 1, image 3 of 3
    • Remove the ten 10 mm Phillips #0 screws found on the computer's back case.

  2. ASUS Transformer Book Flip TP500LA Fan Replacement: step 2, image 1 of 2 ASUS Transformer Book Flip TP500LA Fan Replacement: step 2, image 2 of 2
    • Slide a heavy-duty spudger between the back case and the computer.

    • Slowly work around the edges to undo the clips to fully separate the back case from the computer.

    • Gently lift off the back case.

  3. ASUS Transformer Book Flip TP500LA Fan Replacement, Battery: step 3, image 1 of 2 ASUS Transformer Book Flip TP500LA Fan Replacement, Battery: step 3, image 2 of 2
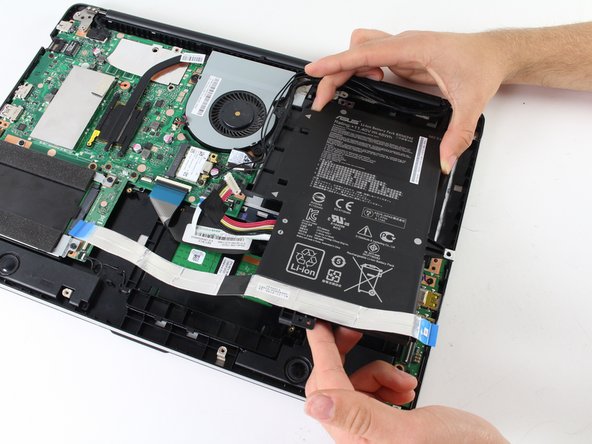
    • Slide a heavy-duty spudger into the ZIF connector and gently flip up the retaining flap to open the connector.

    • Pull the blue tab to remove the ribbon.

  4. ASUS Transformer Book Flip TP500LA Fan Replacement: step 4, image 1 of 2 ASUS Transformer Book Flip TP500LA Fan Replacement: step 4, image 2 of 2
    • Remove the three 5 mm Phillips #0 screws.

    • Remove the single 6 mm Phillips #0 screw.

  5. ASUS Transformer Book Flip TP500LA Fan Replacement: step 5, image 1 of 2 ASUS Transformer Book Flip TP500LA Fan Replacement: step 5, image 2 of 2
    • Use the heavy-duty spudger to pry the white 8-pin connector away from the motherboard.

    • Gently pull the connector away from the motherboard.

    • The black 8-pin connector on the motherboard is very fragile, so be careful when removing the white 8-pin connector.

  6. ASUS Transformer Book Flip TP500LA Fan Replacement: step 6, image 1 of 2 ASUS Transformer Book Flip TP500LA Fan Replacement: step 6, image 2 of 2
    • Use the blue plastic opening tool to loosen and remove the three black wires from the battery.

    • Slide the battery out from the computer to remove.

  7. ASUS Transformer Book Flip TP500LA Fan Replacement, Fan: step 7, image 1 of 2 ASUS Transformer Book Flip TP500LA Fan Replacement, Fan: step 7, image 2 of 2
    • Unscrew the six 5 mm Phillips #0 screws.

  8. ASUS Transformer Book Flip TP500LA Fan Replacement: step 8, image 1 of 3 ASUS Transformer Book Flip TP500LA Fan Replacement: step 8, image 2 of 3 ASUS Transformer Book Flip TP500LA Fan Replacement: step 8, image 3 of 3
    • Grasp the top of the 3-pin connector with tweezers.

    • Wiggle the connector until it loosens itself from the motherboard.

    • Gently lift the connector from the motherboard attachment.

  9. ASUS Transformer Book Flip TP500LA Fan Replacement: step 9, image 1 of 1
    • Carefully lift the fan off the motherboard.

    • Attached to the fan is thermal pasting that needs to be reapplied when attaching the fan back to the motherboard. Follow this guide to reapply thermal pasting correctly.

Conclusion

To reassemble your device, follow these instructions in reverse order.

4 other people completed this guide.

Solomon Dovinh

Member since: 04/10/17

403 Reputation

2 Guides authored

Team

Cal Poly, Team S13-G5, Forte Spring 2017 Member of Cal Poly, Team S13-G5, Forte Spring 2017

CPSU-FORTE-S17S13G5

4 Members

6 Guides authored

0 Comments

Add Comment

View Statistics:

Past 24 Hours: 1

Past 7 Days: 2

Past 30 Days: 10

All Time: 1,916