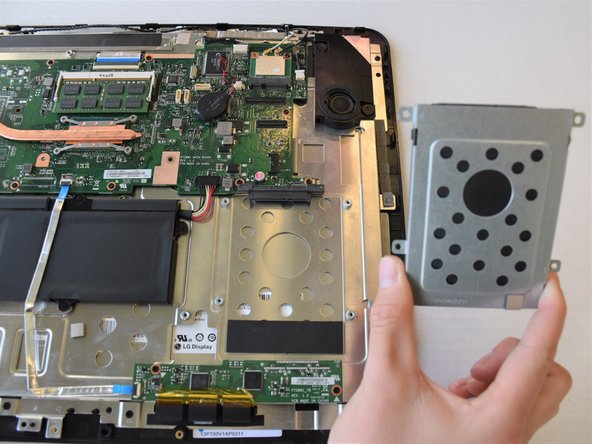
ASUS Portable AiO PT2001 Hard Drive Replacement

What you need

  1. ASUS Portable AiO PT2001 Hard Drive Replacement, Back Panel: step 1, image 1 of 3 ASUS Portable AiO PT2001 Hard Drive Replacement, Back Panel: step 1, image 2 of 3 ASUS Portable AiO PT2001 Hard Drive Replacement, Back Panel: step 1, image 3 of 3
    • Remove the grey scuff guard at the bottom of the PC by pressing down on it, and pulling it away.

    • Lift the hinge and remove the grey rubber tabs on either side of the PC’s model information.

    • Remove the two 7.62mm Phillips #1 screws beneath the rubber tabs under the hinge and the four 7.62mm Phillips #1 screws where the scuff guard was removed.

    • Remove the two 4.74mm Phillips #1 screws under the hinge (near the hinge joints) and a 4.74mm Phillips #1 screw under the handle.

  2. ASUS Portable AiO PT2001 Hard Drive Replacement: step 2, image 1 of 3 ASUS Portable AiO PT2001 Hard Drive Replacement: step 2, image 2 of 3 ASUS Portable AiO PT2001 Hard Drive Replacement: step 2, image 3 of 3
    • Use 1-2 plastic opening tools or nylon spudgers to firmly pry open the back panel.

    • We recommend that you start prying the panel where the scuff guard was removed.

    • Prying the back panel will cause loud popping noises. This is just the sound of the clips that hold the back panel to the PC popping off.

    • Using excess force while prying can break the clips that hold the back panel and can damage the ports on the side of the PC.

  3. ASUS Portable AiO PT2001 Hard Drive Replacement: step 3, image 1 of 3 ASUS Portable AiO PT2001 Hard Drive Replacement: step 3, image 2 of 3 ASUS Portable AiO PT2001 Hard Drive Replacement: step 3, image 3 of 3
    • Disconnect the three cables connecting the back panel ports to the motherboard.

    • Flip up the locking latch holding the two ribbon cables with a plastic opening tool and pull the cables out.

    • Gently wiggle the third connector out of its socket.

  4. ASUS Portable AiO PT2001 Hard Drive Replacement, Hard Drive: step 4, image 1 of 1
    • Remove the four 5.0 mm Phillips #1 screws on the outer casing of the hard drive.

  5. ASUS Portable AiO PT2001 Hard Drive Replacement: step 5, image 1 of 2 ASUS Portable AiO PT2001 Hard Drive Replacement: step 5, image 2 of 2
    • Gently pull the hard drive away to disconnect it from the motherboard.

  6. ASUS Portable AiO PT2001 Hard Drive Replacement: step 6, image 1 of 1
    • Remove the four 3.5 mm Phillips #1 screws on the edges of the outer casing, two on each side.

  7. ASUS Portable AiO PT2001 Hard Drive Replacement: step 7, image 1 of 1
    • Separate the hard drive from the casing.

Runjia Chen

Member since: 04/18/18

295 Reputation

2 Guides authored

Team

Cal Poly, Team S17-G5, Livingston Spring 2018 Member of Cal Poly, Team S17-G5, Livingston Spring 2018

CPSU-LIVINGSTON-S18S17G5

4 Members

16 Guides authored

View Statistics:

Past 24 Hours: 0

Past 7 Days: 5

Past 30 Days: 30

All Time: 3,440