
ASUS N550JK-DS71T Laptop Battery Replacement

What you need

  1. ASUS N550JK-DS71T Laptop Battery Replacement, Back Case: step 1, image 1 of 2 ASUS N550JK-DS71T Laptop Battery Replacement, Back Case: step 1, image 2 of 2
    • Turn the laptop off and unplug all cables.

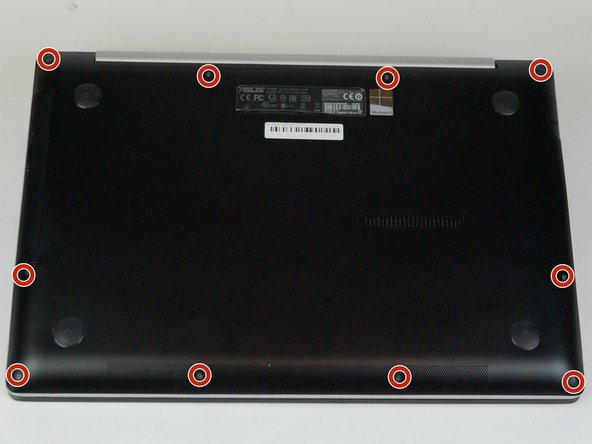
    • Flip over so the bottom is facing you.

    • Remove the ten 3mm Torx T5 screws from the bottom cover.

  2. ASUS N550JK-DS71T Laptop Battery Replacement: step 2, image 1 of 2 ASUS N550JK-DS71T Laptop Battery Replacement: step 2, image 2 of 2
    • Use a spudger to wedge between the laptop and bottom cover—lift upwards to pry open.

    • Run the spudger along the perimeter of the bottom cover to remove.

  3. ASUS N550JK-DS71T Laptop Battery Replacement, Battery: step 3, image 1 of 2 ASUS N550JK-DS71T Laptop Battery Replacement, Battery: step 3, image 2 of 2
    • Remove the three 4mm JIS #0 screws from the battery.

  4. ASUS N550JK-DS71T Laptop Battery Replacement: step 4, image 1 of 2 ASUS N550JK-DS71T Laptop Battery Replacement: step 4, image 2 of 2
    • Using both hands, lift the battery vertically out of the device.

Conclusion

To reassemble your device, follow these instructions in reverse order.

4 other people completed this guide.

Steven Hahn

Member since: 01/29/18

875 Reputation

6 Guides authored

Team

USF Tampa, Team S5-G1, Passmore Spring 2018 Member of USF Tampa, Team S5-G1, Passmore Spring 2018

USFT-PASSMORE-S18S5G1

4 Members

6 Guides authored

0 Comments

Add Comment

View Statistics:

Past 24 Hours: 0

Past 7 Days: 1

Past 30 Days: 18

All Time: 2,771