Introduction
Follow along with me as I replace the left-front window regulator on my old Mercedes sedan
What you need
Video Overview
-
-
Today's patient, the 1976 230.6, this guide will apply to any W114 or W115 from 1973 onwards (facelift)
-
-
-
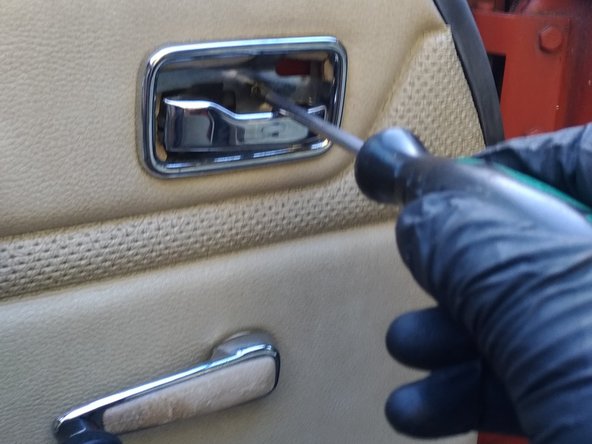
Pry out the black plastic cup behind the door lever, using your pick or flat-head screwdriver
-
Then remove the single phillips #2 bolt, taking care to retain the lockwasher
-
-
-
There are a total of three phillips #3 bolts holding the handle to the door, two at the bottom, and a single one at the top
-
Your phillips #2 screwdriver will work fine here, but you could use a #3 if you want
-
For the top bolt there is a chrome trim covering it. You'll need to pry back gently - using a pick or small screwdriver so as to leave it undamaged
-
-
-
You've removed the two surrounds, and the door handle
-
There are two metal garnishes above each lower-leg of the door handle, I like to arrange them so I know where they went - for later reassembly
-
-
-
-
Looking down almost behind the window winder handle, you can see the trim panel has a bent-metal clip, the trim also acts as the locking-clip to hold the handle on
-
First push the trim panel outwards toward yourself
-
Then it slides away from the hub, towards the knob which you hold to rotate the handle
-
-
-
The interior door trim panel is held in place by a series of push-pins around the edge of the panel, you can pry them out using a plastic trim tool, or like I did here with a small prybar and rag
-
To avoid damaging the trim or the door, try to get the pry tool as close as possible to each clip then gently pry until it pops out
-
The trim panel separates below the top portion, so the lock-knob and window seal can remain in-place and undisturbed
-
Remember the trim panel is very-fragile and made of particle-wood, so handle it gently and place it out of harms way while you're working on the door
-
-
-
Peel back the vapour/moisture barrier plastic, mine was removed before, so the original glue was gone, I had some spots of double-sided tape holding it in
-
I just fed it through the partially-open window to hold it back, but if it's windy it might be annoying
-
We're trying to gain access to the door interior
-
-
-
My new part (1157251102) looked so full of promise with it's blue genuine parts label, and it's shiny metal it's manufacture date stamped 10/1987
-
However the installation was about to take a turn for the worse, I didn't realise at first, naively thinking a genuine part would just bolt-on
-
It turns out my new part didn't have threads tapped in the four bolt holes!
-
Can you believe it!?
-
So with a bit of cursing, I dragged out my tap and die set
-
If you get lucky you won't need to tap the holes on your replacement regulator
-
-
-
The arm that attaches to the bottom of the window uses a pin with clip and special washer
-
It's a bit fiddly since you can't see it easily, mostly you'll be working by feel, the clip slides into a groove machined into the tip of the pin
-
There is a rectangular plastic bushing that slides in the window-bottom track, it fits over the pin first
-
Then the pin and bushing go through the track
-
Then there is a plastic slightly-conical flat washer with a metal star-shaped washer that fits over that
-
Then at the very tip of the pin - facing into the door, there is a spring-steel clip
-
I used a pick and a flathead screwdriver and a pair of needlenose pliers and a bit of cursing to get it out and back in
-
NOTE: the window drops after you pull out the pin, since nothing is holding it up - I put a small prybar in place to hold it up, but you could also use a piece of wood or whatever
-
-
-
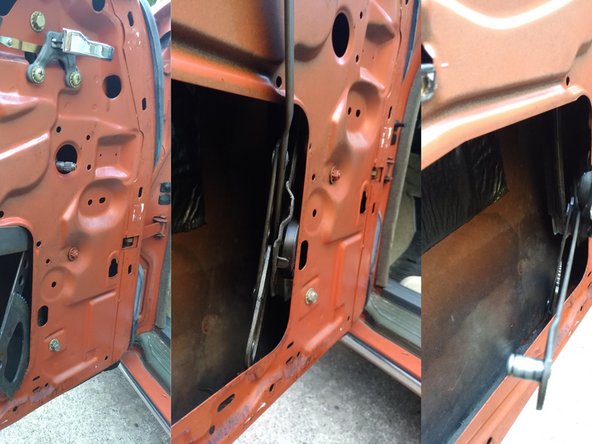
There are four bolts (circled in blue) holding the regulator to the door, they are all 10mm head bolts, but the top two are longer
-
I used a 10mm deep socket on a 1/4 inch ratchet, but any 10mm wrench, spanner, or socket should work
-
in the second picture you can see the gear-quadrant of my old regulator hanging down, it's supposed to be up engaged in the winder gear teeth
-
It was at this point that I realised I could not get the old regulator past the window vertical track...
-
Notice I'm using a short prybar to prop up the window now (since otherwise it drops down) you could use a piece of wood or some other tool as well
-
-
-
Since you can't get the regulator out past the window track, it has to be detached temporarily
-
It's held on by two 10mm bolts, which have fancy dimpled flat washers, and lock washers, I've circled them in green in the picture
-
Remove those two bolts, which should give you enough movement to push that window track forward off the window a bit, then into the door a bit deeper
-
At this point it should be possible to pull out the window regulator, angling it as you go to avoid jamming on things
-
-
-
As I mentioned in step 9, I was punished by the lack of threads in my new window regulator
-
So I broke out my tap and die set, and checked the bolt thread pitch, which was metric M6 x 1.0
-
I didn't notice until I'd already slipped my new part into the door... I actually pulled it back out of the door to tap the four holes
-
If your part also has a lack of threads in the holes, be sure to check it before you've put the clip through the pin, and reinstalled the track bolts etc
-
-
-
Install several of the regulator bolts (remember the top two are the long ones)
-
Don't tighten them yet
-
Grease up the window bottom track and bushings before assembling
-
The bushing clip is pretty hard to get on - enjoy that
-
After you're happy with the placement tighten the bolts
-
Then remember to put the vertical window track bolts back in too - they have the funny dimpled flat washers (be sure the window glass is in the track)
-


To reassemble your device, follow these instructions in reverse order.
To reassemble your device, follow these instructions in reverse order.
Cancel: I did not complete this guide.
2 other people completed this guide.
