
This translation may not reflect the most recent updates from the source guide. Help update the translation or view the source guide.

更换 iPhone 7 Plus 的 LCD 屏幕和触控板

What you need

  1. 更换 iPhone 7 Plus 的 LCD 屏幕和触控板, 五角梅花螺丝: step 1, image 1 of 1
    • 开始这一过程前,请将iPhone电量放至25%以下,电量过高可能使得锂电池在意外情况下更容易起火或爆炸。

    • 在拆解前,确保你的iPhone已经关机。

    • 移除位于手机底部的两颗3.4 mm五角梅花螺丝

    • 打开iPhone的显示屏将导致防水密封被破坏。 所以请准备好新的密封胶。未更换密封胶的情况下重新组装的iPhone将不再具有防泼溅功能。

  2. 更换 iPhone 7 Plus 的 LCD 屏幕和触控板, 使用胶带粘贴屏幕: step 2, image 1 of 3 更换 iPhone 7 Plus 的 LCD 屏幕和触控板, 使用胶带粘贴屏幕: step 2, image 2 of 3 更换 iPhone 7 Plus 的 LCD 屏幕和触控板, 使用胶带粘贴屏幕: step 2, image 3 of 3
    • 如果您的手机显示屏已经碎裂,请避免屏幕进一步的破碎,并且当您用胶带粘贴屏幕玻璃以维修手机时,请避免身体部位受伤。

    • 使用透明胶带交替重叠粘贴,完整地覆盖住手机的屏幕。

    • 该步骤可有助于在撬起屏幕时防止屏幕玻璃碎片飞溅并保持屏幕结构的完整。

    • 请戴好防护眼镜以防止维修时玻璃碎片飞溅入眼。

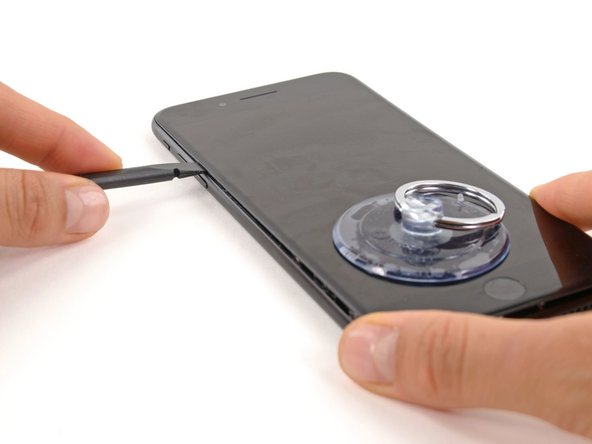
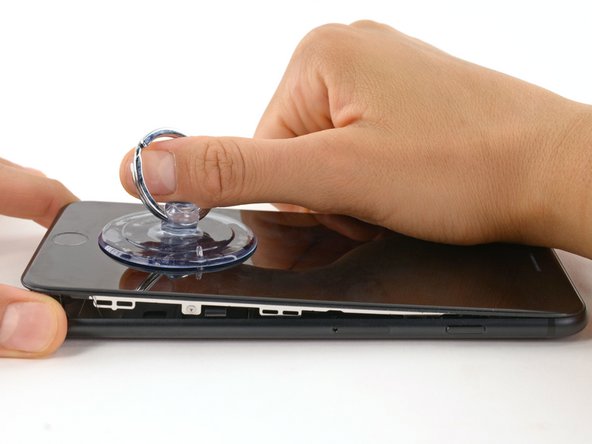
    • 如果屏幕玻璃的碎裂导致接下来的步骤中的吸盘难以吸在屏幕上,请尝试使用黏度较高的胶带(如粘水管用的胶带)折叠成一个把手,来提起屏幕。

  3. 更换 iPhone 7 Plus 的 LCD 屏幕和触控板, 拆机步骤: step 3, image 1 of 1
    • 加热 iPhone 的下方可以软化粘合剂,让拆解更轻松。

    • 用吹风机或者准备一个 iOpener 来加热 iPhone 下方大概一分钟,以软化屏幕下方的粘合剂

  4. 更换 iPhone 7 Plus 的 LCD 屏幕和触控板: step 4, image 1 of 2 更换 iPhone 7 Plus 的 LCD 屏幕和触控板: step 4, image 2 of 2
    • 在前面板的下半部分放置一个吸盘,正好位于Home按钮的上方。

    • 确保吸盘与Home按钮不重叠,以确保吸盘和前玻璃之间能形成密封状态。

    • 如果您的屏幕已经严重损坏,使用透明胶带将其粘好可以让吸盘固定。或者您也可以用非常强力的胶带来替代吸盘。如果这些都失败的话,您可以用万能胶将吸盘和破损的屏幕粘在一起。

  5. 更换 iPhone 7 Plus 的 LCD 屏幕和触控板: step 5, image 1 of 3 更换 iPhone 7 Plus 的 LCD 屏幕和触控板: step 5, image 2 of 3 更换 iPhone 7 Plus 的 LCD 屏幕和触控板: step 5, image 3 of 3
    • 以固定的恒定拉力上拉吸盘,来使得前面板和后壳之间产生轻微的间隙。

    • 将撬起工具的扁端插入间隙。

    • 固定显示器的防水粘合剂非常坚固; 创造这个初始差距需要很大的力量。 如果你很难打开缝隙,上下摇晃屏幕以削弱粘合剂,直到你可以插入撬起工具。

    • 在向上拉起吸盘的同时,旋转撬起工具以加宽屏幕和后壳之间的开口。

  6. 更换 iPhone 7 Plus 的 LCD 屏幕和触控板: step 6, image 1 of 3 更换 iPhone 7 Plus 的 LCD 屏幕和触控板: step 6, image 2 of 3 更换 iPhone 7 Plus 的 LCD 屏幕和触控板: step 6, image 3 of 3
    • 在iPhone左下角的前面板和后壳之间插入撬起工具的扁端。

    • 沿着手机的左边缘滑动撬起工具,从下方开始朝向音量控制按钮和静音开关移动,来将显示屏的粘合剂破开。

    • 不要尝试将显示器顶部从后壳上撬开,因为那里有塑料卡勾固定,可能会被损坏。

  7. 更换 iPhone 7 Plus 的 LCD 屏幕和触控板: step 7, image 1 of 2 更换 iPhone 7 Plus 的 LCD 屏幕和触控板: step 7, image 2 of 2
    • 将撬起工具从左边取出,再从右下角插入。

    • 从下至上的滑动撬起工具来破开固定显示器的背胶。

  8. 更换 iPhone 7 Plus 的 LCD 屏幕和触控板: step 8, image 1 of 2 更换 iPhone 7 Plus 的 LCD 屏幕和触控板: step 8, image 2 of 2
    • 上拉吸盘来上提显示屏以及打开iPhone。

    • 不要将显示屏提起超多10°,因为沿着设备右边有连接显示屏和逻辑板的细软性电路板。

  9. 更换 iPhone 7 Plus 的 LCD 屏幕和触控板: step 9, image 1 of 2 更换 iPhone 7 Plus 的 LCD 屏幕和触控板: step 9, image 2 of 2
    • 上拉吸盘上的小突块,将吸盘从前面板上取下。

  10. 更换 iPhone 7 Plus 的 LCD 屏幕和触控板: step 10, image 1 of 2 更换 iPhone 7 Plus 的 LCD 屏幕和触控板: step 10, image 2 of 2
    • 沿着手机顶部的边缘开口,使用开启塑料片滑动,以松开最后粘合剂。

  11. 更换 iPhone 7 Plus 的 LCD 屏幕和触控板: step 11, image 1 of 3 更换 iPhone 7 Plus 的 LCD 屏幕和触控板: step 11, image 2 of 3 更换 iPhone 7 Plus 的 LCD 屏幕和触控板: step 11, image 3 of 3
    • 将显示屏组件拉到略微远离手机的顶部边缘,使其脱离将显示器固定至后壳上的卡勾。

    • 通过从左侧摆动显示屏来打开iPhone,就像翻开一本书的封底页。

    • 此时,先不要尝试将显示屏完全取开,因为还有一些脆弱的排线仍然连接着iPhone的主板。

  12. 更换 iPhone 7 Plus 的 LCD 屏幕和触控板, 电池的连接器: step 12, image 1 of 1
    • 卸下四颗将下方显示线缆保护片固定至逻辑版的三端Y000螺丝:

    • 三颗1.2 mm螺丝

    • 一颗2.6 mm螺丝

  13. 更换 iPhone 7 Plus 的 LCD 屏幕和触控板: step 13, image 1 of 2 更换 iPhone 7 Plus 的 LCD 屏幕和触控板: step 13, image 2 of 2
    • 卸下下方显示线缆保护片

  14. 更换 iPhone 7 Plus 的 LCD 屏幕和触控板: step 14, image 1 of 3 更换 iPhone 7 Plus 的 LCD 屏幕和触控板: step 14, image 2 of 3 更换 iPhone 7 Plus 的 LCD 屏幕和触控板: step 14, image 3 of 3
    • 使用撬棒的尖端从逻辑板的插座上撬起并断开电池的连接。

    • 向上轻轻翻开连接器线缆,以防止其意外触碰连接到插座并给手机供电。

  15. 更换 iPhone 7 Plus 的 LCD 屏幕和触控板, 显示屏总成: step 15, image 1 of 3 更换 iPhone 7 Plus 的 LCD 屏幕和触控板, 显示屏总成: step 15, image 2 of 3 更换 iPhone 7 Plus 的 LCD 屏幕和触控板, 显示屏总成: step 15, image 3 of 3
    • 确保电池接口是断开的。

    • 使用撬棒的平端或者指甲以撬开两个下部显示连接器,笔直地从逻辑版的插座上撬起。

    • 若要重新安装连接器,向下按压直到其到位,接着重复按下另一端。请不要按压中部。若连接器未对准,可能会弯曲从而造成永久损伤。

    • 如果你在重新组装手机时有空白屏幕,显示屏上有白线,或部分、完全没有触摸响应,请尝试断开连接并小心地重新连接这两根电缆,并确保它们完全就位。

  16. 更换 iPhone 7 Plus 的 LCD 屏幕和触控板: step 16, image 1 of 3 更换 iPhone 7 Plus 的 LCD 屏幕和触控板: step 16, image 2 of 3 更换 iPhone 7 Plus 的 LCD 屏幕和触控板: step 16, image 3 of 3
    • 卸下三颗固定前部面板传感器组件连接器的保护盖的三端Y000螺丝。

    • 一颗1.3mm螺丝

    • 两颗1.0mm螺丝

    • 卸下保护盖。

  17. 更换 iPhone 7 Plus 的 LCD 屏幕和触控板: step 17, image 1 of 2 更换 iPhone 7 Plus 的 LCD 屏幕和触控板: step 17, image 2 of 2
    • 从逻辑板的插座上断开前部面板传感器总成连接器。

    • 这种按压连接器应该小心避免弯曲损伤。

  18. 更换 iPhone 7 Plus 的 LCD 屏幕和触控板: step 18, image 1 of 1
  19. 更换 iPhone 7 Plus 的 LCD 屏幕和触控板, 听筒扬声器: step 19, image 1 of 1
    • 卸下五颗固定听筒支架的十字螺丝:

    • 两颗1.8 mm螺丝

    • 一颗2.3 mm螺丝

    • 一颗2.4mm螺丝

    • 一颗2.8 mm螺丝

  20. 更换 iPhone 7 Plus 的 LCD 屏幕和触控板: step 20, image 1 of 1
    • 卸下听筒支架。

  21. 更换 iPhone 7 Plus 的 LCD 屏幕和触控板: step 21, image 1 of 3 更换 iPhone 7 Plus 的 LCD 屏幕和触控板: step 21, image 2 of 3 更换 iPhone 7 Plus 的 LCD 屏幕和触控板: step 21, image 3 of 3
    • 使用撬棒的平端撬起前置摄像头。

    • 轻轻地将摄像头柔性线缆摆到另一侧以露出下面的扬声器。

  22. 更换 iPhone 7 Plus 的 LCD 屏幕和触控板: step 22, image 1 of 1
    • 卸下听筒扬声器。

    • 不要用手指触碰四个金属触点——手指上的油污可能会导致设备异常。如果不小心触碰触点表面,使用酒精(90%或更高浓度)擦拭清洁。

  23. 更换 iPhone 7 Plus 的 LCD 屏幕和触控板, 前置摄像头和传感器排线: step 23, image 1 of 2 更换 iPhone 7 Plus 的 LCD 屏幕和触控板, 前置摄像头和传感器排线: step 23, image 2 of 2
    • 轻轻将摄像头和排线向 iPhone 下部翻折,露出下面的组件

  24. 更换 iPhone 7 Plus 的 LCD 屏幕和触控板: step 24, image 1 of 2 更换 iPhone 7 Plus 的 LCD 屏幕和触控板: step 24, image 2 of 2
    • 这一步,传感器非常的脆弱。要增加无损拆卸的几率,使用 iOpener 或者吹风机加热屏幕。或者,滴两滴酒精,使之浸透之后,再撬动。

    • 将挑线器插入环境光传感器排线下,把传感器挑出洞外。

  25. 更换 iPhone 7 Plus 的 LCD 屏幕和触控板: step 25, image 1 of 3 更换 iPhone 7 Plus 的 LCD 屏幕和触控板: step 25, image 2 of 3 更换 iPhone 7 Plus 的 LCD 屏幕和触控板: step 25, image 3 of 3
    • 将挑线器尖的一头插到距离传感器排线下,同样地把传感器挑出。

  26. 更换 iPhone 7 Plus 的 LCD 屏幕和触控板: step 26, image 1 of 3 更换 iPhone 7 Plus 的 LCD 屏幕和触控板: step 26, image 2 of 3 更换 iPhone 7 Plus 的 LCD 屏幕和触控板: step 26, image 3 of 3
    • 将 iFixit 拆机工具尖的一头插到前置摄像头的背面、摄像头总成的排线下

    • 如果需要的话,使用 iOpener 或电吹风加热显示屏上部,使固定排线的粘合胶软化

    • 撬起,使排线和显示屏背部分离

  27. 更换 iPhone 7 Plus 的 LCD 屏幕和触控板: step 27, image 1 of 3 更换 iPhone 7 Plus 的 LCD 屏幕和触控板: step 27, image 2 of 3 更换 iPhone 7 Plus 的 LCD 屏幕和触控板: step 27, image 3 of 3
    • 将挑线器尖的一头插入到上一步撬起排线的位置

    • 沿着听筒的圆形金色触点推动,继续将排线与显示屏分离

  28. 更换 iPhone 7 Plus 的 LCD 屏幕和触控板: step 28, image 1 of 1
    • 继续用挑线器小心地分离与屏幕粘连的最后一点排线

  29. 更换 iPhone 7 Plus 的 LCD 屏幕和触控板: step 29, image 1 of 3 更换 iPhone 7 Plus 的 LCD 屏幕和触控板: step 29, image 2 of 3 更换 iPhone 7 Plus 的 LCD 屏幕和触控板: step 29, image 3 of 3
    • 卸下前置摄像头和传感器排线组件。

    • 在屏幕和摄像头/传感器排线背面上三排铜触点的中间有一块黑色的双面绝缘垫片。有可能残留在屏幕上,也有可能跟随排线一同脱落。

    • 重新组装的过程中,检查该垫片是否在正确位置,否则使用如聚酰亚胺胶带来将其粘贴到排线背面的触点上。

  30. 更换 iPhone 7 Plus 的 LCD 屏幕和触控板, Home键/Touch ID: step 30, image 1 of 1
    • 卸下四颗固定Home/Touch ID传感器支架的Y000螺丝。

    • 一颗1.1mm螺丝。

    • 三颗1.3mm螺丝。

    • 重新组装时,请注意不要拧得太紧,否则Home 键可能不起作用。

  31. 更换 iPhone 7 Plus 的 LCD 屏幕和触控板: step 31, image 1 of 1
    • 卸下固定Home/Touch ID传感器的支架。

  32. 更换 iPhone 7 Plus 的 LCD 屏幕和触控板: step 32, image 1 of 3 更换 iPhone 7 Plus 的 LCD 屏幕和触控板: step 32, image 2 of 3 更换 iPhone 7 Plus 的 LCD 屏幕和触控板: step 32, image 3 of 3
    • 从右侧向上断开Home键在插座中相连线缆的连接器。

    • 如果排线连接器没有分离时便开始翻转,用你撬棒(Spudger)上平的一面按住排线靠近连接器的一端,同时翘起连接器的左端。请务必小心,不要损坏连接器或排线,否则将导致传感器无法使用。

  33. 更换 iPhone 7 Plus 的 LCD 屏幕和触控板: step 33, image 1 of 2 更换 iPhone 7 Plus 的 LCD 屏幕和触控板: step 33, image 2 of 2
    • 轻轻地移出Home键相连的线缆。

    • 请不要尝试按压连接器——轻轻将其抬起以卸下Home/Touch ID传感器线缆。

    • 如果接口不易撬起,请使用吹风机或iOpener 加热和软化固定接口的粘合剂,然后再试一次。

    • 不要试图完全拆下接口—— 只需稍微向上翻转,以便可以移除下面的家用/ Touch ID传感器电缆。

  34. 更换 iPhone 7 Plus 的 LCD 屏幕和触控板: step 34, image 1 of 1
    • 加热Home 键/ Touch ID 周围的区域将有助于软化将其细腻的电缆固定在适当位置的粘合剂,从而更容易安全地去除它。

    • 翻转显示组件,将一个加热过的 iOpener 放置在Home/Touch ID 区域约90秒,来软化粘合剂。

  35. 更换 iPhone 7 Plus 的 LCD 屏幕和触控板: step 35, image 1 of 3 更换 iPhone 7 Plus 的 LCD 屏幕和触控板: step 35, image 2 of 3 更换 iPhone 7 Plus 的 LCD 屏幕和触控板: step 35, image 3 of 3
    • 使用一个塑料撬片轻柔地分离固定Home/Touch ID传感器线缆到显示面板后侧的粘合胶。

  36. 更换 iPhone 7 Plus 的 LCD 屏幕和触控板: step 36, image 1 of 1
    • 卸下Home/Touch ID传感器组件。

    • 要重新安装,请首先将电缆穿过显示屏正面的孔。

    • 你的更换配件可能随附有 Home 键右侧的Y000额外螺丝。卸下不必要的螺丝,以便你可以重新安装 Home 键支架。

    • 请按照本指南在屏幕上安装替换显示器粘合剂。

  37. 更换 iPhone 7 Plus 的 LCD 屏幕和触控板, LCD 屏幕和触控板: step 37, image 1 of 3 更换 iPhone 7 Plus 的 LCD 屏幕和触控板, LCD 屏幕和触控板: step 37, image 2 of 3 更换 iPhone 7 Plus 的 LCD 屏幕和触控板, LCD 屏幕和触控板: step 37, image 3 of 3
    • 撕开 LCD 屏蔽板贴纸上部的矩形部分,使其与下方排线分离

    • 除非是要更换贴纸,否则无需将整个贴纸撕下

  38. 更换 iPhone 7 Plus 的 LCD 屏幕和触控板: step 38, image 1 of 2 更换 iPhone 7 Plus 的 LCD 屏幕和触控板: step 38, image 2 of 2
    • 用 Y000 螺丝刀从显示屏 EMI 屏蔽板的一侧卸下三颗 1.1mm 螺丝

    • 如果松开这些螺钉遇到困难,请在转动时将螺丝刀用力按压在螺钉上。如有必要,使用撬棒的扁平边缘从后面支撑每个夹扣,这样可以对螺丝施加更大的压力,而不会使夹扣弯曲。

  39. 更换 iPhone 7 Plus 的 LCD 屏幕和触控板: step 39, image 1 of 1
    • 用 Y000 螺丝刀卸下 EMI 屏蔽板另一侧的两颗 1.1mm 螺丝

  40. 更换 iPhone 7 Plus 的 LCD 屏幕和触控板: step 40, image 1 of 1
    • 卸下接近显示屏底部、用于紧固 EMI 屏蔽板的 1.8mm 十字螺丝

  41. 更换 iPhone 7 Plus 的 LCD 屏幕和触控板: step 41, image 1 of 2 更换 iPhone 7 Plus 的 LCD 屏幕和触控板: step 41, image 2 of 2
    • 将 LCD 屏蔽板抬起,同时按着周围的排线

    • 将排线从 LCD 屏蔽板的洞中穿出,小心不要伤到排线

  42. 更换 iPhone 7 Plus 的 LCD 屏幕和触控板: step 42, image 1 of 1
    • 卸下 LCD 屏蔽板

  43. 更换 iPhone 7 Plus 的 LCD 屏幕和触控板: step 43, image 1 of 1
    • 现在只剩下 LCD 屏幕和触控板了

Conclusion

要重新组装各个组件,请以相反的顺序执行这些步骤。

193 other people completed this guide.

Special thanks to these translators:

en zh

90%

These translators are helping us fix the world! Want to contribute?
Start translating ›

Jeff Suovanen

Member since: 08/06/13

428,098 Reputation

259 Guides authored

Team

iFixit Member of iFixit

Staff

135 Members

16,817 Guides authored

18 Comments

Step 14 Pic# 3 the second cable damaged , what can i do ?!

Ameed Bader - Reply

If you damaged only the cable and nothing else, replacing the display should solve the problem—it will come with new cables attached.

Jeff Suovanen -

For anyone performing hardware exchanges, there is a free app on Apple store called Dr. Phone that can be used to test the several hardware components… Nice to do before closing it up..

H. Alves - Reply

Has anyone else had trouble getting the Y000 screws out from the bracket over the home/Touch ID sensor? All other Y000 came out no problem. These are fighting me. The driver seems to be spinning in place as if too big. Follow up question. If I strip these screws, any idea how to get them out then?

jferguson757 - Reply

In my situation the Y screw behind the Home/Fingerprint Button seems to be GLUED ON by design to prevent inexperienced non-certified Apple replacers to remove it. So what I did was left it on to prevent stripping the screw and breaking the button. I just CAREFULLY BENT the metal bracket AT AN ANGLE so that I can maneuver the whole assembly into the hole of the screen and remove it.

Eric Vengeance -

Add Comment

View Statistics:

Past 24 Hours: 255

Past 7 Days: 3,134

Past 30 Days: 11,370

All Time: 199,467