三星盖乐世S4屏幕面板替换

What you need

Video Overview

  1. 三星盖乐世S4屏幕面板替换, 后壳: step 1, image 1 of 2 三星盖乐世S4屏幕面板替换, 后壳: step 1, image 2 of 2
    • 使用撬棒或指甲来从后置摄像头靠近电源键位置撬起后壳。

  2. 三星盖乐世S4屏幕面板替换: step 2, image 1 of 3 三星盖乐世S4屏幕面板替换: step 2, image 2 of 3 三星盖乐世S4屏幕面板替换: step 2, image 3 of 3
    • 将后壳与手机上的卡扣分离,移除手机后壳。

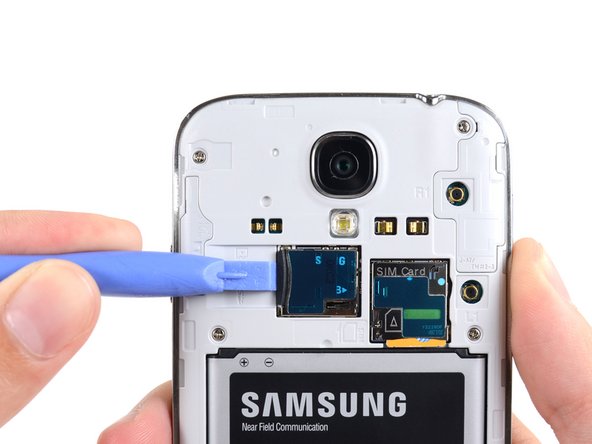
  3. 三星盖乐世S4屏幕面板替换, MicroSD 卡: step 3, image 1 of 3 三星盖乐世S4屏幕面板替换, MicroSD 卡: step 3, image 2 of 3 三星盖乐世S4屏幕面板替换, MicroSD 卡: step 3, image 3 of 3
    • 使用撬棒扁平的一端或者您的指甲,来轻轻按动microSD卡压入进卡槽中,直到听到卡塔一声。

    • 在听到咔塔一声后松开卡,卡将会从卡槽中弹出。

    • 移除卡片。

    • 要重新装入卡,将其插入卡槽,直至卡入到位。

  4. 三星盖乐世S4屏幕面板替换, 电池: step 4, image 1 of 3 三星盖乐世S4屏幕面板替换, 电池: step 4, image 2 of 3 三星盖乐世S4屏幕面板替换, 电池: step 4, image 3 of 3
    • 使用塑料撬棒或者手指甲来从电池仓槽口处向上提起电池。

    • 将电池从您的手机中移出。

  5. 三星盖乐世S4屏幕面板替换, SIM卡: step 5, image 1 of 3 三星盖乐世S4屏幕面板替换, SIM卡: step 5, image 2 of 3 三星盖乐世S4屏幕面板替换, SIM卡: step 5, image 3 of 3
    • 使用塑料开启工具(或者你的手指)来把SIM卡向卡槽反向轻微挤压,直到你听到了声响。

    • 听到声响后,停止挤压SIM卡,它会自动弹出卡槽。

    • 移除SIM卡。

    • 在重新安装的过程中,将卡推入卡槽直到你听到声响。

  6. 三星盖乐世S4屏幕面板替换, 中框: step 6, image 1 of 1
    • 拆下九个用来固定中框和屏幕的4 mm 菲利普斯# 00螺钉。

  7. 三星盖乐世S4屏幕面板替换: step 7, image 1 of 2 三星盖乐世S4屏幕面板替换: step 7, image 2 of 2
    • 中框是由几个塑料卡子后面的中框镀铬挡板固定在显示组件上的。接下来的步骤将指导你分离中框与屏幕组件的连接。

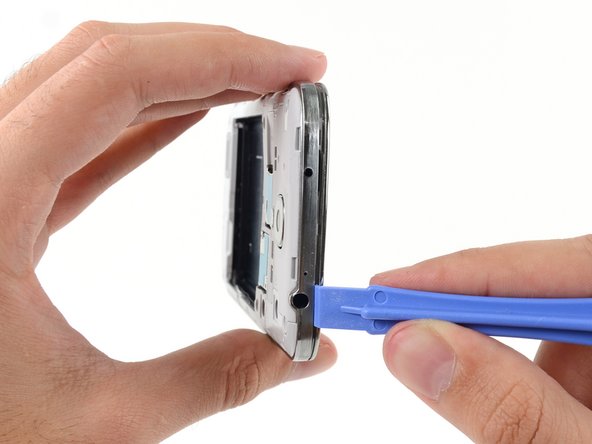
    • 从手机的音量按钮开始,在显示玻璃的铬边框和较大的镀铬边框之间插入塑料开口工具。寻找两者之间的缝隙。

    • 沿着切口滑动开孔工具,将塑料卡子分开。

    • 轻轻地撬开,只够将塑料卡子在中框挡板就可以打开。

  8. 三星盖乐世S4屏幕面板替换: step 8, image 1 of 2 三星盖乐世S4屏幕面板替换: step 8, image 2 of 2
    • 继续撬开手机边缘。

    • 滑动你的开启工具沿着设备的底部中框和显示器之间的缝。

  9. 三星盖乐世S4屏幕面板替换: step 9, image 1 of 2 三星盖乐世S4屏幕面板替换: step 9, image 2 of 2
    • 再次,撬到电源按钮的一边。

    • 沿缝滑动开启工具。

  10. 三星盖乐世S4屏幕面板替换: step 10, image 1 of 2 三星盖乐世S4屏幕面板替换: step 10, image 2 of 2
    • 继续滑动开启工具在手机的顶部,最后市中框离开显示组件。

    • 检查一遍周围,确定所有边缘都已被撬棒打开。

  11. 三星盖乐世S4屏幕面板替换: step 11, image 1 of 3 三星盖乐世S4屏幕面板替换: step 11, image 2 of 3 三星盖乐世S4屏幕面板替换: step 11, image 3 of 3
    • 从剩余零件中去处中框。

  12. 三星盖乐世S4屏幕面板替换, 主板组件: step 12, image 1 of 3 三星盖乐世S4屏幕面板替换, 主板组件: step 12, image 2 of 3 三星盖乐世S4屏幕面板替换, 主板组件: step 12, image 3 of 3
    • 使用一个撬棒的平端断开USB板连接器。

    • 断开前面对面摄像机排线接头。

    • 断开耳机扬声器排线连接器。

  13. 三星盖乐世S4屏幕面板替换: step 13, image 1 of 3 三星盖乐世S4屏幕面板替换: step 13, image 2 of 3 三星盖乐世S4屏幕面板替换: step 13, image 3 of 3
    • 断开耳机插孔总成的排线接头。

    • 断开显示器/数字化器排线连接器。

    • 断开天线排线接头。

  14. 三星盖乐世S4屏幕面板替换: step 14, image 1 of 1
    • 从主板组装拆卸单2.4 mm菲利普斯# 00螺杆。

  15. 三星盖乐世S4屏幕面板替换: step 15, image 1 of 2 三星盖乐世S4屏幕面板替换: step 15, image 2 of 2
    • 轻轻地拆下主板。

    • 保持主板的边缘以防止静电放电损坏。小心不要在任何电缆上把它从显示器装配中取出。

  16. 三星盖乐世S4屏幕面板替换, 耳机插孔: step 16, image 1 of 1
    • 去除一颗2.4 mm 用来固定耳机插孔组件,显示组件的菲利普斯# 00螺丝。

  17. 三星盖乐世S4屏幕面板替换: step 17, image 1 of 1
    • 拆下耳机插孔总成。

  18. 三星盖乐世S4屏幕面板替换, 屏幕面板: step 18, image 1 of 2 三星盖乐世S4屏幕面板替换, 屏幕面板: step 18, image 2 of 2
    • 如果屏幕支架上半部分有一个2.4 mm PH #00 的螺丝,请把它去除。

    • 移除上半部分的屏幕支架。

  19. 三星盖乐世S4屏幕面板替换: step 19, image 1 of 1
    • 把前置摄像头从屏幕面板上去除。

  20. 三星盖乐世S4屏幕面板替换: step 20, image 1 of 1
    • 把听筒从屏幕面板上去除。

  21. 三星盖乐世S4屏幕面板替换: step 21, image 1 of 3 三星盖乐世S4屏幕面板替换: step 21, image 2 of 3 三星盖乐世S4屏幕面板替换: step 21, image 3 of 3
    • 将一块撬棒插入振动器来将他从带有胶水的屏幕面板上分离。

    • 注意,请不要直接去除振动器,因为它的线缆也粘附在屏幕面板的背后。

    • 用撬棒的尖端将振动器的线缆从屏幕上分离。

    • 加热工具是一个软化胶水的“快捷工具”。使用加热枪可以软化胶水。如果你分离胶水足够小心的话,你可以重新使用上面的胶水。

  22. 三星盖乐世S4屏幕面板替换: step 22, image 1 of 1
    • 把振动器从显示屏后面板移除。

  23. 三星盖乐世S4屏幕面板替换: step 23, image 1 of 2 三星盖乐世S4屏幕面板替换: step 23, image 2 of 2
    • 小心的把撬棒的尖端插入USB接口和USB接口支架来把USB接口从支架拆除。

  24. 三星盖乐世S4屏幕面板替换: step 24, image 1 of 1
    • 把USB支架从USB接口上拆除。

    • 这个支架有一定的弹力并且在组装过程中能自动弹回到原位。

  25. 三星盖乐世S4屏幕面板替换: step 25, image 1 of 2 三星盖乐世S4屏幕面板替换: step 25, image 2 of 2
    • 按键线缆从USB面板线缆上断开。在这里需要非常地小心,一旦你去除了线缆,你需要小心的把它从USB面板上剥除。

    • 将天线连接线缆从USB面板上断开。

  26. 三星盖乐世S4屏幕面板替换: step 26, image 1 of 3 三星盖乐世S4屏幕面板替换: step 26, image 2 of 3 三星盖乐世S4屏幕面板替换: step 26, image 3 of 3
    • USB面板会用少量胶水来连接屏幕。

    • 轻轻的将撬棒的平的一面插入USB面板的下方来将其从胶水中分离。

    • 小心并且缓慢地分离来避免面板弯曲。

  27. 三星盖乐世S4屏幕面板替换: step 27, image 1 of 1
    • 将USB面板从屏幕上分离。

  28. 三星盖乐世S4屏幕面板替换: step 28, image 1 of 3 三星盖乐世S4屏幕面板替换: step 28, image 2 of 3 三星盖乐世S4屏幕面板替换: step 28, image 3 of 3
    • 将天线线缆从屏幕背部的凹槽中剥离。

    • 其他的通讯商机器可能会在手机的另一头添加额外的天线。我们也需要把其从屏幕面板上移除。

    • 在拼装的过程中,最好在重新连接天线连接线缆之前先安装USB面板。

Conclusion

若要重新组装你的设备,按照以下步骤逆序操作。

597 other people completed this guide.

Special thanks to these translators:

en zh

100%

eric is helping us fix the world! Want to contribute?
Start translating ›

Sam Goldheart

Member since: 10/18/12

465,659 Reputation

538 Guides authored

Team

iFixit Member of iFixit

Staff

135 Members

16,757 Guides authored

28 Comments

HELP! step 28 just ends how do I insert the new one, how do I resemble the parts that used adhesives to stick?

Tom - Reply

Nearly all the guides end like this, you just need to work backwards through the steps using the new hardware.

Dave Davidson -

Just work backwards like Nick stated. I usually reverse assemble the parts I take off so I know the order in which I need to put them back in.

Sturgis Baxter -

Just run it along its track. Use a plastic spudger to push it down. Use 3m double sided adhesive tape to re-attach parts that require adhesive.

Fausto Lebron - Reply

What is the difference between an AT&T digitizer and a Verizon digitizer? How interchangeable are they?

Martin - Reply

Add Comment

View Statistics:

Past 24 Hours: 8

Past 7 Days: 35

Past 30 Days: 136

All Time: 702,536