
The March 2015 update of Apple's 13" MacBook Air features fifth generation Intel Core i5 and i7 processors, resulting in slightly increased performance and battery life.

623 Questions View all

Are These Components The Reason My MacBook Air Won't Boot up?

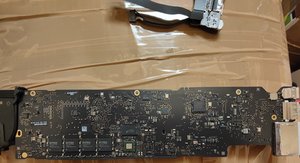
MacBook Air A1466 (820-00165A)

I’m so close to fixing it myself, I really want that sense of achievement; I’m fairly technical, but far from an actual electrical engineer! (I have the diagram/schematic to hand)

Won’t power on, completely dead, except MagSafe light goes from green to orange after 3 seconds of being connected. No fan movement. Nothing.

Block Image

It’s current condition was gradual, I had left it plugged in on charge for a long time, maybe 2 weeks, and hadn't used it for a while, having kept it closed in sleep, powered on. Then went to open it to find it booting up, which was a surprise, as I expected it to be at the user log-in prompt.

After some use, there were sudden power off’s, and would not come back on immediately, almost like it needed to cool down; but it was not hot… I use the term ‘cool down’ loosely.

Eventually, it wouldn't boot at all, unless in a cold room (I had put it in my storage room to fix at a later date). One day I went to try it, and to my surprise, it booted immediately. But it turned off shortly after logging in, and wouldn't turn back on until a few minutes had passed, pressing the power button over and over. But this time, it only got as far as half way progress bar loading os.

Full disassembly revealed a really clean mobo, I videoed my inspection to help with my eye sight, and to share online so other’s maybe able to see something that I missed…
That was 10 months ago (26/10/2021) https://youtu.be/F-CW0U-HsoM

Did some Googling back then, and found a few ways of testing, and I remember that one of them caused the fan to spin up to full speed, and I think it stayed on. To do this, I think I had the battery disconnected, as well as everything else, except for the keyboard (for power button). So, just the mobo, dc board, fan, the two cables that link dc to mobo, and keyboard.

While holding the power button down for 10 seconds, I connected power, and continued to hold power button for a further 10 seconds. Then when I let go of power button, the fan spins up, showing me that not all is lost!

I spoke to a local shop that does phone and laptop repairs, but the guy on the phone was not the engineer, and said “It probably just needs a reflow”, and said “it’ll probably be around 100gbp”. I didn’t like the vague guess at price, and I didn’t want any unexpected surprises, when I feel like I could probably fix this myself with enough effort and research… and the feeling of achievement with my working laptop would give me a real boost, not to mention the money saving!

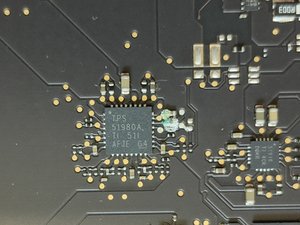
I ended up putting it to one side for 10 months before today I thought I’d take another look after watching a few Louis Rossman videos… check if the fuse had popped, and checking for shorts. But immediately noticed corrosion on two or three capacitors, just outside the TPS51980A. C7500, C7503, and R7552.
C7500 is a "1UF 16v X5R 402", C7503 is a "2.2UF 10v X5R-CERM 402", and R7552 is a "1/20w MF 0201 Resistor".

I went back to my video (linked above) to see if there was any sign of this 10 months ago, but as you can see in the video above, there was no sign of corrosion back then. I wonder if this in a symptom of poor storage, or that the fault was localised there, and took this long to visually expose the symptoms. You can see what I saw today here, in this video: https://youtu.be/7R757tgbKp0

So I grabbed a toothbrush, and 99% isopropanol and gave it a good scrub, then tried to measure resistance, just to write it down. But I couldn’t get a reading, that might have been my shaky hands though. At one point, I thought I saw a reading on one of them, but I may have bridged the two with one of the probes.

The saddest part is that I’m certain that one of them moved a little, and now I’m committed to doing something about this. Either I’ve dislodged it, or the corrosion had weakened the solder connection, and my cleaning it was the final straw.

You can see the post-cleaning video here: https://youtu.be/IA8rg0UzvpY

So, where do I go from here?

Is it a certainty that these two/three components are the problem, or maybe this problem developed in those 10 months due to poor storage?

How do I get a replacement for those components, I’m guessing they are extremely common?

I’m probably going to need a microscope, and a proper heat gun. I’ve soldered plenty of times, but this is tiny work… I’d certainly like to give it a go, because I really want the buzz of having done it myself.

Are there other checks I can do, to ensure that these are the components to blame, and replacing them would almost certainly restore life to the board?

Does my description of it’s history and behaviour tie in with this area of the board being to blame?


Any advice you can give me here would be greatly appreciated.

Thank you ever so much for taking the time to read.

Block Image

Block Image

Block Image

Block Image

Block Image

Answer this question I have this problem too

Is this a good question?

Score 0
Add a comment

2 Answers

Most Helpful Answer

Good on you for getting this far!

It's definitely possible this was your issue all along. Corrosion occurs instantaneously, but if it's only a small amount of moisture, it can become worse over time. Even if the MacBook was powered off, voltage is still present in many places. It could have been the damage was too small to see at the time of initial inspection.

For now, I would ignore the capacitors, you can come back to them if need be. They may be functional after the cleaning.

Your issue is going to be the resistor (R7552). U7501 is a Power IC and the resistor is specifically on the Enable Pin for the 3v3 side of the chip. Enable lines are particularly important, for obvious reasons. If the chip isn't being told to turn on, then it just doesn't.

The resistor in question is a 0 ohm resistor, which basically means it's like a fuse. It's a wire, unless something goes wrong. You can verify this with your multimeter by checking for continuity between the two test points on either side of the resistor. If they are not continuous, the resistor itself will need to be replaced. In theory, you can replace it with a jumper wire, but I tend to recommend against that as a permanent fix since it will not blow like the resistor, which could prevent damage to the chip if there was an issue upstream.

Since this is a 0201 size component, godspeed if this is your first microsoldering repair. It's doable. But those little suckers are tiny. A hot air station, fine point tweezers, and flux will be your best friends.

Block Image

Block Image

Was this answer helpful?

Score 2

2 Comments:

Thank you so much for your message. Yup! This will be my first repair with a heat gun; I've only ever soldered larger components, with an iron...

Ok, so I've tested the R7552 resistor, and this appears to be working just fine, zero resistance, and stable.

Before I begin replacing components, the big scary task, I want to make sure my plan is optimal, so I'm not doing anything unnecessary.

So considering the R7552 appears to be ok, how should I proceed?

ps. I tested at "TP[1]P3V3S5_EN_R" and "TP[1]S5_PWR_EN" test points, to ensure R7552 is soldered in place correctly.

by

If you've got continuity, I would double check to see if you've got any shorts on the lines your capacitors are on. I typically use diode mode for this, but you can check the resistance of those lines to ground. Close to zero resistance (or the same in diode mode) would tell me those components may have caused a short.

Otherwise, if you have not, see if you get power with the trackpad disconnected. The trackpads on the Airs are a hotspot for minor liquid damage that can cause this sort of issue.

by

Add a comment

Well you do have some corrosion on the SMC chip so that does need to be cleaned off using some White Vinegar on a cotton swab to clean the copper oxide (the green stuff) don't over do the vinegar! And after you clean it off you'll need to use some distilled water to wash down the area to clean off the vinegar.And no we don't want tap or spring water as its loaded with minerals!

You'll still need to take the logic board out to work on it.

Its likely the small SMD devices and the chip its self have corrosion under them so you really need to carefully desolder them off (I would use a hot air rework station) you can also use a good soldering iron, but its a bit harder as we need to add solder to the SMD pins so all of them are wet and so you can heat the whole chip at once! When the solder is wet all the way around the chip should just slide off don't push! As you'll damage the logic board pads.

Now with a better idea on what you'll need to fix this make sure you'r up to the task. The SMD IC and SMC devices are available you might want to just replace them.

Given the age of your system it likely needs a new battery as well.

Was this answer helpful?

Score 0

2 Comments:

Hi, thank you for your message. I'm hoping to follow up with you on what you might have meant by SMC, since the SMC looks fine to me, and it's pins are underside. (980 YFE). You go on to mention I'll need to take out the logic board? I'm not sure what you mean, because from the photos, and fact that I can see the underside of the logic board, I have definitely removed the logic board. Did you maybe mean something else, a misunderstanding maybe?

I'm happy to replace the components if needed, but I suspected a reflow is all that's needed... I've got a new battery on standby, as this was the first thing I tried replacing at the very start.

So, with that out of the way... The 3 components that are clearly covered in corrosion, have now been removed. That is C7500, C7503, and R7552.

The R7552 appears to be a zero resistance resistor, and measures as such.

After discharging the 2 caps, they appear to behave normally when charging them with an ohms test.

Please could you clarify what you meant by "SMC corrosion"

by

@dailafing - The chip LM4FS1EH is the SMC controller. Check out Step 7 in this MacBook Air 13" Early 2015 Teardown its the dark Blue marked chip. Often times I find the corrosion creeps under the chips causing problems. Reflowing with a good flux might be all you need. Just don't bet on it. I often had to re-tin the pads and/or patch a line or two.

Sorry about the odd comment of taking out the board I had two questions open and I guess I slipped it in by mistake.

by

Add a comment

Add your answer

Damian will be eternally grateful.
View Statistics:

Past 24 Hours: 0

Past 7 Days: 2

Past 30 Days: 4

All Time: 247