Introduction
We got our hands on a brand-new 3rd Generation shuffle and wondered what was inside...
What you need
-
-
Here it is, in all its magnificent glory -- the new Shuffle! We'll post updates on twitter about interesting things that we discover as we go.
-
The box is as dainty as its contents.
-
According to Apple, the Shuffle has a "true volume" of 4,326 cubic millimeters and weighs in at 10.7 grams. A single MacBook Pro 17" weighs as much as 286 of these Shuffles.
-
Shameless plug: In addition to taking things apart, we also sell Mac and iPod parts and upgrades.
-
-
-
Upon connecting the shuffle to a computer, we learned that the voice-over feature must first be downloaded via iTunes.
-
Interestingly enough, normal headphones can still be used to listen to music. The only drawback: without Apple's proprietary headphone playback control, you will not be able to change songs or adjust the volume.
-
The headphone playback control offers two buttons for volume control and a center button for playback control. The center button can be clicked once to play, twice for the next track, and three times for the previous track.
-
-
-
On to the dismemberment...
-
Apple hasn't made their iPods easy to open lately, and unfortunately we don't expect things to change with this iPod.
-
We begin by inserting a metal spudger into a crevice between the rear cover and the rest of the shuffle.
-
Inserting the metal spudger creates a gap big enough to insert an iPod opening tool. We slide the iPod tool across the length of the gap to dislodge the left side of the rear cover.
-
Now that one side of the rear cover is fully dislodged, it's easy enough to use the iPod opening tool to dislodge the right side as well.
-
-
-
-
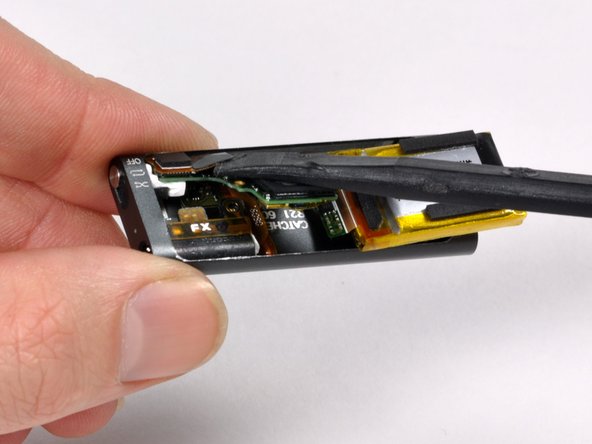
Is this the future? A single IC, a battery, and some user interface components.
-
Amazingly, at least on our scale, both halves weighed 5 grams. That means the entire functional half of the iPod weighs only about 10% more than a single sheet of letter size paper.
-
-
-
Remove the small Phillips screw. We won't waste our time circling it -- there's only one.
-
We get lots of requests to add more screw guides. Fortunately we don't need to make one for this iPod. Just don't drop the screw, and you'll be fine.
-
-
-
It's in three pieces now. There are not many parts in this iPod.
-
This is not a surprise, but like all other Shuffles, the battery is soldered to the logic board. Apple does offer a battery replacement service, but $49 is pretty steep considering the entire iPod was only $79.
-
-
-
The headphone jack and shuffle switch come out as one unit.
-
The back of the casing is stamped 09/03/03. If that means March 3rd of 2009, then this Shuffle has been assembled for no more than nine days.
-
In the third picture, you can see the white translucent piece of plastic to the left of the headphone jack. This serves to transmit the the LED status light to the outside of the iPod.
-
-
-
Apple's claimed battery life on this iPod is 10 hours. That's two hours less than the previous Shuffles.
-
The 3.7 volt lithium-polymer battery lists a capacity of 0.27 watt-hours.
-
To calculate the capacity in amp-hours, we know P(power) = I(amps)*V(volts), so I = P/V. That yields a capacity of about .073 amp-hours, or 73 mAh. That's definitely record-breakingly small in terms of iPod batteries.
-


5 Comments
Please do not try these things at home because the iPod shuffle had no user serviceable parts take it to a apple store so they can fix it.
...says Paul, on a website that is literally named "I" "fix" "it"
lucas s -
Yeah, Umm..
Here On iFixit, We try all we can to fix our things!
Plus apple charges more than they should for fixing it.
can I buy some of these components now?
Impossible. Try opening using a ifixit Essential Toolkit, and measuring the dimensions of the battery using Vernier Calipers. Use those dimensions to search for a lipo battery on eBay. Mostly you will find one (atleast $15-20). Use a multimeter in Voltage mode to test the leads of battery. Desolder them and carefully solder battery (keep in mind that the leads are very thick). In that case, short the leads to length, use emery wire to extend and then solder to the board. Then you can bend the Backcover to shape and reseat it. I would use some mobile adhesive like B-7000 to keep it shut. Totally depends on your skill level as this is very very hard and you must know micro-soldering to achieve this. If any other part gets damaged, find a donar iPod to exchange parts. LiPo battery usually has a limited lifetime. It costs you lot of time, and I would attempt this, if I'm the only survivor on the Earth after Doomsday.