Introduction
We got our new iPod touch 3rd Generation on the morning of September 11, 2009.
Want up-to-the-minute updates? Follow @ifixit on twitter.
Check out the YouTube video of the teardown!
What you need
-
-
The new iPod touch 3rd Generation!
-
It's available in three different configurations, with both the 32 GB and 64 GB sporting a faster processor and OpenGL ES 2.0 support.
-
We don't think anything changed on the 8 GB touch. The only thing we know for sure has changed is the price (it's now $199).
-
According to Phil Schiller, "$199 is the magic price point in the iPod world." However, it sure seems people don't mind paying more. Apple's already sold 20 million iPod touches, all for more than $199 each.
-
-
-
We have a 32 GB touch. It looks identical on the outside, but does sport a new model number on the back, A1318. (The second gen touch was A1288).
-
The iPod touch didn't get nearly as much love as its smaller sibling, the new nano. There's still no camera.
-
For now anyway, if you want both a touch screen and a camera, an iPhone's your only option.
-
-
-
We're working on getting it open. In the meantime, let's have some fun with numbers.
-
Retailing for $399 in the US, you'll be paying $6.23 per gigabyte for the 64 GB touch. That's no match for the $1.56 per gigabyte for the 160 GB iPod Classic.
-
Going back four years, the original nano was $62.25 per gigabyte, while the hard drive-based 60 GB iPod Video of that era was $6.65 per gigabyte.
-
Interestingly, that means that today flash is roughly equivalent to where hard drives were four years ago. In 2005, you could purchase a 60 GB iPod Video for $399, while today you can get a 64 GB iPod Touch for the same price.
-
-
-
According to Apple, the new touch is up to 50% faster. It will be interesting to see how performance stacks up against the iPhone 3GS.
-
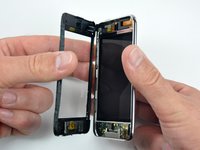
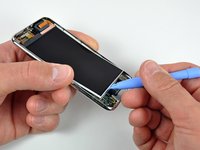
Getting this iPod open wasn't easy. Yes, we keep saying that about iPods lately. Unfortunately, there's not a single currently shipping iPod that isn't very difficult to open.
-
The front glass and digitizer isn't the same as on earlier touches. This is our most popular repair part on the iPod touch. We have these for both the 1st and 2nd generation, and will be adding parts for this one as soon as possible.
-
-
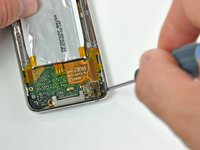
Tool used on this step:Phillips #00 Screwdriver$5.49
-
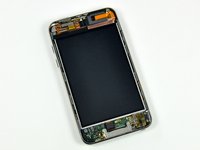
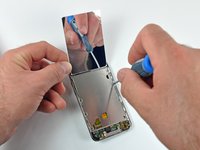
You get a free mirror with every iPod touch!
-
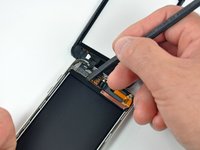
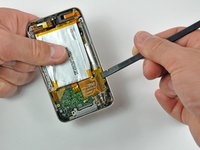
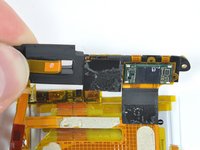
A Phillips #00 screwdriver makes quick work of the screws holding the LCD assembly in the touch.
-
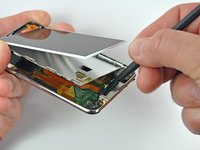
The LCD is very similar, but not identical to that of the 2nd gen touch. The connector on this display is just a tad wider.
-
-
-
-
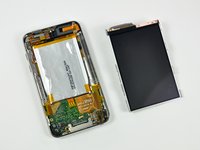
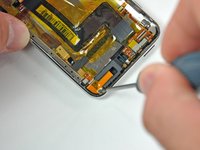
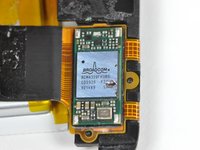
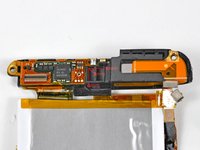
After peeling away the speaker, here's the brains of the Touch.
-
Samsung looks to be the big winner here.
-
The primary ARM processor is adorned with the following:
-
339S0075 ARM
-
K4X2G303PE-SGC8
-
YNE069AC 0928
-
APL2298
-
Is this a new, faster processor? The processor on the last iPod touch (2nd gen) was labelled 339S0048ARM. The processor in the iPhone 3GS is marked 339S0073ARM.
-
-
-
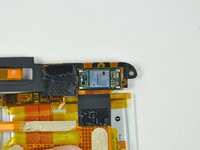
Broadcom BCM4329FKUBG wireless chip.
-
According to Broadcom, the BCM4329 supports 802.11n!
-
This is a big deal, as even the iPhone 3GS doesn't support 802.11n. The iPhone 3GS has a BCM4325 wireless chip, which only supports 802.11 a/b/g. We don't know yet if 802.11n will be supported in software, but at least the hardware's there.
-
There's also Bluetooth 2.1 + EDR and a FM receiver and transmitter packed into this chip. If they built in the antennas, and if Apple adds software support, you could theoretically stream music to your car stereo without any external hardware. But that's a lot of ifs.
-
-
-
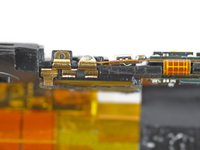
It appears that Apple left in room for a camera in the top of the device. There is a 6mm × 6mm × 3mm space between the Broadcom chip and the wireless antenna. There isn't enough depth for an iPhone-style autofocus still camera, but just enough room for the camera that Apple used in the 5th generation iPod nano.
-
-
-
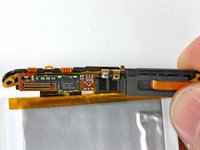
Other side of the board.
-
Not enough hardware for you? Just yesterday, we did a teardown of the 5th generation iPod nano.
-
Shameless plug: We sell hundreds of iPod parts for repairing your iPod touch, replacing an aging iPod battery, or fixing a cracked screen.
-


8 Guide Comments
Well, I took mine apart and at some point it stopped working. If you're careful it will probably still work if you put it back together (mine was more like an autopsy because the touchscreen already didn't respond to input. I was then dumb enough to short the battery hoping the voltage drop would reset it, but now I probably also killed the battery. It could theoretically still be made usable with quite a bit of effort, but it wasn't even that great when it was new.
if my screen starts glitching out like as if the wire is loose is there a way to fix it my self
it's fine now but soon it'll start up again so is there a way to fix it my self like what materials would i need to set it back
My iPod screen replacement didn't come with the mirror that is supposed to be attached to the back of the screen upon replacement for the new one