Introduction
Overview of the Sony Ericsson XPERIA X1 hardware with circuit diagrams and labeled chips.
What you need
-
-
The Sony Ericsson XPERIA X1 is one device that’s not afraid to brag. It’s got the looks of a sophisticated modernist, an interface to temporarily boast, and the price tag that’ll blow up your mind and your surrounding minds.
-
For this phone, we had to be particularly careful when we tore it open (we love our gadgets, after all). It was relatively easy, but hidden screws are always deadly. Luckily, the shielding on the chips were easily removed.
-
-
-
This device is one of the most gorgeous devices I’ve seen. Not only does it look good, it feels like a million bucks (it actually does cost a lot though). The sliding mechanism is the smoothest and most solid mechanism to date and actually tilts the screen slightly towards you. It works, and it works well. There’s absolutely no give to the device due to its brushed aluminum components. Heck, the battery door is fully aluminum, the base of the keyboard is aluminum, even the keys feel aluminum (we’re not sure they actually are though).
-
-
-
The 4-rows of keys is definitely useful for regular typing though, and it’s even laid out with a staggering QWERTY effect that makes it easy to get used to. Unfortunately, the keys are very flush and rather soft, giving it subdued tactile feedback. Technically, this is a general complaint about slide-out keyboards, because they have to be nearly flush so that the screen can slide on top.
-
-
-
-
And of course, the screen. The X1 sports one of the first WVGA (800×480) screens, and it’s beautiful. Colours are vibrant, small texts are clear and very visible. It’s sad that they’ve chosen to run with a resistive touchscreen rather than a capacitive, of course, they’ve given it one of the best resistive displays, with very fine film-to-screen gaps. It’s also quite responsive.
-
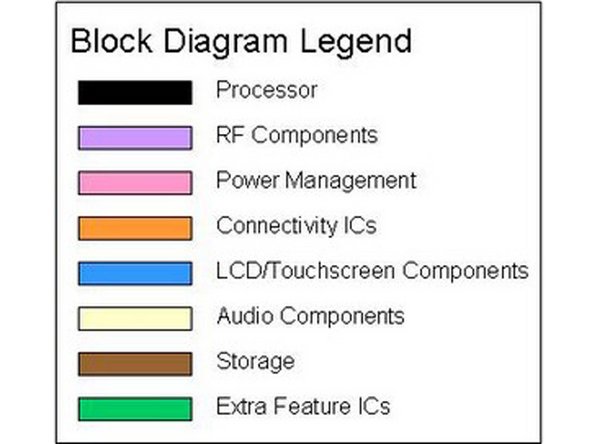
As always, the block diagram can be found here.
-
-
-
The main IC diagram can be found here.
-
Another interesting thing to note is the Mini-USB port. It’s actually eerily similar to HTC’s traditional ExtUSB ports. In fact, it looks just like it except that it’s symmetrical enough to only fit a Mini-USB connector inside.
-
There’s not too much to note on the front except the USB PHY, which we believe to be developed by SMSC. Again, similar chips with similar markings were found on other devices.
-
-
-
Finally, on the right, there is a connection to the front CMOS camera. Both camera modules are shown side by side, below.
-
If you have questions, comments, concerns, humorous anecdotes, be sure to let us know in the comments or through e-mail (phonewreck@gmail.com). Also be sure to visit the wiki for more pictures (http://www.phonewreck.com/wiki/index.php...)! Thanks!
-