Introduction
While Google hosts a scavenger hunt, iFixit has taken a step further and uncovered our own treasure, the Samsung Series 5 3G ChromeBook.
Has Google changed much since the prototype Cr-48 Chromebooks were sent to developers late last year? Join us as we reveal the inner-most secrets of the Series 5 3G ChromeBook.
For the most up-to-date information, follow iFixit on twitter.
What you need
-
-
The Samsung Series 5 Chromebook is the first ChromeOS notebook offered to the public.
-
It features:
-
A 1.66 GHz Intel Atom N570 Processor and integrated Intel NM10 Graphics
-
2GB of non-upgradeable DDR3 RAM
-
12.1" Matte LED-backlit LCD display
-
16GB internal SSD
-
802.11 b/g/n Wi-Fi and Verizon 3G WWAN connectivity
-
SD card reader and two USB 2.0 ports
-
-
-
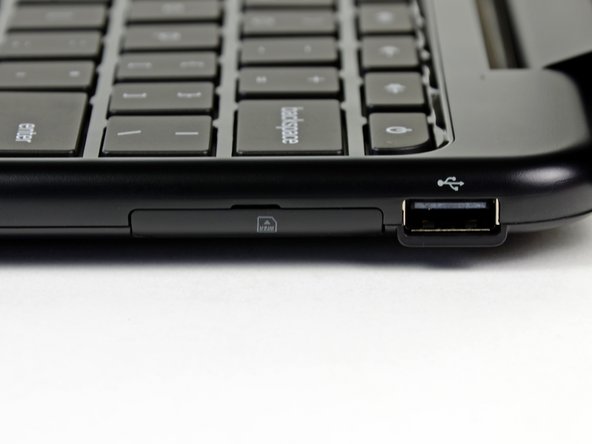
Along the left edge lies the power connector, fan vent, rubber door for Mini-VGA and USB ports, and a headphone/microphone jack.
-
The SD reader is on the front left face of the machine for all you shutterbugs and mini-storage freaks.
-
Finally, along the right side is the door for a USIM card and another USB port.
-
-
-
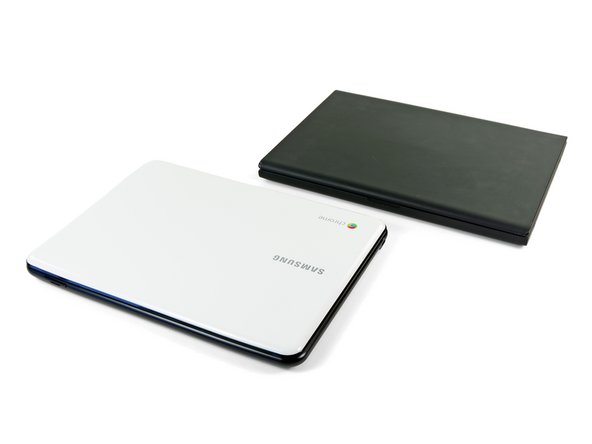
Before we start tearing this device apart, let's do a little comparing to Google's previous developer-only Chromebook, the Cr-48.
-
The outer exterior of the Series 5 is much more elegant than its ancestors, and a bit slimmer as well.
-
Both feature nearly identical keyboards, and playing around with the machine for a bit revealed that the Series 5's trackpad is an improvement from the Cr-48.
-
Sadly, Samsung's legalese-speaking technical writing department made their safety instructions much more boring than those included with the Cr-48.
-
Enough jabber, let's crack this thing open!
-
-
-
We decided to pop open the Cr-48 to see how it compares to the new Series 5.
-
The similarities include:
-
Separate motherboard & I/O board layout with mini-PCIe cards for WWAN, Wi-Fi, and flash memory.
-
Intel NM10 graphics cards are used in both machines.
-
The major differences are:
-
The Cr-48 has removable/upgradeable RAM, while the Series 5's RAM is soldered to the motherboard.
-
The Cr-48's battery is accessible from the outside of the machine, while the Series 5 must be cracked open to swap out the battery.
-
The Series 5's Atom N570 processor sports dual cores with a total of 512K more L2 cache than the Cr-48's single core Atom N455.
-
-
-
-
Big players on the Qualcomm Gobi2000 WWAN board include:
-
Qualcomm MDM2000
-
Samsung K4X56323PI 32 MB Mobile DRAM
-
Qualcomm RFR6500 receiver
-
Qualcomm RTR6285 UMTS transceiver with GPS
-
-
-
After removing its mounting screw, the 16 GB SanDisk SDSA4DH-016G SSD can be removed from the motherboard.
-
-
-
Front and rear side of the motherboard:
-
1.66 GHz Intel Atom dual-core N570 processor
-
Intel NM10 Express Chipset (labeled as CG82NM10)
-
Realtek ALC272 4-Channel High Definition Audio Codec
-
Samsung K4B2G0846 HCH9 2 Gb DDR3 SDRAM (total of 8 IC's = 2 GB RAM)
-
SMSC MEC1300-NU
-
SLG8SP513V clock generator
-
SMSC EMC2112 Fan controller
-
-
-
At this point, not too many interesting components are left in the Series 5's chassis.
-
The I/O board can be removed at this point, and it isn't all that appealing. It simply serves to transmit information from the motherboard to the mini PCIe communication cards, USIM card, USB port, and right speaker.
-
The speakers are held on with little strips of tape and can be removed at this point. No word on how they sound just yet but judging by their diminutive size and fabric domes, they probably won't be popping eardrums anytime soon.
-
Removing the SD card reader reveals the widely-used Realtek RTS5138 SD reader IC.
-
-
-
Samsung Series 5 3G Chromebook Repairability Score: 6 out of 10 (10 is easiest to repair)
-
SSD, Wi-Fi, and WWAN, and most other components are individual modules that can be replaced independently
-
Display is very easy to remove
-
Mostly-plastic construction feels a little cheap
-
RAM is not replaceable
-
Battery cannot be removed without opening the case
-


7 Comments
Just a comment. I don't want to sound rude but it looks like Samsung just took a bunch of old parts and connectors and put this notebook together. Very little looks like it was customized for this device. I'm not saying this is bad but I would have hoped Google/Samsung would have made a better attempt at providing a quality product. This looks like the typical Dell computer with a bunch of Fry's rip-off parts.
We're just so spoiled by the elegance of Apple laptops, that industry standard looks bad in comparison :)
Just pointing out a major difference: The N570 processor is dual core while the N455 processor is single core.
It would seem based on this new UI, Google may be looking to do what Apple has. Create a PC OS that is integrated with a Mobile OS. Wouldn't be surprised to see ChromeOS replace Android in the near future. Would certainly give Android a refresh with all the fragmentation issues it currently has.