Introduction
The PowerMac G4 MDD (Mirrored Drive Doors) was apple's G4-Based Flagship from 2002-2004. All revisions of this computer can run leopard (With 512MB+) It has a mirrored finish on the drive covers, hence the term "Mirrored Drive Doors." This computer replaced the powermac G4 "Quicksilver" and was replaced by the PowerMac G5 In 2004. These computers came with CPU's with the following clock speeds; 867Mhz, 1Ghz, and 1.25Ghz in single and dual configurations, as well as a Dual 1.42Ghz Model. Later revisions of the 1.25Ghz and Dual 1.42Ghz Models supported AirPort Extreme instead of original Airport, and FireWire 800, These Computers were the first macs that could not boot into OS9.
What you need
-
-
The Power Mac G4 MDD: the last, and the fastest G4-based Mac. This computer boasted up to a Dual 1.42GHz PowerPC G4 CPU (though I have a single 1.25GHz).
-
Two USB 1.1 Ports
-
Assorted Audio
-
Video (ADC & DVI)
-
Networking (RJ-45 Ethernet/56k Modem)
-
Some later model MDD's (such as the dual 1.42GHz) Have a FireWire 800 Port Here:
-
-
-
The ram is between the graphics card, and the CPU, and removal is simple. Push the tabs down on both sides, this will free the ram, then lift it out.
-
The MDD uses a maximum of 2GB PC2700 DDR RAM (512MB X4) and has 4 slots.
-
-
-
The AirPort card is located next to the graphics card.
-
If your computer has a FireWire 800 port between the FireWire 400 Ports and the Ethernet Ports then your computer uses an AirPort Extreme 802.11g Card (See Related Parts). If your computer has no firewire 800 port, then your computer uses an 802.11b AirPort PCMCIA Card (Also See Related Parts). Removal of both cards is pretty much the same.
-
First disconnect the antenna from the card, it may be helpful to use a spudger or flathead screwdriver.
-
Now, grasp the plastic tab on the back of the card and pull it out of the computer.
-
-
-
-
Once the cables are free, set the drive cage aside.
-
To remove the hard drives from the cages, remove the four screws on the sides of the cage that are connected to the drives, then slide the drives out.
-
The two cages are cross compatible and can be put in either location.
-
The MDD does not have a 128GB drive limit like older Macs. My MDD has 3 drives (a 400GB Hitatchi Deskstar, 40GB Seagate Barracuda 7200.7, and a 30GB Quantum Fireball LCT).
-
Note the ID jumpers on the two drive set. One is set to Master, the other to slave. A single drive can be set to Cable Select.
-
-
-
The Power Mac G4 MDD uses a Mac-Compatible AGP Graphics card with ADC, And DVI or VGA.
-
My mac has a NVIDIA GeForce4 Titanium with 128MB of video ram, this was an excessively large card, for some reason.
-
Start by removing this Phillips screw.
-
-
-
Using a flathead screwdriver, spudger, or your finger pull this tab towards you, and lift the card out.
-
The "excessively large" NVIDIA GeForce4 Titanium 128MB. This was one of the most powerful cards on the market when this computer was released, now, there are flashed cards such as the Radeon 9700 Mac, but this is the most powerful AGP ADC supporting card, great for gaming, Photoshop, and other 3D intensive applications.
-
-
-
The Power Mac G4 MDD Supports four PCI Cards, allowing for SCSI, sound, wireless networking (only AirPort compatible clones) USB, FireWire, etc. The PCI slots do not, however support PCI graphics.
-
Remove the screws for any occupied PCI bays.
-
-
-
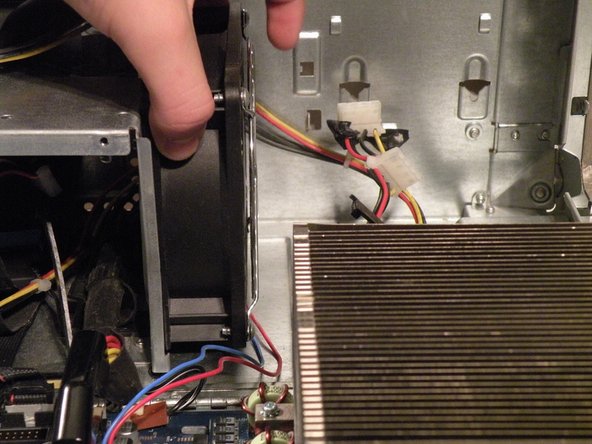
You may find removing the system fan is unnecessary to remove the power supply cable from behind it, but if you're unfamiliar with how the power supply cable is situated behind the fan, this step is useful in seeing this.
-
Disconnect the optical drive IDE/ATA-33 cable from the logic board.
-
Disconnect the system fan 2-wire power cable connector from the logic board.
-
-
-
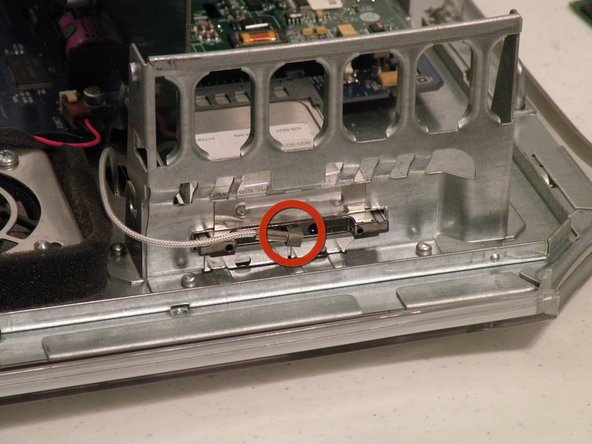
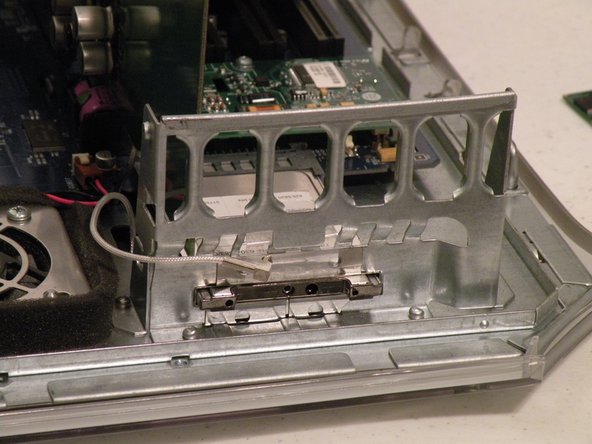
To remove the power supply connector from the motherboard, push the top end of this clip towards the power supply connector, and pull the connector up and off the motherboard. If the connector seems to be stuck, rock it back and forth a tiny bit to loosen up the connection, then pull up again.
-
-
-
The power supply has a 24-pin connector with non-standard voltages, so dropping in a 24-pin ATX power supply without modification isn't a great idea.
-
The power supply connector has a 25V lead to drive Apple ADC displays, so though it is possible to modify an ATX power supply, it won't be able to drive ADC displays, just VGA, or DVI, though the computer will work fine (I've actually tried this).
-
It also has three 12V/5V rails to drive all six drives (four hard drives, two optical drives) simultaneously. This is the only Macintosh computer other than the Mac Pro to support six drives.
-
-
-
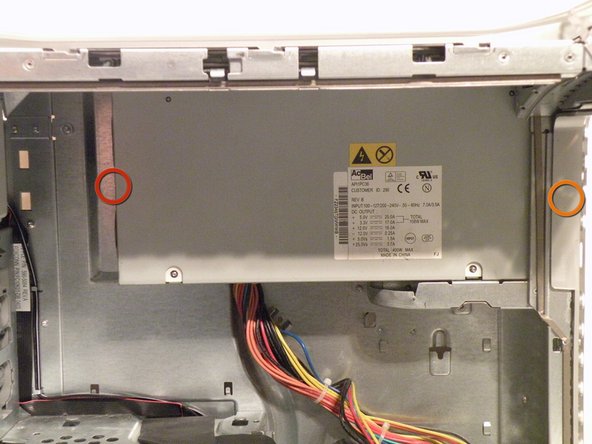
Now, remove these three Phillips screws:
-
As there are two Phillips screws well, there are two that you can see in the photo, but you want to remove the screws that are behind them.
-
-
-
The Powermac G4 MDD's, Guts Spilled On My Desk:
-


Team

7 Comments
Hi, thanks for the good job you do, I'm restoring my old G4 MDD and I wanted to know if it's possible for you to be able to install a 256gb ssd on this machine using a common sata - ide adapter. Does Leopard really run too? And how is the performance?
Hello, Carlo Sciarra. I'm sorry if this doesn't just respond to you directly. I am a little of an extreme apple fan, but I may be able to respond to you. As said, this is Apple's strongest Product in their G4 Line. If this is true, yes you can run Leopard on here. The 256GB SSD, you won't get your hands on a compatible SATA SSD for this because as far as I know there is no SATA Compatibility. I've never owned this product until today, so I don't know if it will run Leopard. It did release on August 31, 1999 after all. But, if that final picture is taken not being photoshopped or having the BIOS flashed in some way, it could very well work with Leopard. That's everything I have to say.
Not sure you should refer to yourself as "a little of an extreme apple fan" if you think the G4 Mac MDD came out in '99.
While it is true the first gen of the G4 Mac came out in 1999, this version, essentially the 3rd generation G4 Mac, known as the Mirrored Drive Doors model, most definitely did not. Not only was it not released on the 31st of August as you say, but more importantly, it wasn't even released in 1999.
It wouldn't be until a few years AFTER the close of the 20th Century that the G4 Mac MDD would make its way to the public. Almost 3 years after, to be more precise. It was on the 13th of August (not the 31st) and it was in 2002, so not 1999, that the G4 Mac MDD was released.
Just thought I'd point that out to you. After all...Knowing is half the battle! #themoreyouknow🌈
I have a Sonnet PCI card that has 2x SATA ports & 1x UltraATA100 port. Currently is installed in my classic PM Dual 1.25G4 MDD. AFAIK, it will drive any SATA III device, such as a SSD... At this time I have only tested it with two old 2.5" SATA 5400rpm HDD's I pulled from some old laptops (320GB, 500GB) and they seem to work fine for data drives. I think I shall test some SSD's I have on hand to see if the card will recognize them. Would be nice, as any SATA SSD, would be faster than an ATA66 HDD.