Introduction
We got our hands on the new Nintendo DSi.
What you need
-
-
It's here! It's here! Whoopee!
-
Contents of the box:
-
Nintendo DSi
-
Operation Manual
-
Quick Start Guide
-
AC Adapter
-
Extra Stylus
-
An invitation from Mario's hat to join Club Nintendo.
-
-
-
A side by side comparison of the Nintendo DS Lite (left) and the Nintendo DSi (right).
-
The DSi has a new skin: a matte-black (almost dark gray) color that feels much rougher than the DS Lite. The roughness allows for better grip of the system, as well as improved scratch resistance.
-
The DSi is 3 mm thinner than the DS Lite, while its length and width increase by 4 mm and 1 mm, respectively.
-
The DSi comes with 3.25" LCD panels, a full 0.25" larger than the previous model's 3" panels.
-
-
-
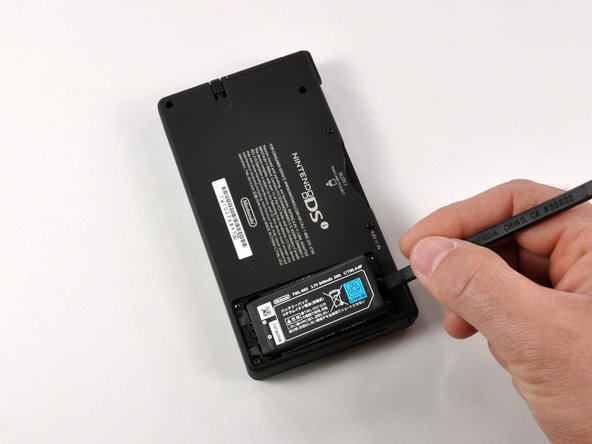
There are a total of seven screws that hold the lower case of the DSi together:
-
Three are immediately visible without removing any plug or cover.
-
Two plugs near the top of the unit have to be removed to reveal two screws.
-
Removal of the battery compartment reveals two additional screws that need to be removed.
-
-
-
-
A comparison between the old and the new. There are definite differences between the DS Lite (left) and DSi (right).
-
The DSi uses a smaller 840mAh rechargeable battery (right) compared to 1000mAh for the DS Lite (left). The difference in size is proportionate to the difference in capacity. The original Nintendo DS shipped with an 850mAh battery.
-
-
-
The upper half with outer case removed.
-
The antenna board for Wireless LAN is mounted in the upper right corner of the chasis.
-
The ribbon cables for the top display and cameras are coiled and routed through the hinge between case halves. We'll go ahead and add that to the list of parts we want to watch a robot assemble.
-
The thin orange wire seen in the second photo is for the microphone. Little DJs everywhere will drool over a new feature allowing users to distort the pitch and speed of music during playback.
-
-
-
Eight Phillips screws secure the battery compartment and the stylus tray/SD/SDHC expansion slot to the case.
-
The DSi has an integrated SD/SDHC expansion slot. You can now use a normal SD card for the playback of AAC audio files and external storage of pictures or downloaded software. Can anyone say homebrew apps?
-
-
-
The logic board in its full glory.
-
Chips of interest, left to right:
-
Samsung 1st generation MoviNAND KMAPF0000M: 256 MB NAND Flash and MMC controller. The integrated MMC controller allows the CPU to offload the complex work of directly talking to the flash memory.
-
82DBS08164D-70L: Fujitsu Ltd 128-bit FCRAM (fast-cycle RAM) chip.
-
Nintendo's custom ARM CPU. Our CPU was manufactured in September of 2008.
-
-
-
Nintendo DSi... REST IN PIECES!
-
Chips of interest:
-
Samsung 1st generation MoviNAND KMAPF0000M: 256 MB NAND Flash and MMC controller. The integrated MMC controller allows the CPU to offload the complex work of directly talking to the flash memory.
-
82DBS08164D-70L: Fujitsu Ltd 128-bit FCRAM (fast-cycle RAM) chip.
-
Nintendo's custom ARM CPU. Our CPU was manufactured in September of 2008.
-


10 Comments
This is Nintendo DSi Teardown
Wow I never would have guessed that
I would like to contribute to iFixit by doing a 3DS XL Teardown. (2012), but i do not have the console.
You should be careful when removing the L button assembly and moving a case. There’s a small square pocket in the case which houses a small square nut which is where the top screw from the battery lid fastens to. The black piece that keeps the L shoulder button assembly in place also holds this nut. Once you remove it, the nut is free to come out and can be easily lost.