Introduction
It seems as though all the hot new electronics these days are tablet-this, phone-that. Frankly, our engineers had enough. Their spudgers were getting soft; we needed to do something that would present a *challenge* and get them sharp again -- none of the take-off-a-display-to-find-a-motherboard baloney.
We knew exactly where to turn. We've done a set of Nikon D70 repair guides in the past, and we saw how difficult it was to take apart an SLR. What better way to infuse a bit of fun in our teardowns than taking apart another SLR?
So, in the name of science and all that is right in this world, let's see what's inside the brand-new Nikon D5100!
What you need
-
-
The first thing we noticed about the D5100 was that the body was nowhere near the same heft as our standard workhorse camera, the D90. It just felt... punier.
-
And then we took some photos with it.
-
The photos came out amazing. The colors were crisp, and we could even get away with usable (albeit super-grainy) ISO 6400 shots, which is certainly not the case with the D90's ISO 3200.
-
-
-
The flippy rotating screen is very useful -- especially if you're trying to record yourself for YouTube.
-
Unlike the D90, the top of the camera does not include an informational LCD. Instead, we get the rotating mode selector on the right.
-
The specs:
-
16.2 MP DX-format CMOS sensor
-
4 FPS continuous shooting
-
3.0 inch, 921,000-dot display
-
1920x1080 recording at up to 30 FPS
-
11-point AF (auto-focus) system
-
-
-
First thing's first: take out the battery. We don't want any electric juice running through the D5100's veins while we're taking it apart.
-
The 7.4 V 1030 mAh EN-EL14 Li-ion battery is used by the D5100, D3100, and the COOLPIX P700. Sadly, it's not compatible with other cameras in the Nikon lineup, such as the D90 and D7000.
-
-
-
The camera has roughly 4 billion screws holding it together. We'll be skipping a lot of the "unscrewing this screw" pictures (like the ones shown in this step) in order to keep the teardown interesting.
-
Trust us, after the 50th screw, it gets boring.
-
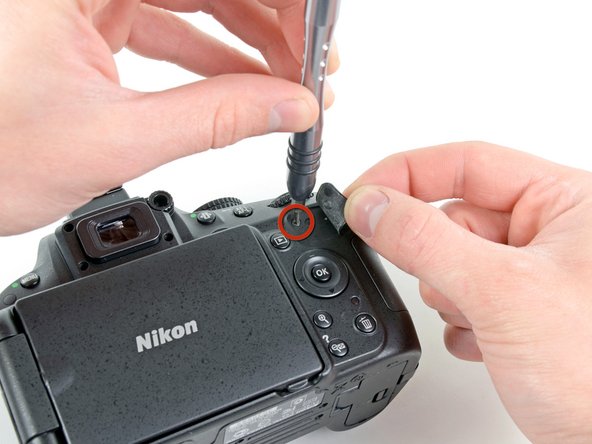
As if exposed screws weren't enough, Nikon also chose to hide screws underneath covers and the rubberized thumb grip.
-
-
-
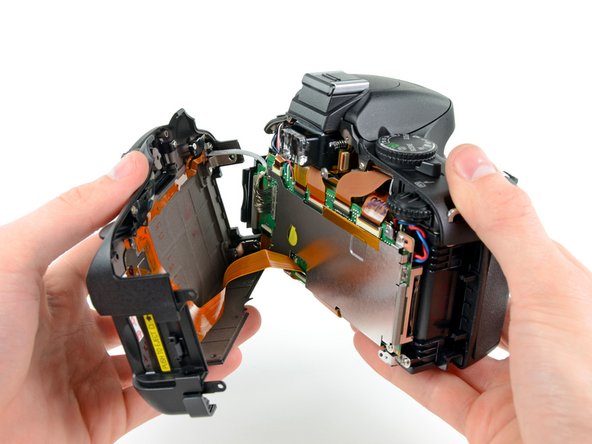
After a good twenty #00 Phillips screws were removed from the perimeter of the device, we managed to separate the rear cover.
-
A ribbon cable for the rear control buttons and a hefty 40 pin cable responsible for transmitting information to the rear display still attached the rear cover to the rest of the camera.
-
-
-
-
Front view of the motherboard. (High-res version of the motherboard, click here):
-
Nikon EXPEED 2 EI-154 1051 Z05 image processor
-
Samsung K4T1G164QF-BCE7 1Gb DDR2-800 SDRAM (total of 3 Gb = 384 MB)
-
MXIC MX29GL128EHXFI-90G 128 Mb parallel flash memory
-
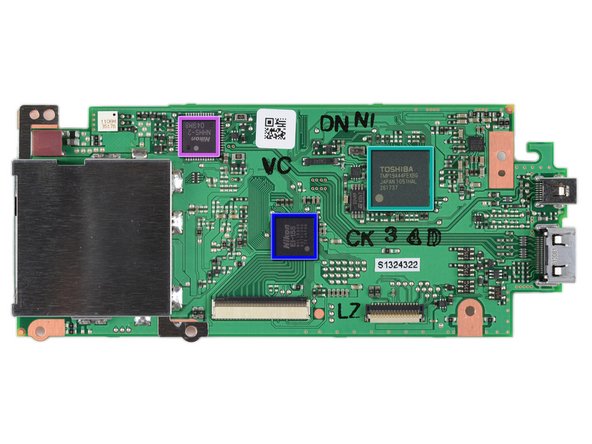
Rear view of the motherboard. (High-res version, click here):
-
Toshiba TMP19A44FEXBG low-power microcontroller
-
Nikon EI-155 M4L1BA00 00151044
-
Nikon NHHS-2 049M8
-
-
-
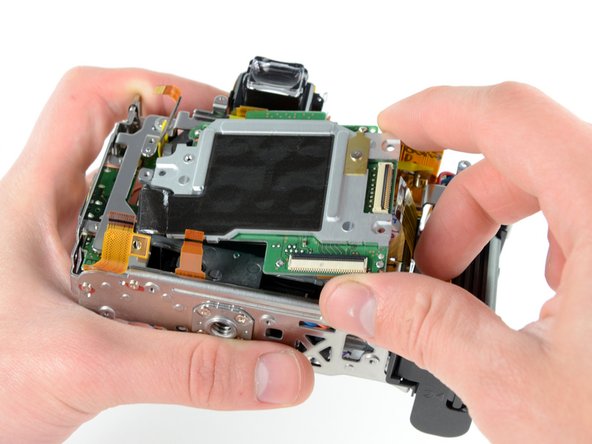
And just like that, the front cover can be pulled off the camera body.
-
With it gone, you can get a good look at most of the components that make the D5100 roar.
-
An electric motor (presumably linked to the shutter) can be seen next to the battery door, and the gigantic flash capacitor is housed right behind the lens release button.
-
-
-
The top cover is a feat of engineering by itself. Within its walls are contained:
-
Main control wheel, shutter/aperture control wheel, live view lever, On/Off switch, "info" button, record button, shutter button, exposure compensation button, IR sensor, AF lamp, flash, flash control circuitry, flash actuator, and the microphone.
-
-
-
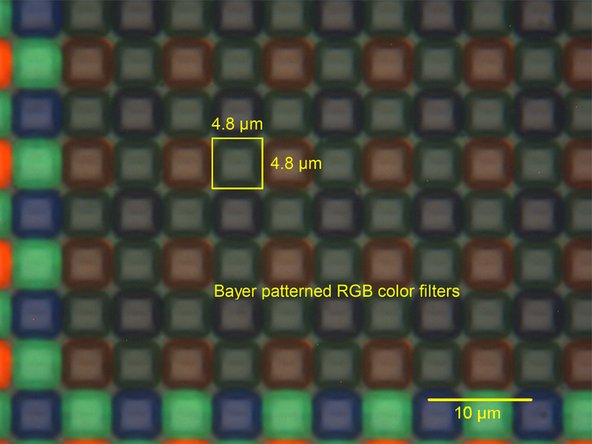
The D5100 utilizes a 16.2 megapixel DX format CMOS sensor to capture images.
-
Chipworks reports that each pixel is 4.8 µm wide. That's about half the diameter of a red blood cell!
-
The sensor has a special glass cover that turns red when viewed at an angle. Neat! (This is the "hot mirror," which filters out the infrared spectrum.)
-
-
-
Nikon D5100 Repairability Score: 2 out of 10 (10 is easiest to repair)
-
The battery can be easily replaced by opening the compartment with your thumbnail.
-
The rear cover comes off with minimal unscrewing/desoldering (for this kind of device), allowing you to access the motherboard.
-
The D5100 has several wires that need to be desoldered in order to take it apart.
-
Approximately 4 billion screws hold the device together.
-
Components are very tightly packed, making it more difficult to disconnect and remove them.
-
For absolute safety, you need to discharge the flash capacitor, otherwise you risk accidentally killing your camera.
-


26 Comments
Thanks a lot! This camera has already made history for me. Because on April 10th I bought a Nikon D3100, not knowing about the new D5100. The day the camera arrived I went to the Nikon web site, where I could now look at the "New Nikon D5100". I was very uncomfortable about that and couldn't sleep all night. In the morning I packed up the D3100 and send it back. The advantages of the D5100 over the D3100 make the couple a hundred bucks extra look ridiculously cheap. Alone the LCD Panel!
While it is with great pleasure to see You doing what I always loved to do, but my new 5100-Baby shall not be tampered with by Yours truly.
This is GREAT !! This has already helped me (by letting me know it was safe to wriggle-off the rubber side-plate over the a/v area). Just to confirm though: Am I correct in thinking that the front can be removed independently from needing to (previously) disassemble the back ? For most consumers - their audacity ends with ribbon-cables and certainly before desoldering... but "screws, i can do". Also - how exactly does one "non-destructively" remove the rubber hand-grip?
These questions are likely to become increasingly relevant because this camera is bound to be a runaway hit. But since N_kon doesn't want to undermine their more-expensive "pro-ish" offerings, they seem (IMHO) to be "de-faciliting" certain features and accessories (like a vertical grip). This means than D5100 owners will be searching for hacks that don't discernably void their warranty (i.e. "future un-doable hacks"). THANKS !!
Super, used this to repair a D3100, the only extra trick was removing the diopter adjuster label to access hidden screw, otherwise as per your guide!
How did you remove the diopter label?!
Randy11 -