Introduction
Did it come from outer space? Did it rise up from the depths of the lost city of Atlantis? How much of it was really made in the United States? When Google announced the Nexus Q at the I/O keynote on June 27, 2012, we decided to take one apart and see what we could uncover. Join us in our quest to quell our quandary!
Did you miss our Nexus 7 teardown from two days ago? Want to make sure you never miss another teardown? Follow us on Twitter!
You know what would pair well with the Q? The iFixit Android App, that's what. Download it if you're keen on viewing iFixit's awesome repair guides in a native format!
What you need
-
-
We tried queueing up the Nexus Q with songs, but after staring at its flashy lights for awhile, we decided to do what we do best: tear the sucker down.
-
Google's glowing orb features:
-
16 GB internal flash memory
-
1 GB RAM
-
32 RGB perimeter and 1 RGB mute indicator LED
-
OMAP4460 (dual-core ARM Cortex-A9 CPU and SGX540 graphics core)
-
Android 4.0 "Ice Cream Sandwich"
-
As an added bonus, we've identified (to the best of our ability) the country of origin of each integrated circuit we found throughout the teardown.
-
-
-
Here's our first view of the Nexus Q plugged in. Not sure if your device is actually a Q? Check out this helpful video.
-
Round like a circle? Check.
-
Little tail? Check.
-
Chances are you have a Q in your hands!
-
Flipping the device over to check out the zinc base, we see our first clue that this device is both "Designed and Manufactured in the USA."
-
-
-
Seated in the back side of the base are the I/O ports:
-
Speaker Ports (Banana Jacks)
-
Optical Out
-
Ethernet Port
-
Micro HDMI
-
Micro USB
-
AC-in Power
-
As we fetch our sledgehammers and chainsaws to begin the teardown, we find this safety information card. We'll try to follow some of these instructions. Sorry numbers 4 and 10.
-
-
-
We are told that this device is designed and manufactured in the USA, but the name makes us wonder if the British Secret Service may be involved. We're watching you, Q.
-
If Q is hiding in here somewhere, he isn't very well fortified. The endless-spin volume/select dome pops off with little effort -- no screws or glue hold it in place.
-
The touch-sensitive matte black dome contains a diffuser for the status LED. The small clips that line its circumference snap into the base of the Q so it can rotate endlessly.
-
-
-
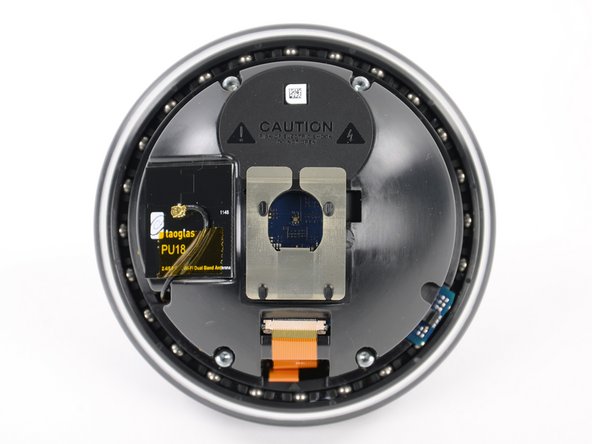
We are kindly greeted by our first warning label. "Risk of electrical shock. Do not open." Thank you, Google; just like a good big brother, you're always looking out for us.
-
Our spudger interferes with Q-mmunication as we disconnect the taoglas PU18 2.4/5.0 GHz Wi-Fi Dual Band Antenna.
-
-
-
On the inner dome we find a small daughterboard held in by a T6 Torx screw. It's labeled as E2230JG along with a barcode.
-
Mounted on the daughterboard is the OMRON EE-SX1131 Photomicrosensor (manufactured in either Santa Clara, CA or Schaumburg, IL.)
-
Photomicrosensors are small photoelectric sensors that provide reliable position sensing in a space-saving and cost-efficient package.
-
-
-
Hey, we're not just a bunch of quacks in an office, we do real stuff as well!
-
We sell parts and tools in order to achieve our goal: to continue building the free repair manual for everything in the world.
-
Tools like this handy-dandy electronics tool kit that we use to take apart the newest gadgets. We assembled the most-used iFixit tools and put them all in one kit for your convenience.
-
Aside from the usual Mac and iPhone thoroughfare, we also carry parts for other devices. Want to fix your dead AirPort Express? We have a kit and guide for that.
-
Heck, there's even a product called the Monster Battery Pack 9000. Trust us, it's legit (it goes to 11).
-
-
-
-
Using a T6 Torx bit from our 54 bit driver kit, we remove another daughterboard from the inner dome.
-
Located on the board are a few notable ICs:
-
Atmel ATMEGA328P (manufactured in Colorado Springs, CO or Nantes, France)
-
NXP Semiconductors 44501 Near-Field Communications Controller (manufactured in Germany, China, UK, Netherlands, or Singapore)
-
TXC 8.00 MHz Crystal Quartz Oscillator (manufactured in Taoyuan, Taiwan or Zhejiang, China)
-
YF04E
-
Status LED
-
-
-
Inside the dome also rests the NFC antenna assembly. Perhaps this allows us to contact the Q Continuum?
-
The antenna comes out easily, leaving the metal part permanently attached to the inner dome.
-
The inner dome, a key component of the Q's spherical design, is one of the parts that we believe to have been manufactured in the USA. Word on the street is that when design changes arose, the Google engineers could quickly implement these changes by meeting with local manufacturers, as opposed to flying to foreign countries.
-
-
-
Another few twists from our screwdriver frees the ball bearing ring from the Q.
-
Surrounding this ring are the couple of dozen steel balls that make up the ball bearing. The clips on the volume control dome snap into the ring to allow it to spin…for-ev-ver.
-
We imagine that cleaning dirt and dust from the Q bearings would only require a few tools and a Q-Tip.
-
-
-
Holy Capacitor, Batman! As we delve further into the Q, we encounter a wide array of capacitors. The largest of them being a 400 V, 82 microfarad capacitor.
-
Physics time! If the capacitance is 82 microfarads, and the voltage is 400 V, that means that this capacitor can hold a charge of 0.033 coulombs.
-
So in this case, Q = 0.033 coulombs
-
-
-
Cue the lights! With the diffuser out, we gain access to the LED board. The perimeter of the Q is lined with 32 RGB LEDs, enabling it to put on one heck of a light show.
-
The board also houses two Texas Instruments TLC5947 24-channel, 12-bit PWM LED drivers with internal oscillators, which could've been made in one of several locations in the world.
-
And the rings continue to appear. Could this be the last of them? Only time will tell…
-
-
-
Let's be serious for a minute. We're not just a bunch of punny folks, we also make software for teaching people to do things. Dozuki makes it easy to create vibrant how-to manuals.
-
Dozuki is great for:
-
Standardized work instructions: improve quality by documenting how to get things done, one step at a time.
-
Building product support sites: make your customers love you by teaching them how to do amazing things.
-
Training and e-learning software: we've used Dozuki to teach over ten million people to repair electronics.
-
Online community platform: build a knowledge base of expert knowledge with Answers, the Q&A engine that drives the popular iFixit Answers.
-
-
-
Before we examine the rest of the Q's internals, we remove some thermal pads and rubber foot to take a look at the die-cast zinc base dome.
-
The whole Q weighs 923 grams (about 2 pounds), according to the Google Play website. The hefty base accounts for 423 grams, or 45.8% of the total weight!
-
Google's push to quickly implement design iterations without sending engineers overseas resulted in the dome's components being produced in the USA.
-
Our question is: will you spend a little more in the store for a tag in the back that says USA?
-
-
-
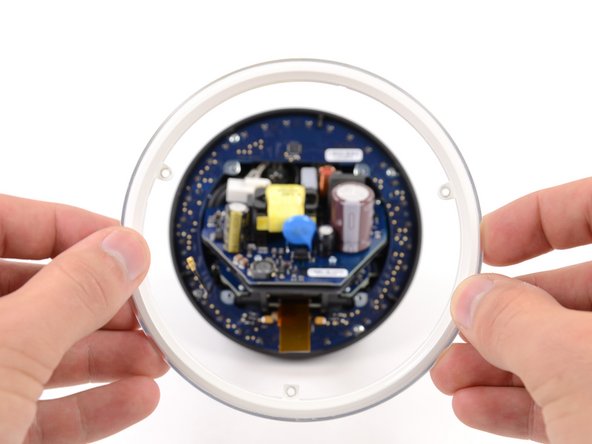
We've gone too far and unleashed the Q's sentinel guardian!
-
Whew! Turns out it's only the internal assembly of the Nexus Q. Crisis averted. Let's take it apart.
-
Just in case this little guy sparks to life and tries to kill us, let's first take out the power supply. The integrated 35 W switching power supply sports a world-ready 50/60 Hz 85-265 V AC input.
-
-
-
Removing the audio board requires disconnecting the speaker terminal wires from their respective posts located on the back of the speaker ports.
-
How did we know this was the audio board? Easy. It bears a striking resemblance to one of our favorite musicians.
-
Featured on the audio board is the Texas Instruments TAS5713 25 watt digital audio power amplifier with EQ and DRC, which could also have been sourced from any one of the numerous TI fab locations.
-
-
-
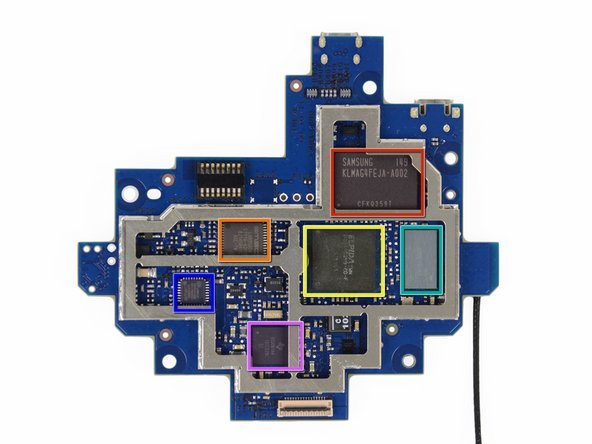
Time to test our IQ with a little chip ID:
-
Samsung KLMAG4FEJA-A002 16 GB moviNAND Flash Memory (manufactured in Hwaseong, South Korea, or Austin, TX)
-
SMSC LAN95000A Hi-Speed USB 2.0 to 10/100 Ethernet Controller (manufactured in North America, Taiwan, Japan, Korea, China, India or Europe)
-
Elpida B8064B2PB 1 GB DRAM and Texas Instruments OMAP4460 Application Processor SOC
-
Murata KM10L3002 (manufactured in Japan, China, or Taiwan)
-
SMSC USB3320C Highly Integrated Full Featured Hi-Speed USB 2.0 ULPI Transceiver (manufactured in North America, Taiwan, Japan, Korea, China, India or Europe)
-
Texas Instruments 6030B1A4 integrated power management (manufactured in USA, Germany, China, Japan, or the Philippines)
-
-
-
Next we pull out the ethernet and optical out ports board.
-
Obviously, not every component could be sourced in the USA -- nor did Google claim anything of the sort. The "Thailand" marking is direct evidence of components from overseas.
-
Notable markings on the ethernet and optical ports board:
-
The ethernet port is labeled as a PulseJack J0011D0NL (manufactured in China).
-
The optical out port is labeled as a Toshiba TX147APL (manufactured in Japan).
-
-
-
The last thing left in this little ball of joy is the set of four speaker jacks. Let's pop them out.
-
To get the jacks out we had to use a tool we don't call on every day—a ratcheting socket wrench and a 3/8" socket—in order to remove the nuts holding the jacks in place.
-
Aww, look at them rolling around on the table. They're so Q-ute!
-
-
-
The folks at Google decided to take a cue from us, so we felt the need to reciprocate. Googlers, consider this an outstanding invitation to use the image on the left as a Google Doodle!
-
Nexus Q Repairability Score: 8 out of 10 (10 is the easiest to repair):
-
Removing the top cover requires no tools. Very limited amounts of adhesive and fasteners with no exotic screw heads simplify disassembly.
-
Very few components are soldered to the main boards, making replacing them easier and less expensive.
-
The entire disassembly is pretty straightforward.
-
Lots of components could make you lose track of important parts if you're not careful.
-
Everything is packed very tightly into one package, which makes replacing some components a tad difficult.
-
The power supply is readily exposed once inside, making repairing the device a bit dangerous unless proper caution is taken.
-


4 Comments
Nice Teardown! That last slide of the Google logo was pretty awesome. All those puns however were making me Q-ringe though I'm willing to give you guys a pass because you also linked to a clip from the Sandlot...
Love your Google Doodle using the bits and pieces. Very clever. Who came up with that one? Like a boss boys, like a boss!
You guys are so sarcastic and punny! Love it!