Introduction
We picked up our new MacBook Pro at the local Apple Store this morning. We practically mugged the Fedex delivery guy on the way in to the building, and we got the first box off the pallet.
What you need
-
-
The new, 37 percent friendlier-to-squirrels and tree-frogs MacBook Pro box. Yay for pallet density! Oh, and it's heavier than it looks.
-
Follow our updates on twitter.
-
-
-
Remove one Phillips screw to release the hard drive bracket. The screw is held captive to the bracket.
-
Remove the four T6 screws securing the hard drive.
-
Replacing the hard drive is significantly easier on this machine than the previous MacBook Pro.
-
This machine uses the same, industry standard SATA notebook drives as previous MacBook Pro and MacBook models.
-
Shameless plug: Of course, you can upgrade the hard drive in any Apple laptop. We have free guides for every model that makes hard drive replacement easy.
-
Kudos to Apple for making this easy. Keeping repair costs down is probably the most environmentally friendly thing Apple has done with this machine.
-
-
-
We're inside!
-
Disassembling this laptop is reminiscent of the old PowerBook G4 Titanium models, and very similar to the MacBook Air.
-
You remove the bottom plate, and everything is screwed into the upper case. The case is now Apple's custom-machined unibody enclosure.
-
The interior is cleaner and flows together better than the previous Pro.
-
Cable routing from various parts of the case to the logic board is simpler in this than the new MacBook because Apple had more room to play with.
-
-
-
Removing the two 1 GB DIMMs. These chips are a new RAM type for Apple, 1066 MHz DDR3 SDRAM.
-
Apple claims this machine maxes out at 4GB RAM, but the Montevina chipset appears to support up to 8GB.
-
Shameless plug: You can upgrade your existing MacBook or MacBook Pro to 4 GB. We'll also be offering the RAM for the new Unibody machines in the near future.
-
-
-
-
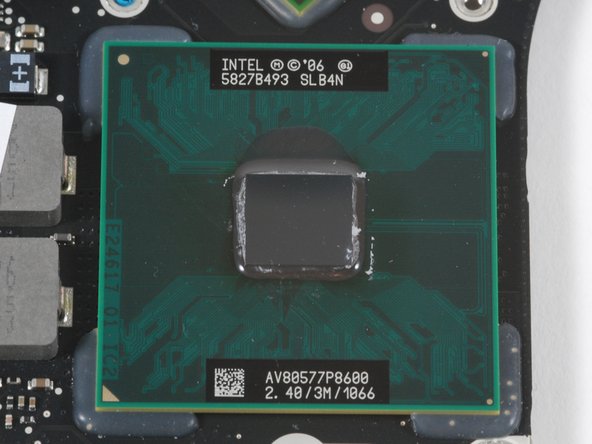
Here are the two Nvidia chips! They occupy a significant amount of the logic board. There's no way both of these puppies could fit in a MacBook Air.
-
The first chip is marked 37N3C2 0836B2 PB6623.S03 MCP79MXT-B2. This is the GeForce 9400M, also serving as a northbridge.
-
The second chip is marked U807B034 0827C1 NH7962.01W G96-632-C1. This is the GeForce 9600M GT, which has 32 processor cores and is capable of 120 Gigaflops.
-
-
-
Removing the Airport card.
-
Disconnect the antenna connector and the data cable.
-
Remove the two screws.
-
The Bluetooth cable disappears into the display, and our sources tell us that it's sandwiched between the glass and the metal case. This means that if your Bluetooth goes out, you may have to replace the entire display!
-
-
-
The "unibody" upper case assembly.
-
This case assembly includes the keyboard, glass trackpad, and ribbon cables.
-
While the manufacturing of the case is sexy, our sources say that Apple is treating this as a single replaceable part. This means that if you break a key on the keyboard, you'll have to replace the entire upper case. That could get very expensive.
-
-
-
Wow! What an incredible machine. We are very impressed by the ease with which the new MacBook Pro came apart. This machine should be a joy to work on.
-
Bottom left: hard drive and battery.
-
Top: Display
-
Center: Logic board, fans, and speakers
-
Bottom-center: subwoofer, optical drive, RAM, and heatsinks.
-
Right: Custom-machined unibody upper case and keyboard.
-
Here's a high resolution image.
-
Looking for more pictures? We've also disassembled the new MacBook.
-


7 Comments
What is the reparability score on this one?
is it possible to replace the memory cage after a spring holder part broke? There are 4 screws but after I took them out it was taking too much pressure to attempt to undo it unless I knew it was supposed to and which way it was supposed to go, Forward, Backward or up? Seems stupid to have to replace the whole logic board just to replace the plastic spring memory holder
I remember when I decide to remove the keyboard for my 2009 13" macbook pro "only for fun" hahaha