Introduction
Welcome to day three of our week of game console teardowns. So far we've taken apart the Magnavox Odyssey 100 and the RCA Studio II; the Atari 2600 is next! We partnered with PC World for this teardown to bring you a peek into another staple of game console history.
Originally labeled as the Video Computer System (VCS), the Atari 2600 was released in 1977. By that time, microprocessor-based hardware had been popularized with the Fairchild Channel F, and the VCS was Atari's first foray into that technology.
The system was originally released with all six switches on the front of the console, however, the console was redesigned in 1980 with only four of the switches on the front, and the other two on the back. The console featured here is a post-1980 model.
What you need
-
-
Atari 2600, with AC adapter and iconic joystick controller.
-
Does the 2600 have a hardwood finish? You are correct sir!
-
Video game consoles these days may not have a sense of home decor, but some computer companies still believe in the aesthetics of wood paneling.
-
At its release, the 2600 sold for $199. In today's coin, that's $696. In comparison, the launch model of PlayStation 3 cost only $599. Prices are coming down!
-
As soon as users figured out that the Atari 2600 could play more games than just Pong, the 2600 became massively successful. It went from selling 250,000 consoles in 1977 to 1 million units in 1979.
-
-
-
From its release in 1977 until 1983, the Atari 2600 was officially called the Video Computer System, in response to Fairchild Semiconductor's Video Entertainment System. The console was later renamed after its model number, CX2600.
-
Instead of following the trend of building a limited number of games into the system like the Magnavox Odyssey 100, the Atari 2600 used removable cartridges to store games like Space invaders, Pac-Man and Pitfall!
-
Each player could select the difficulty of the game they were playing by simply flipping a switch from "A" to "B". Which one was harder is anyone's guess.
-
-
-
...Or not. Seriously? That's it? The case design team must have wanted to give lots of breathing room to the motherboard team, just in case. (Actually this is the third version of the internal hardware, the first took up much more of the case.)
-
Jay Miner was able to integrate the display and sound chip into a single IC, thereby reducing the footprint of the motherboard, but the case size still seems rather hyperbolic.
-
With a design that is unseen in just about any other electronic device, the motherboard is propped up and sits at an angle of 30 degrees inside the Atari. Now those case screws make sense!
-
-
-
-
Finally, cables that are not soldered to the board! (Take note, Studio II.) The RCA cable is easily removed.
-
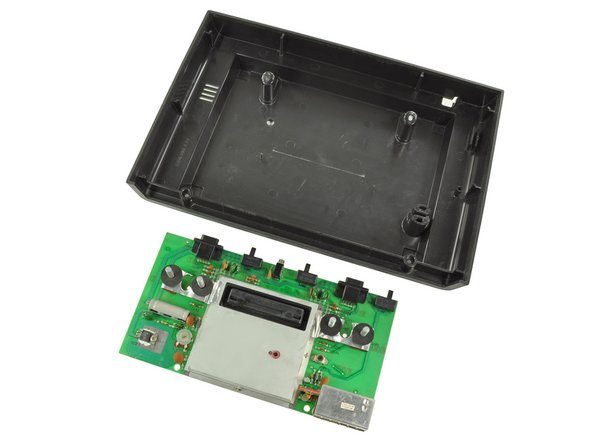
The motherboard easily lifts out, as there are no additional screws or clips holding it in place. The only thing securing it down were the angled screws we removed from the outer case.
-
The motherboard measures 9.75" x 5.25" and the lower case measures 13.75" x 9.75".
-
The case of the 2600 is 2.6 times larger than the motherboard!
-
-
-
The motherboard of the 2600 is dominated by an ominous metal box, likely the EMI shield covering the ICs.
-
Our efforts to access the brain of the Atari are temporarily thwarted by four metal tabs.
-
A few short twists with pliers and the EMI shield lifts free.
-
Atari gets a +1 on repairability for not soldering the shield to the motherboard, as some recent manufacturers have done.
-
-
-
Brains!
-
The Atari 2600 boasts:
-
1.19MHz 8-bit processor
-
128 bytes RAM
-
192 x 160 pixel resolution
-
128 colors, with max 4 colors per line
-
2 channel mono sound
-
Unlike most earlier consoles -- where the games were stored on internal chips -- the Atari 2600 stored games in Read Only Memory (ROM) chips housed in external cartridges. This allowed for a potentially infinite number of playable games for the console.
-
-
-
The top two chips are the 6532 Ram-I/O-Timer (RIOT) chip and MOS Technology's 6507 CPU (a slimmer version of the more popular 6502). By the current revision, they were manufactured by Synertek and Rockwell, respectively.
-
Atari's custom chip, the Television Interface Adapter (TIA) is the moneymaker of the 2600, as it allowed for multiple colors, increased graphic capabilities, and sound.
-
Because memory was so expensive during the 2600's design, the video processor has no external RAM. As a result the CPU must send video data to the TIA one line of video at a time.
-
There are six components of video that the TIA can create: The playing field, Two sprites (8 pixel lines), a "ball" (single pixel), and two "missiles" (two pixel lines). Combinations of these elements allowed for the complex video games witnessed in the 2600.
-
-
-
With the EMI shield removed, all the components of the motherboard are visible.
-
Color tint adjustment
-
Sound tuner
-
RF modulator
-
Cyan Engineering TIA custom chip (manufactured by Motorola)
-
MOS Technology 6532 RIOT (manufactured by Synertek)
-
MOS Technology 6507 CPU (manufactured by Rockwell)
-
Voltage regulator (manufactured by Texas Instruments)
-
-
-
Behold the Atari in all five of its parts!
-
We give the Atari 2600 a big plus for repairability. Every component is attached via through-hole solder, so replacing a burnt out resistor or IC is quite feasible.
-
We're sad to say that we don't have parts for the Atari 2600, but we do have a brand new game console parts store to help keep your (slightly more modern) consoles running.
-
Keep an eye on our teardown page or blog for a detailed look at another retro game console tomorrow!
-


17 Comments
Your IC ID on this teardown is incorrect.
The Rockwell chip in the middle CO10745 is the 6507 CPU
The Motorola CO10444 is the TIA and the Synertek is the 6532 RIOT IC
-John
Curator
The CPU Shack Museum
www.cpushack.com
Agreed, and I don't get how you guys came to the conclusion of "a great appreciation for [...] hand drawn circuits".
I see nothing but straight lines, which very well could be neatly hand drawn, but just as easily could be CAD'ed.
But otherwise I love your teardowns of classic hardware. Keep them coming!
Michael -
Perhaps they meant to suggest that the traces were laid out manually using a CAD program, as opposed to auto-routed?
cityzen -
Perhaps by "hand drawn" they meant "hand taped," the more usual method for circuit layout. While I have done small boards with a photo-resist pen on the copper or a marker on a mylar mask, it was more usual and easier to use a strong black tape on the copper or the mask. It came in varying widths, and you could also buy stick-on or transfer pads for through-holes and sets of pads for ICs. When taping out stuff it was definitely easier to do straight lines than curves!