iMac Intel 17" Optical Drive Replacement

Replace the optical drive in your iMac Intel 17".

  • Add Note x
  • x 16

Use this guide to upgrade or replace your optical drive.

first image
thumb image 1
thumb image 2

Add Note Edit Step 1 — Access Door  ¶ 

  • Loosen the two captive Phillips screws securing the access door to the iMac.

  • Remove the access door from the iMac.

first image

Add Note Edit Step 2 — Front Bezel  ¶ 

  • Remove the following four screws:

    • Three 6 mm T8 Torx.

    • One 8 mm T8 Torx.

first image
thumb image 1
thumb image 2

Add Note Edit Step 3  ¶ 

  • Flip your iMac over and lay it stand-side down on a flat surface.

  • To lift the front bezel off the iMac, simultaneously:

    • Use your thumbs to press in the RAM arms and hold the iMac down.

    • Use your index fingers to pull the small bridge of material on the front bezel toward yourself.

    • Pull the Front bezel up with your index fingers.

  • Once the small bridge of material has cleared the RAM arms, lift the front bezel by its lower edge just enough to clear the bottom edge of the rear case.

first image
thumb image 1
thumb image 2
thumb image 3

Add Note Edit Step 4  ¶ 

  • Re-orient your iMac so it sits upright on the stand.

  • Insert a plastic card up into the corner of the air vent slot near the top of the rear case.

  • Push the card toward the top of the iMac to release the front bezel latch.

  • Pull the front bezel away from the rear case.

  • Repeat this process for the other side of the front bezel.

  • It may be necessary to apply several layers of duct tape to the top of the access card to aid in releasing the latches.

  • If the bezel refuses to release, try pressing the lower edge back onto the rear case and repeat this opening process.

first image

Add Note Edit Step 5  ¶ 

  • Lay your iMac stand-side down on a table.

  • Lift the front bezel from its lower edge and rotate it away from the rest of your iMac, minding the RAM arms that may get caught.

  • Lay the front bezel above the rest of the iMac.

first image

Add Note Edit Step 6  ¶ 

  • If necessary, remove the piece of kapton tape(it is ok to toss this) wrapped around the microphone and camera cables.

first image
thumb image 1
thumb image 2

Add Note Edit Step 7  ¶ 

  • Disconnect both the camera and microphone cables.

first image

Add Note Edit Step 8 — Display  ¶ 

  • Peel up the lower EMI shield from the rear case.

  • It is only necessary to peel the shield up from three sides. Leave it attached to the display.

  • We have found it helpful to tape the EMI shield against the display to keep it out of the way.

first image
thumb image 1
thumb image 2

Add Note Edit Step 9  ¶ 

  • Remove the two 4.8 mm T6 Torx screws securing the display data cable to the logic board.

  • Grab the display data cable connector by its black tab and pull it straight up off the logic board.

first image

Add Note Edit Step 10  ¶ 

  • Inverter cable on 24inch iMac pulls off to the left.

  • Pull the inverter cable connector straight up off its socket on the logic board.

first image

Add Note Edit Step 11  ¶ 

  • Peel back the aluminum EMI tape from the two vertical edges of the display.

  • During reassembly, it is helpful to use several small strips of tape to hold the EMI shielding along the left and right edges of the display footprint out of the way before lowering the display into the rear case of your iMac.

first image
thumb image 1
thumb image 2

Add Note Edit Step 12  ¶ 

  • Allow the EMI shield to hang down from the display.

  • Remove the four 8 mm with 2 mm thick head coarse-thread T10 Torx screws securing the display to the rear case.

  • These screws are recessed, so a thin screwdriver such as this is essential for removal. Bit drivers tend to be too short for this application.

  • It is strongly recommended to use a magnetized screwdriver so the screws won't fall into the iMac.

first image

Add Note Edit Step 13  ¶ 

  • Lift the display from its lower edge and pull it toward yourself to peel off the EMI shield attached to its top edge.

  • Be mindful of any cables that may get caught during removal.

first image

Add Note Edit Step 14 — Optical Drive  ¶ 

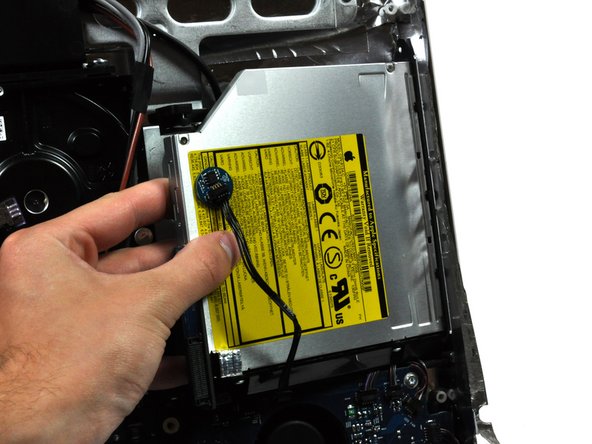
  • Remove the two 7 mm T10 Torx screws securing the optical drive clip to the logic board.

first image

Add Note Edit Step 15  ¶ 

  • Remove the optical drive clip.

first image

Add Note Edit Step 16  ¶ 

  • Pull the optical drive thermal sensor cable connector away from its socket on the logic board.

first image
thumb image 1
thumb image 2

Add Note Edit Step 17  ¶ 

  • Squeeze the two optical drive bracket ears together while pulling the drive toward yourself.

  • It may be helpful to hold the logic board down near the optical drive connector when pulling the drive toward yourself to avoid both components lifting together.

  • Pull the optical drive away from the side of the rear panel and remove it from the iMac.

first image
thumb image 1
thumb image 2

Add Note Edit Step 18 — Optical Drive Replacement  ¶ 

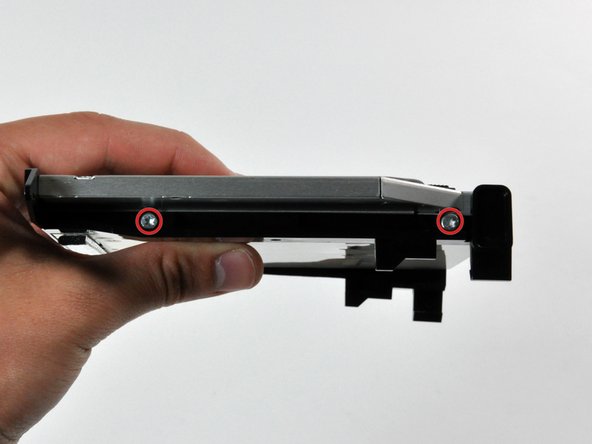
  • Remove the two T6 Torx screws securing the connector board to the optical drive.

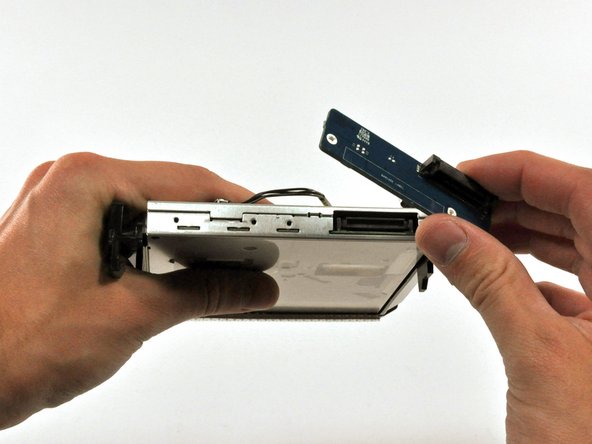
  • Pull the connector board away from the optical drive.

first image
thumb image 1
thumb image 2

Add Note Edit Step 19  ¶ 

  • Remove the two T10 Torx screws from each side of the optical drive (four screws total).

first image

Add Note Edit Step 20  ¶ 

  • Use the flat end of a spudger to remove the EMI gasket from the underside of the optical drive.

  • Don't forget to transfer this to your new drive.

first image
thumb image 1
thumb image 2

Add Note Edit Step 21  ¶ 

  • Use the sharp end of a spudger to push the optical drive bracket tabs out of their slots on the bottom of the optical drive.

first image

Add Note Edit Step 22  ¶ 

  • Using the sharp end of a spudger, press the optical drive bracket tab out of its slot on the side of the optical drive.

first image

Add Note Edit Step 23  ¶ 

  • Push the optical drive bracket tabs out of their slots in the top of the optical drive.

first image

Add Note Edit Step 24  ¶ 

  • Pull the optical drive away from its bracket, minding any tabs that may still be caught in their slots.

first image

Add Note Edit Step 25  ¶ 

  • Use a flat end of a spudger to remove the EMI gasket from the top of the optical drive.

  • Don't forget to transfer this to your new drive.

first image

Add Note Edit Step 26  ¶ 

  • Use the flat end of a spudger to pry the optical drive thermal sensor off the adhesive holding it to the top of the optical drive.

  • Don't forget to transfer this to your new drive.

  • If you have a disk or anything else stuck inside your optical drive, we have a guide to fix it.

To reassemble your device, follow these instructions in reverse order.

For more information, check out the iMac Intel 17" device page.

Did you successfully follow this guide?

This guide has been completed 16 times.

Comments Add Note Comments are offturn on