Introduction
The clock battery in my Zojirushi rice cooker failed after about 5 years of use. I could tell because the time no longer showed on the front of the rice cooker. This is not totally fatal, you can still cook rice without the battery, but you can’t use the cool timer mode. Plus I like to have my devices working correctly.
I went to replace the battery, and was really pissed to find that it is soldered in and not designed to be user replaceable. Who does this? What an example of planned obsolescence!
I went ahead and fixed it and wrote this guide mostly because I was so unhappy with them. Also I am not buying any more Zojirushi products that don’t have replaceable batteries.
What you need
-
-
Un-plug the Rice Cooker
-
Turn it over and place it on a towel or padded surface.
-
-
-
Remove 4 screws from the bottom. 3 are normal #2 Phillips, one is a security screw that looks like a 6-sided star with a hole in the center. The bit I used was marked T-20.
-
Use a Spudger or other prying tool to work around the edges of the metal bottom plate and unclip the plastic tabs holding it in place. There were 7 tabs, 1 in each corner, one in the front and 2 in the back about 1-inch each side of the center. This was pretty easy.
-
Pull the bottom plate off and set aside.
-
-
-
-
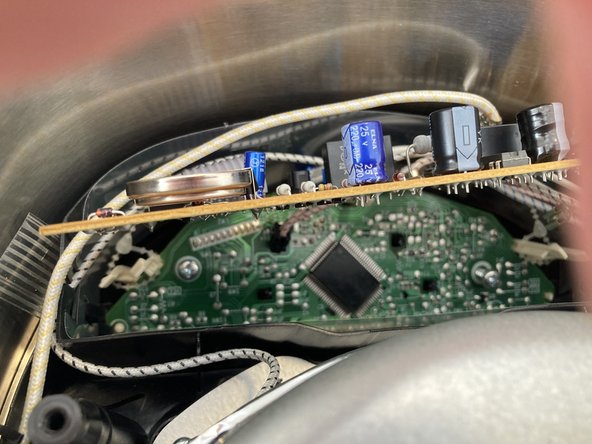
You can now see the circuit board with battery.
-
There are actually two circuit boards stacked on top of each other. You can leave the hidden circuit board (with the display and controls) in place for this repair.
-
Remove 6 connectors from the top circuit board. Pull these straight out. there are no locking mechanisms. From left to right they are Red, Black, Yellow, Blue, Blue base and Black base. The colors are nicely marked on the circuit board.
-
The ribbon cable does not have a connector, so don't remove it, leave it in place.
-
Push in the plastic tabs holding the top board in place to release it, and fold it out on the ribbon cable to expose the underside of the clock battery.
-
Don't remove the bottom board! I did this and it was a big pain to get it correctly reseated so that the control buttons worked.
-
-
-
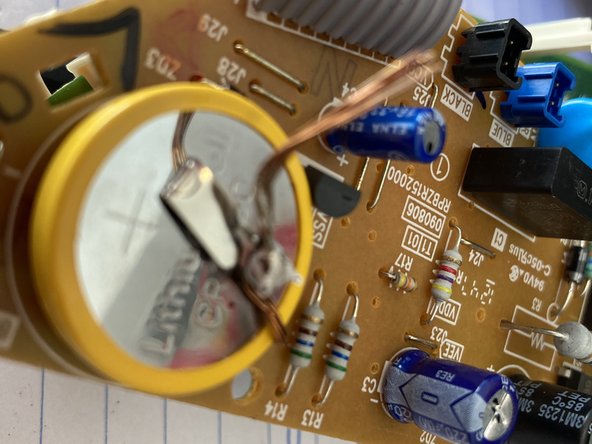
Use your soldering iron to heat one of the two battery terminals on the back-side of the top circuit board. The terminals are conveniently marked.
-
When the solder is melted use your plastic spudger to pry the battery away from the top of the circuit board.
-
Repeat for the other battery terminal and remove the battery for recycling.
-
Caution! If you want pull the battery away with pliers, wrap the pliers with electrical tape to avoid shorting out the battery. You can probably use your fingers (if not too hot) or your plastic spudger.
-
-
-
Hopefully you bought a replacement battery with Solder tabs. I found mine on eBay.
-
The solder tabs on your replacement battery may not line up with where you need them, mine didn't.
-
I soldered one tab in place directly, then soldered some stranded wire to bridge between the second tab and the circuit board. I trimmed and bent the second tab a little to make this work. It was easy to solder the wire to.
-
-
-
put the top circuit board back in place. The black plastic tabs on the sides are the card guides.
-
Plug in the 6 connectors you removed earlier. Double-check the colors vs the labels...I almost swapped two.
-
If you turn the unit over you should now see the time displayed on the clock.
-
Replace the bottom cover and the 4 screws.
-


To reassemble your device, follow these instructions in reverse order.
To reassemble your device, follow these instructions in reverse order.
Cancel: I did not complete this guide.
8 other people completed this guide.

19 Comments
If you have a Ring doorbell, try the included orange-handled screwdriver for opening the case and removing the circuit board. The security screw head along with Phillips head fit all the screws inside and out. Not sure about all rice cooker versions, but this worked perfectly for mine.
This battery holder fit my rice cooker perfectly.
CR2450 Coin Cell Battery Holder - PC Pin https://a.co/d/71iBrrP
Thanks for the article. I fixed mine by removing the battery and adding wire leads to a 2032 battery holder. I covered the connections on the back of the holder with epoxy to insulate the leads. I then hot glued the holder to the inside front of the case. I still have to remove bottom to replace battery, but 2032 batteries are cheaper and easier to find. I replaced the security screw with a standard one.