
Viola String Replacement

  1. Viola String Replacement, String: step 1, image 1 of 1
    • Turn the tuning peg belonging to the string you want to replace.

    • Pegs on the left side (C, G) of the viola require you to turn clockwise to loosen, and pegs on the right side (D, A) turn counterclockwise to loosen.

    • Make sure to turn the peg in the correct direction. Accidentally tightening the strings too much may cause it to snap.

  2. Viola String Replacement: step 2, image 1 of 2 Viola String Replacement: step 2, image 2 of 2
    • Gently remove the string from the scroll side of the viola, then remove the opposite side of the string from the fine tuner area.

  3. Viola String Replacement: step 3, image 1 of 1
    • Insert the new string into the peg hole.

    • Make sure the hole is in the correct area and that the inserted string does not overlap other strings. For example, the C string hole should be to the left of the G string.

  4. Viola String Replacement: step 4, image 1 of 1
    • Turn the tuning peg slowly to tighten the newly inserted string.

    • If the string has a coloured tip, turn the peg until all the colour is wound up.

    • Do not worry about snapping the string in this step. The ball side of the string has not been inserted so there is no risk.

  5. Viola String Replacement: step 5, image 1 of 2 Viola String Replacement: step 5, image 2 of 2
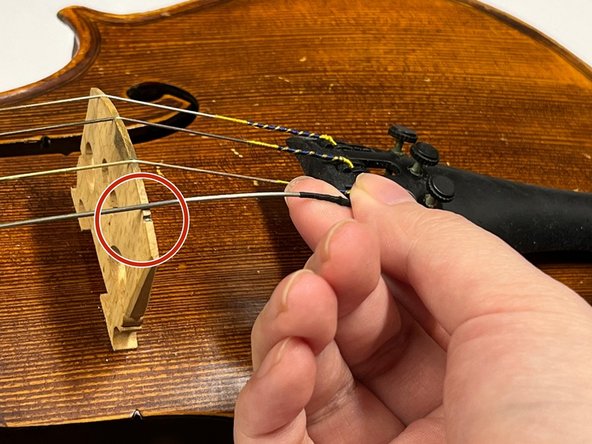
    • Insert the ball side of the string into the fine tuner area. If the string does not reach, loosen the tuning peg until it slides in easily. Make sure to also align the string with the bridge.

  6. Viola String Replacement: step 6, image 1 of 2 Viola String Replacement: step 6, image 2 of 2
    • After the string has been inserted, begin slowly tuning the string by turning the pegs.

    • Try to tune a pitch lower using the pegs, then use the fine tuners to fully tune the string.

    • Be careful, the string may snap if tightened too much. Try using the advice above to avoid this.

  7. Viola String Replacement: step 7, image 1 of 1
    • Gently tug the newly inserted string to make sure it is secured. If it slides off the bridge, it is not tightened enough.

Finish Line

Irene Shang Yun Yang

Member since: 05/24/23

145 Reputation

1 Guide authored

Team

0 Comments

Add Comment

View Statistics:

Past 24 Hours: 1

Past 7 Days: 2

Past 30 Days: 10

All Time: 125