Introduction
Upgrade mid 2010 27 inch Apple iMac from a Core i3 3.2GHz (Dual core) to Core i7 2.93GHz (Quad core) processor.
I used this guide for disassembly and reassembly.
http://www.btobey.com/learn/imac-ssd-ins...
Also added a 3TB SATA drive and 32Gb of RAM to max out this system under Lion 10.7
- Update : Removed the 3Tb SATA drive and replaced with 512Gb SSD and upgraded to Mountain Lion 10.8
- If you upgrade or change the HD, you will need to buy HDDFanControl software to control the HDD fan which will run at full speed otherwise.
- April 2013 - 1 year later : This system has been absolutely ROCK SOLID with no crashes, no kernel panics and no freezes!
- April 2014 - 2 years later : now running OS X 10.9 Mavericks successfully with zero issues. System continues to be fast - but is starting to show its age compared to Sandy Bridge, Ivy Bridge and Haswell architectures! Newer apps are starting to creak at the seams & the beachball is now a fixture.
- April 2015 - 3 years later. Yosemite 10.10.3. Continuity works but Handoff does not (lacks built-in Bluetooth LE v4.0). Not as fast as my Haswell Macbook Pro or 2010 Xeon 12 proc Mac Pro, but still rock solid. With these simple mods, I have gained years of additional service out of this "obsolete" machine!
- May 2016 - 4 years later. Running El Capitan 10.11.5 . Only Handoff does not work (see above) but everything else is rock solid. New Notepad app rocks as does a stable version of Apple Mail (at last), and now that the abomination that was 'discoveryd' is dead and the tried and true 'mDNS-Responder' is back, networking is stellar once again. The system continues to amaze with its longevity.
- August 2016 - 4+ years later. Now running Sierra 10.12 Beta 2 with zero issues other than the usual beta bugs.
- November 2017 - It’s been 5 years since I did the upgrade and I still use this iMac in anger every day! Now running a OWC 1TB SSD and High Sierra 10.13 with APFS. Machine has been absolutely flawless!
- September 2018 - It’s been 6 years, yes SIX years! since I did the upgrade and I still use this iMac in anger every day! Now running Mojave 10.14 with APFS, using Dosdude's Mojave Patcher. Please note - this 2010 iMac (11,3) built in video card is *NOT* Metal compatible so video acceleration is DISABLED with Mojave which makes your iMac screen refresh sluggish, Photos to go black and other graphics anomalies but everything else is stellar. Dark Mode makes the upgrade worth it.
- Don’t install Mojave or Catalina on this machine. It will barely run and the experience is terrible. This quote is from DosDude1 himself: “Radeon HD 5xxx and 6xxx series video cards are not, and most likely never will be, supported under Mojave or later.“
- March 2019 - I have abandoned using Mojave 10.14 on this 2010 27” iMac. The slow GPU makes it completely unusable. I’m back to High Sierra 10.13 with APFS, 1TB internal SSD and 32Gb RAM. This appears to be my optimal configuration for this 2010 27” iMac
What you need
-
Tool used on this step:Anti-Static Wrist Strap$7.95
-
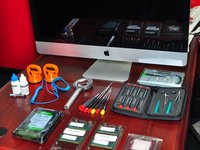
Start by gathering your parts, tools, anti-static strap and gloves (gloves are for glass & LCD)
-
Remove glass
-
Then remove LCD. iFixit has step-by-step- write-ups on how to do this.
-
-
-
Core i7 2.93GHz Quad Core processor, Arctic Silver thermal compound and iFixit + OWC tools
-
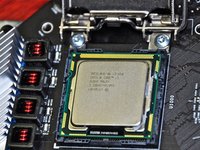
Processor is Intel Core i7 870 2.93GHz 8MB LGA 1156 Quad Core Processor 95W. I bought this CPU used on eBay.
-
-
-
Remove HD, Superdrive and motherboard. Follow the excellent iFixit guides to remove these items.
-
To remove motherboard (a little tricky), I followed this excellent guide - http://www.btobey.com/learn/imac-ssd-ins...
-
Not mentioned in the guide is that you have to remove the IR sitting in back of the front Apple logo before you can remove the motherboard.
-
-
-
-
Goodbye Core i3 and hello Core i7.
-
Note arrow on CPU (bottom left in picture). New CPU must be installed in the same orientation.
-
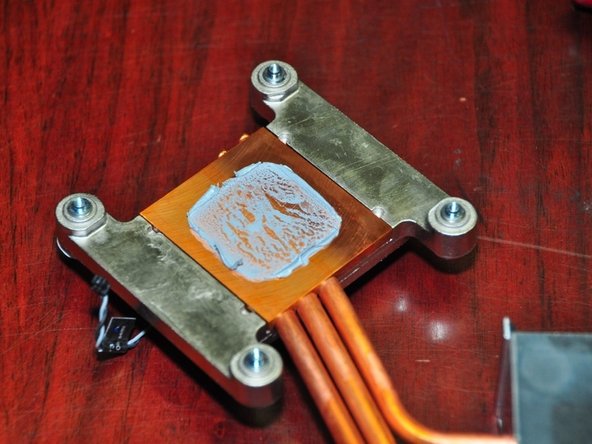
Apply Arctic Silver thermal compound with finger covered in plastic. Spread evenly on CPU only. Guide is here - How to Apply Thermal Paste
-
Reverse to reassemble. Enjoy the new speed demon!
-
-
-
More than 6 years later - now running Mojave 10.14. Dark Mode makes the upgrade worth it.
-
This 2010 iMac (11,3) built in video card is *NOT* Metal compatible so video acceleration is DISABLED with Mojave which makes your iMac screen refresh sluggish, Photos to go black and other graphics anomalies but everything else is stellar.
-
However... Don’t install Mojave or Catalina on this machine. It will barely run and the experience is terrible. This quote is from DosDude1 himself: “Radeon HD 5xxx and 6xxx series video cards are not, and most likely never will be, supported under Mojave or later.“
-
After Mojave installation, your colours will be inverted. To fix - Go to System/Library/Extensions and put this file into the trash: AMDRadeonX3000.kext then reboot
-


To reassemble your device, follow these instructions in reverse order.
Cancel: I did not complete this guide.
107 other people completed this guide.

243 Guide Comments
Ok a word of caution about doing this. I installed an i7 in my 2010 27" i3 iMac and the system works, it reports the correct stats for the i7 but the cpu fan runs at high speed from boot. Annoying! I've researched a number of forums and found no way to resolve this, I also know there are a number of people with the same problem. So either I screwed up my logic board or it just doesn't like the i7 processor. It's the correct processor that people have used the i7 870. I'm at a loss and don't want to pull it out because it just runs so much faster for video editing but using the machine as an audio workstation is now impossible because of the noise from the fan. Also be extremely careful with the LCD screen. just having your shirt brush against it leaves marks and you can't clean it. If you think gloves will solve this you are wrong. DO NOT touch the lcd and be extremely careful with the connectors. If anyone has any ideas about the fan speed fix please let me know!
Also, I assume that you are using this processor?
Intel Core i7 870 2.93GHz 8MB LGA 1156 Quad Core Processor 95W
If you upgrade or change the Apple HD, you will need to buy HDDFanControl software to control the HDD fan which will run at full speed otherwise. I also use smcFanControl to monitor and control the other fans in the system.
As with any modification, your mileage may vary. This is a "Medium" difficulty mod and not recommended for novices to the hobby. I experienced none of the issues your have experienced.
I upgraded to Mountain Lion 10.8 when it was released to the Dev community with zero issues - currently at 10.8.2; I use this machine 'in anger' every day.
I did these mods 5 months ago, and this system has been absolutely ROCK SOLID with no crashes, no kernel panics and no freezes!
If you do the CPU replacement and afterwards the optical drive fan and cpu fan are running at max speed (very loud) then you more than likely didn't plug in the CPU temp sensor. The guide here doesn't talk about it so you can easily forget it! The connector is on the other side of the board, which is different from all the other temperature connectors and not on the same side as the heatsink screws either.
I did this and the computer ran with noisy fans. I used a fan control app to quiet it down, but it was still loud on startup until login. More importantly, the performance without the CPU temp sensor connected was terrible. It was slower than the original i5 CPU. HD videos would stutter and benchmarks gave very low scores.
Make sure you plug in the CPU temperature sensor after you put the heatsink on.
mikk -
download ssd fan control, this program let you adjust the fan speeds.