
Steam Deck OLED Left Trigger Replacement

What you need

  1. Steam Deck OLED Left Trigger Replacement, Prepare your Steam Deck for disassembly: step 1, image 1 of 3 Steam Deck OLED Left Trigger Replacement, Prepare your Steam Deck for disassembly: step 1, image 2 of 3 Steam Deck OLED Left Trigger Replacement, Prepare your Steam Deck for disassembly: step 1, image 3 of 3
    • Turn on your Steam Deck and allow the battery to discharge below 25% before starting your repairs, as a charged lithium-ion polymer battery can be dangerous if accidentally punctured.

    • As an extra precaution, Valve recommends putting your Steam Deck into battery storage mode within the BIOS before starting any internal repairs. Read how to do that here.

    • Power down your Steam Deck and unplug any cables.

    • If you have a microSD card installed, make sure to remove it before opening the Steam Deck. If you attempt to remove the back cover with it still installed, it could snap right in half.

    • During your repair, it can be helpful at times to lay the Steam Deck face-down in its case to protect the thumbsticks and prevent wobble.

  2. Steam Deck OLED Left Trigger Replacement, Remove the back cover screws: step 2, image 1 of 2 Steam Deck OLED Left Trigger Replacement, Remove the back cover screws: step 2, image 2 of 2
    Tool used on this step:
    FixMat
    $36.95
    Buy
    • Use a T6 Torx driver to remove the eight 5.8 mm‑long screws securing the back cover.

    • Throughout this repair, keep track of each screw and make sure it goes back exactly where it came from.

  3. Steam Deck OLED Left Trigger Replacement, Unclip a handle: step 3, image 1 of 3 Steam Deck OLED Left Trigger Replacement, Unclip a handle: step 3, image 2 of 3 Steam Deck OLED Left Trigger Replacement, Unclip a handle: step 3, image 3 of 3
    • Insert an opening pick at an upward angle between the back cover and the front shell near one of the triggers.

    • If you can't insert your pick here, try along the top or bottom edges of the Steam Deck OLED before sliding it toward the handle.

    • Slide your pick along the edge of the handle to release the clips securing it to the front shell.

  4. Steam Deck OLED Left Trigger Replacement, Unclip the top and bottom edges: step 4, image 1 of 3 Steam Deck OLED Left Trigger Replacement, Unclip the top and bottom edges: step 4, image 2 of 3 Steam Deck OLED Left Trigger Replacement, Unclip the top and bottom edges: step 4, image 3 of 3
    • Reinsert your pick and slide it along the top and bottom edges until the back cover feels loose.

  5. Steam Deck OLED Left Trigger Replacement, Remove the back cover: step 5, image 1 of 3 Steam Deck OLED Left Trigger Replacement, Remove the back cover: step 5, image 2 of 3 Steam Deck OLED Left Trigger Replacement, Remove the back cover: step 5, image 3 of 3
    • Grip the unclipped handle and pull it away from the front shell to release the remaining clips.

    • Remove the back cover.

  6. Steam Deck OLED Left Trigger Replacement, Disconnect the battery: step 6, image 1 of 3 Steam Deck OLED Left Trigger Replacement, Disconnect the battery: step 6, image 2 of 3 Steam Deck OLED Left Trigger Replacement, Disconnect the battery: step 6, image 3 of 3
    • Grip the battery cable pull tab, located to the left of the battery.

    • Firmly pull the battery cable straight away from the motherboard shield (toward the battery) to disconnect it.

    • This bundled cable is fairly stiff. If you're having trouble, re-grip the pull tab close to the head of the connector and gently walk it side-to-side as you pull.

    • If the cable pull-tab feels fragile or rips during this process, remove the motherboard shield and disconnect the cable using a spudger.

    • When the battery cable comes free, it might push up on the motherboard shield. Don't worry, as this won't damage anything.

  7. Steam Deck OLED Left Trigger Replacement, Reassembly instructions: step 7, image 1 of 2 Steam Deck OLED Left Trigger Replacement, Reassembly instructions: step 7, image 2 of 2
    • During disassembly, skip the next four steps.

    • During reassembly:

    • Reinstall the two 3.8 mm‑long screws to secure the motherboard shield.

    • Reconnect the interconnect cable ZIF connector.

  8. Steam Deck OLED Left Trigger Replacement, Reassembly instructions: step 8, image 1 of 3 Steam Deck OLED Left Trigger Replacement, Reassembly instructions: step 8, image 2 of 3 Steam Deck OLED Left Trigger Replacement, Reassembly instructions: step 8, image 3 of 3
    • During reassembly:

    • Use the flat end of a spudger to slide the battery connector into its socket on the motherboard.

  9. Steam Deck OLED Left Trigger Replacement, Reassembly instructions: step 9, image 1 of 3 Steam Deck OLED Left Trigger Replacement, Reassembly instructions: step 9, image 2 of 3 Steam Deck OLED Left Trigger Replacement, Reassembly instructions: step 9, image 3 of 3
    • During reassembly:

    • Use your T6 Torx driver to remove the two 3.8 mm‑long screws securing the motherboard shield.

    • Lift the top edge of the motherboard shield up and flip it over the bottom edge of the frame, away from the motherboard.

    • Be careful not to crease or strain the cable.

  10. Steam Deck OLED Left Trigger Replacement, Reassembly instructions: step 10, image 1 of 3 Steam Deck OLED Left Trigger Replacement, Reassembly instructions: step 10, image 2 of 3 Steam Deck OLED Left Trigger Replacement, Reassembly instructions: step 10, image 3 of 3
    Tool used on this step:
    Tweezers
    $4.99
    Buy
    • During reassembly, follow this step and the above four steps to reconnect the battery.

    • In this reassembly step, you'll disconnect the interconnect cable to free the motherboard shield.

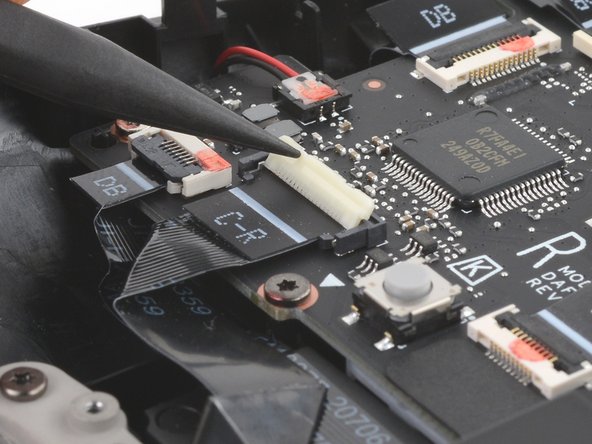
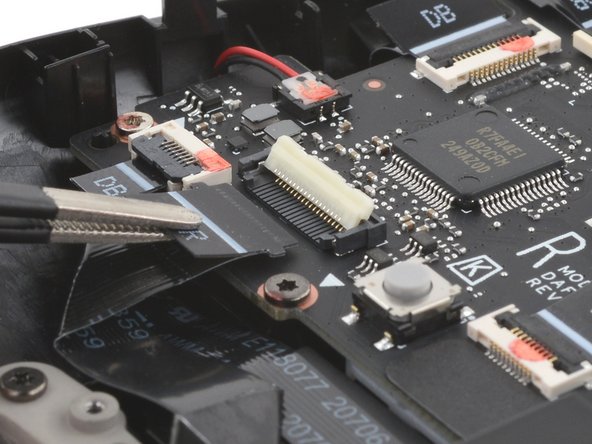
    • Use a spudger to flip up the small white locking flap on the right button board interconnect cable ZIF connector.

    • Use tweezers or your fingers to grip the cable's pull tab and slide it straight out of its socket to disconnect it.

    • The pull tab may be labelled C‑R.

  11. Steam Deck OLED Left Trigger Replacement, Remove the left trigger: step 11, image 1 of 3 Steam Deck OLED Left Trigger Replacement, Remove the left trigger: step 11, image 2 of 3 Steam Deck OLED Left Trigger Replacement, Remove the left trigger: step 11, image 3 of 3
    • The left trigger is on your right-hand side when working on the Steam Deck OLED, as it's laying upside down.

    • The trigger clips into place on two pegs on the frame, which double as the hinge.

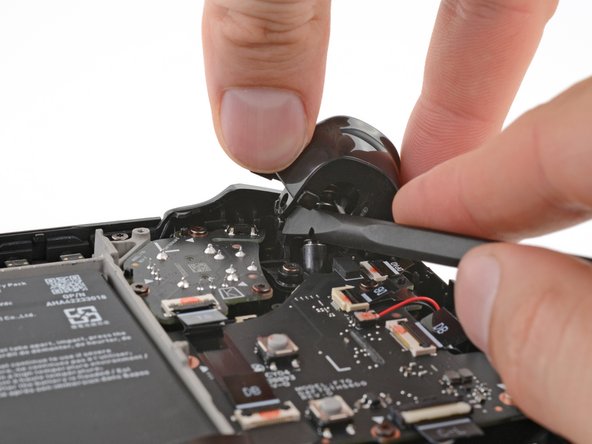
    • Place the flat end of a spudger onto the inside edge of the trigger's left clip.

    • Use your fingers to push the trigger toward the left as you wedge the spudger between the clip and the peg.

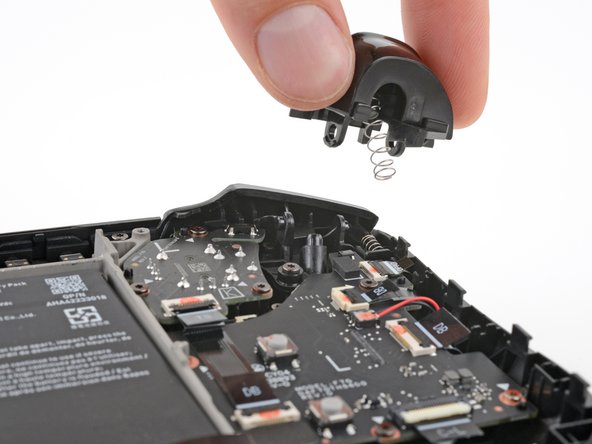
    • Use your spudger to pivot the trigger clip out, away, and up from the peg to unlatch it.

    • During reassembly, latch the right peg first. Once in place, push down on the trigger to latch the left peg, producing an audible "click" sound.

    • Check to make sure that the trigger spring is properly aligned. Test the trigger action before continuing reassembly.

Conclusion

To reassemble your device, follow these instructions in reverse order.

Repair didn’t go as planned? Try some basic troubleshooting, or ask our Steam Deck OLED answers community for help.

One other person completed this guide.

Clay Eickemeyer

Member since: 09/19/22

66,989 Reputation

453 Guides authored

Team

iFixit Member of iFixit

Staff

135 Members

17,277 Guides authored

0 Comments

Add Comment

View Statistics:

Past 24 Hours: 5

Past 7 Days: 15

Past 30 Days: 82

All Time: 253