Introduction
Is your battery not lasting as long as it used to? Swapping it out for a new one is a snap.
What you need
Video Overview
-
-
If your display glass is cracked, keep further breakage contained and prevent bodily harm during your repair by taping the glass.
-
Lay overlapping strips of clear packing tape over the iPhone's display until the whole face is covered.
-
-
-
Remove the two 3.7mm Phillips #00 screws from the dock-connector end of the iPhone.
-
-
-
Remove the metal handle from the suction cup. It's easier and safer to grip the suction cup's base instead of the metal handle.
-
Use a small suction cup near the Home button to gently pull up the bottom portion of the iPhone's display assembly.
-
-
-
Rotate the display assembly up until it is at an angle of approximately 45 degrees.
-
-
-
Continue to hold the display assembly with one hand, and use your other hand and a spudger to disconnect the black ribbon cable labeled "1". (Cable 1 is for the display)
-
-
-
Rotate the display assembly up until it is roughly vertical. This will allow easier access for disconnecting the remaining cables.
-
Use a spudger to disconnect the black ribbon cable labeled "2". (Cable 2 is for the capacitative touch panel)
-
-
-
-
Use a spudger to flip up the white plastic tab holding the ribbon cable "3" in place. The white tab will rotate up 90 degrees, releasing the ribbon cable.
-
Slide the black ribbon cable out of its connector, and remove the display assembly from the iPhone.
-
-
-
Insert your SIM eject tool or a paper clip into the hole next to the headphone jack.
-
Press down on the tool until the SIM card tray pops out.
-
Grasp the SIM card tray and slide it out of the iPhone.
-
-
-
Remove the following 8 screws:
-
Five 2.3 mm Phillips #00 screws with partial threads securing the logic board to the rear case.
-
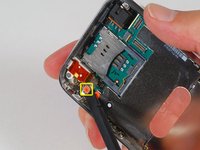
Two 2.3 mm Phillips #00 screws with full threads securing the logic board and camera.
-
One 2.9 mm Phillips #00 screw from beneath the "Do not remove" sticker.
-
Note for re-assembly:
-
The screw that goes next to the camera (bottom right orange highlighted screw) also has a metal strip that holds the camera in place.
-
-
-
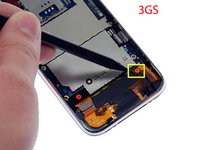
Use a spudger to gently pry the camera up and out of its housing in the rear case.
-
-
-
Use a spudger to gently pry up the end of the logic board closest to the dock connector.
-
-
-
Slide the logic board towards the dock connector and out of the iPhone.
-
When replacing the logic board after installing battery, connect the camera to the logic board before inserting it into the case. Then make sure to set the top section of the logic board (where the SIM tray is) in place before settling the rest of the board in place. This is important, as sometimes the SIM card slot will not align into place. Once the top section is in place, the bottom section can be maneuvered into place. You will know the logic board is correctly installed when the SIM tray is aligned with the opening in the iPhone case and the camera module seats neatly into its place.
-
-
-
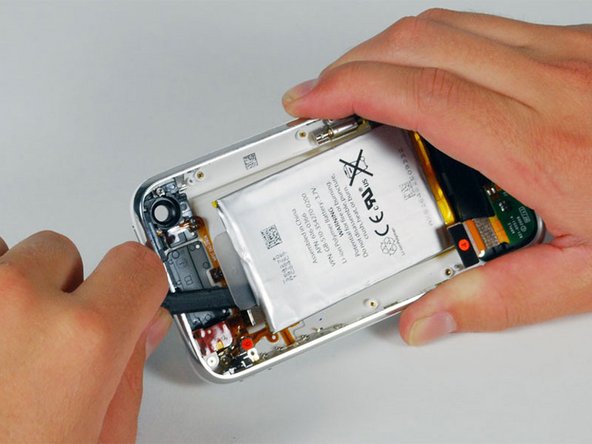
Use a spudger to pry the battery up from the rear case. The battery is attached with an adhesive strip around the perimeter of the battery.
-


To reassemble your device, follow these instructions in reverse order.
Cancel: I did not complete this guide.
937 other people completed this guide.

36 Guide Comments
I replaced the battery in both my iPhone and my wife's in the same session. Using the slideshow and directions I was able to successfully do the replacement. Of course my iPhone was the first one done so as to gain some experience before tackling my wife's iPhone. I had two minor issues in reassembling mine. Firstly, I completely missed re-installing the number 3 cable. It wasn't till I was reassembling my wife's iPhone that I realized I'd missed it. Not sure what it supports as I had my phone up and running, checked the GPS, etc while it wasn't connected. Secondly, my camera wasn't seated properly and I got the strangest imagery when I launched it. All green and black, looking like one of those ghost buster reality shows using night vision. Fortunately, both issues were easy to correct. Outstanding directions and slides! Oh yeah finally, the kits for the battery comes with both a #00 Phillips screwdriver and a spudge, however, I ordered the extra spudge and got one that is better suited for prying the battery up.
Hey,
first of all - BIG UPS AND THX for everything.
That means FAST shipping to germany and the great tutorials, manuals etc.
I did change the battery in less than 15 minutes whit ur manual this was easy as.... dunno :).
the "hardest part" was to remove the battery from the cover - but with a bit of tact it works fine.
So thx :)
Incredibly easy to make the swap. Thanks for the great writeup. I was able to complete the battery replacement within about 20 minutes. I've swapped an iPod battery before and although this was a bit more complex it really wasn't that tough. Anyone who's a bit handy should be able to complete it with no trouble at all. Thanks.
Great instructions, very clear. A couple points:
1) The screwdriver I had wasn't working that well, so I had to use a different one. I found that a 0# worked fine (although I suspect a 00# would work better.0
2) When I reassembled the phone, the home button didn't work. You really need to press down on the bottom of the screen when you screw the bottom screws (by the dock connector) back in. Otherwise, the contacts for the home button won't reliably hit.