Introduction
Use this guide to replace a worn-out battery on your 2nd generation Touch. This procedure requires soldering.
What you need
-
-
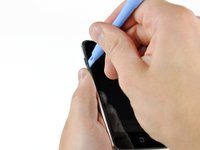
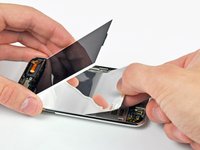
The picture at left (front panel already removed) shows the locations of the metal clips (shown in red) that snap on to the plastic frame. In the next few steps, try to pry the front panel up from the gaps between these clips.
-
-
-
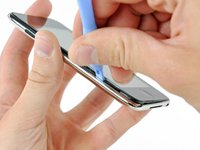
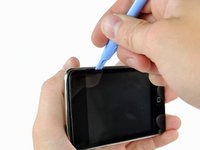
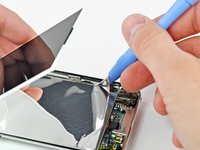
Insert a small iPod opening tool with the edge angled up toward the underside of the display between the white plastic backlight and the metal shield beneath it.
-
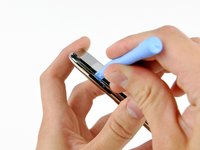
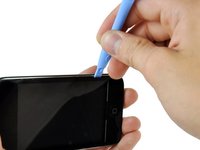
Pry up along the lower edge of the display enough to grab it with your fingers.
-
-
-
-
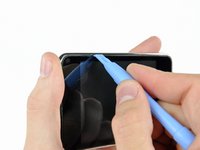
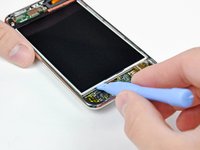
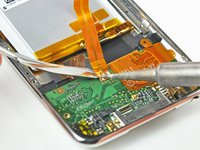
Use the flat end of a spudger to pry the battery off the adhesive securing it to the metal display tray.
-
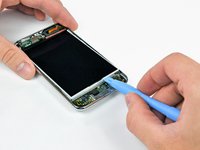
Remove the metal display tray and set it aside.
-
Lay the battery down flat in the rear case.
-
-
-
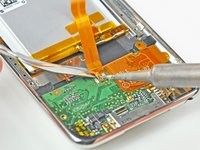
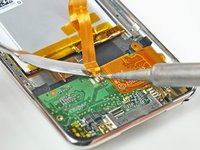
Start working from one side of the battery ribbon cable. In our case, we started on the left. Heat the leftmost solder pad while gently prying up from under the ribbon cable to free it from the board. Repeat this process for each of the two remaining pads, working either right to left or left to right.
-
-
Tool used on this step:FixHub | Power Series Smart Soldering Iron$79.95
-
Next, use the tip of a soldering iron to flatten out the solder on the logic board solder pads. The pictures show a 'before' and 'after' shot.
-
-
-
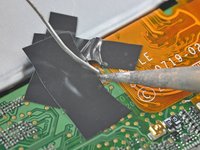
Place your battery in the rear panel, with the cable side down, and use two small strips of electrical tape to hold the cable against the solder pads.
-
Place a strip of tape over the end of the battery ribbon cable to both cover two of the solder pads and hold the contacts down against the logic board.
-
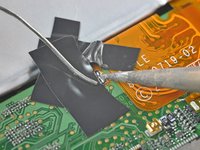
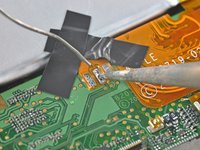
Heat the rightmost contact until the solder below melts and apply a small amount of solder to the contact, allowing it to flow through the two holes in the cable and down to the logic board.
-
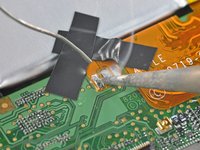
As soon as the solder has flowed into the joint, remove both the solder and the iron.
-
-
-
Remove the piece of tape covering the remaining two leads. If you are satisfied with the position of the cable relative to the pads on the board, proceed. If not, de-solder the first connection and try again.
-
Solder the two remaining pads to the logic board, being mindful of overheating the cable or board.
-


To reassemble your device, follow these instructions in reverse order.
Cancel: I did not complete this guide.
127 other people completed this guide.

10 Guide Comments
1 thing I misunderstood or otherwise.
When removing the touch glass/front of the iPod you need to be very very very careful to actually get between the plastic/rubber and outer chrome frame, not between the glass and and the plastic/rubber part. Otherwise this will break all of your plastic pieces that are glued to your touch screen.
Another thing is I removed one of the contacts from the circuit board while removing the battery. I thought the ipod was toast. But upon further investigation I realized that that contact went though the board. So I scraped that area down to the other contacts and applied solder to it. Then I was able to reinstall the new battery. PHEW!
cool. you've got a same problem with me :)
Be careful when you insert your ipod opening tool into your device in step 2 and step 3. The ipod opening tool shouuld be inserted between the metal part and the rubber pad, not between the rubber pad and the edge of touch screen. It will damage your rubber pad surrounding the touch screen. Even though I did some damage to the rubber pad, it looks good when I finish the replacement :)
Did it! Taking apart the case of the Touch (first steps) was the hardest part. Soldering the battery in was a bit tricky. I tinned the connectors prior to soldering and that made it much easier than adding solder later. Reassembly took only about 20 minutes. Disassembly was about 45 minutes. Broke left side of plastic frame around glass front but when reassembled its no problem. You would never know it. I'm really pretty good at electronic assembly and I would agree that its very difficult.
Refer to this thread and I would suggest not desoldering the old pads. This happened to me and I was careful and work with electronics everyday.