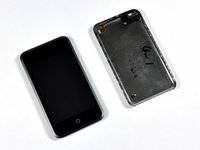
Introduction
Battery not lasting long? Swap it out (requires soldering).
What you need
-
-
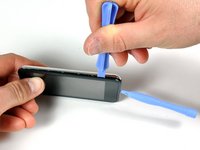
Insert the small plastic opening tool into the seam in between plastic display panel and the metal back panel. The angled edge should point towards the metal back panel.
-
Hold the tool in place once it is wedged inside and the two panels are separated.
-
-
-
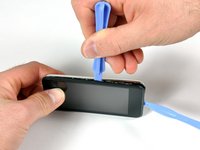
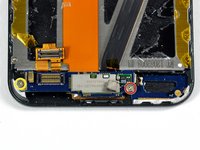
Flip the iPod 180 degrees so it matches the orientation in the picture.
-
Carefully insert the spudger in between the battery and the display. There are routing cables underneath, so make sure you slowly pry the battery loose.
-
-
-
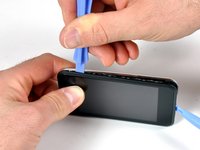
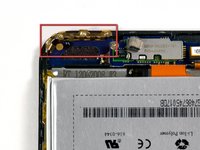
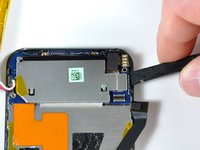
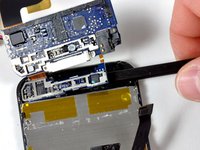
Use a spudger (or your fingernails) to remove the gold antenna. The antenna bends easily, so make sure not to apply too much pressure. When re-assembling, put the gold antenna in place before inserting the antenna circuit boards.
-
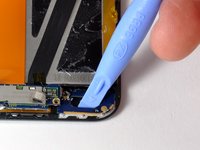
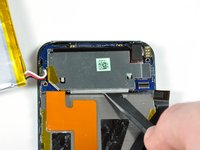
Use the spudger to remove the connector on the left side.
-
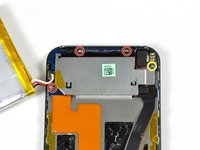
Remove the 2.4 mm Phillips screw.
-
Remove the 1.6 mm Philips screw.
-
-
-
-
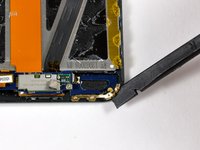
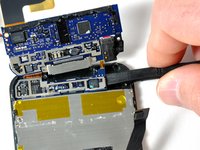
The antenna loop board needs to be pried up (it is glued down). Gently use a plastic opening tool or spudger, to dislodge the antenna loop board. The board is connected to the antenna electronics by a small ribbon cable. This two-board assembly is very frail.
-
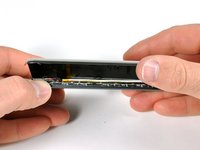
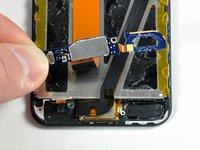
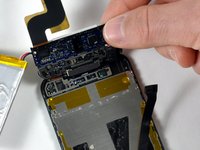
The two small antenna circuit boards can now be lifted up together, and their orange cable can be peeled from the display.
-
-
-
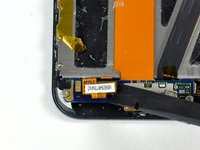
Use the tip of a spudger to remove the cloudy white glue covering the battery contacts.
-
-
Tool used on this step:FixHub | Power Series Smart Soldering Iron$79.95
-
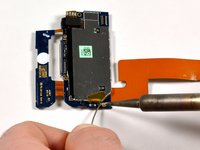
Place the desoldering wick on top of the existing solder ball.
-
Place the soldering iron on top of wick above the existing solder ball.
-
Hold the soldering iron in place until the solder melts into the wick.
-
Repeat the same procedure on the remaining two connectors.
-
Lift the old battery out of the iPod. Be sure that all the solder has been removed before pulling the wires away from the board. The wires should come free with little to no resistance.
-
-
-
Melt a small solder bead directly onto the metal connector on the board by placing the soldering iron onto the metal connector and then pressing solder against the tip and the board.
-
Once a small amount of solder has melted onto the board, lift the solder away first and then the soldering iron.
-
-
-
Place the wire from the new battery onto the new solder bead.
-
Press the tip of the soldering iron onto the solder bead until it melts.
-
Slide the wire lead into the liquid solder until the wire goes through the center of the bead, then remove the soldering iron.
-
Continue with the other two connections the same way, taking special care not to solder two of the connectors together.
-


To reassemble your device, follow these instructions in reverse order.
Cancel: I did not complete this guide.
138 other people completed this guide.

8 Guide Comments
When i did this i found the desoldiering wick un necessary. A helper is mutch advised, she held it, i heated and pulled out the old wires, then reused the soldier already there
If you don't want to go to all the trouble and risk of breaking something. Don't take everything apart. Just cut the battery wires as close as possible to the old battery terminals and splice the wires from the new battery on them. A little solder and a bit of electrical tape and your done! It's miller time!
while this might be an easy way to get the job done, it is for lack of a better word half-assed. It opens the door for shorts and part malfunction in the future. While i can see where you are coming from, it is not the corect way. Do it right the first time.
I stopped at step 5, cut the battery wires and spliced them to those on the new battery and then scotch taped them. It worked, although to official method is doubtless better.
I recommend examining the metal case fastening carefully to see that prongs are flattened before reassembly. Several of mine were bent out and up.