Introduction
Removing the RAM on the mid 2010 Mac mini is an easy task that requires no tools.
What you need
-
-
Place your thumbs in the depressions cut into the bottom cover.
-
Rotate the bottom cover counter-clockwise until the white dot painted on the bottom cover is aligned with the ring inscribed on the outer case.
-
-
-
-
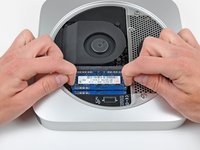
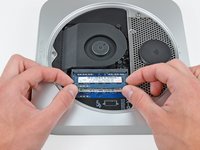
Release the tabs on each side of the RAM chip by simultaneously pushing each tab away from the RAM.
-
After the RAM chip has popped up, pull it straight out of its socket.
-


To reassemble your device, follow these instructions in reverse order.
Cancel: I did not complete this guide.
101 other people completed this guide.

15 Guide Comments
Do the RAM chips have to be paired, or could I replace a one gig bar with a 4 gig bar?
Thanks for any hints!
They don't need to be paired, although that is the optimum. Just remember, it is best to make sure they are the same speed, or the Mac will just operate both RAMs at the speed of the slowest stick. For example, if you have 2x 1GB PC8500 sticks in there, and you replace one of them with a 4GB PC10600 stick (fastest speed this Mac Mini will run) you will get a benefit form the extra memory, but not the full speed upgrade as both RAMs will operate at the speed of the 8500 stick. Does that make sense? So replacing both with 2x 2GB PC10600 will give you better performance.
This Mac Mini will run PC10600 RAM sticks, although I believe only 4GB per slot.
This Mac can run 16GB of RAM, mine does. Just FYI.
Interesting. I want to try that.