Introduction
Upgrade your hard drive for more storage space.
What you need
-
-
Power down your Mac mini, disconnect all of the cables, and flip it over.
-
Insert the Jimmy into the crack between the aluminum top housing and the plastic lower housing.
-
The Jimmy should reach a stop about 3/8" down.
-
-
-
-
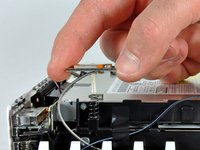
We will first remove the AirPort antenna, located in the lower left corner of this picture.
-
-
-
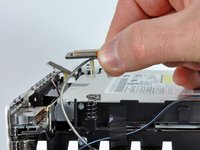
Remove the two Phillips screws connecting the underside of the hard drive to the internal frame.
-


To reassemble your device, follow these instructions in reverse order.
Cancel: I did not complete this guide.
638 other people completed this guide.

27 Guide Comments
The Phillips required on this for me was a size 0, not 00, which was too small.
Step 13 is not needed and should not be attempted.
Ah no you need to remove it to get to the hard drive.
You don't need to remove the connector of the HD temperature sensor from the interconnection board, just detach the sensor from the drive. Then you can still get the drive out. My sensor connector unfortunately broke off completly. I managed to solder the sensor wires directly to the tiny contacts on the board :))