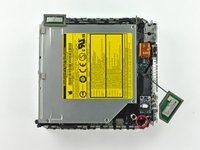
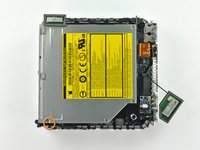
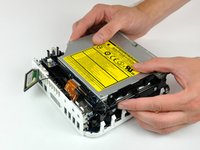
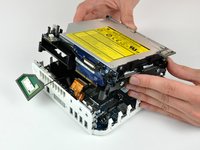
Mac mini Model A1176 RAM Replacement

What you need

Video Overview

  1. Mac mini Model A1176 RAM Replacement, Top Housing: step 1, image 1 of 2 Mac mini Model A1176 RAM Replacement, Top Housing: step 1, image 2 of 2
    • Power down your Mac mini, disconnect all of the cables, and flip it over.

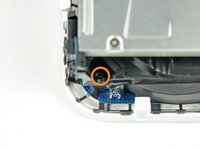
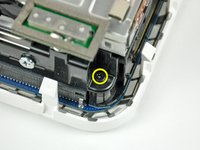
    • Insert the Jimmy into the crack between the aluminum top housing and the plastic lower housing.

    • The Jimmy should reach a stop about 3/8" down.

  2. Mac mini Model A1176 RAM Replacement: step 2, image 1 of 3 Mac mini Model A1176 RAM Replacement: step 2, image 2 of 3 Mac mini Model A1176 RAM Replacement: step 2, image 3 of 3
    • Gently bend the Jimmy outwards to pry the crack open a little larger and lift the lower housing up a small amount.

    • There are several plastic clips on the lower housing that fit into a channel in the aluminum top housing. Your goal is to use the Jimmy to push these clips inward enough to free them from the channel, while gently pulling up on the lower housing.

  3. Mac mini Model A1176 RAM Replacement: step 3, image 1 of 2 Mac mini Model A1176 RAM Replacement: step 3, image 2 of 2
    • Once you have the first side free, rotate the Mac mini and start prying up on the front edge.

    • Use the same prying motion to both bend the clips inward and lift the lower housing up out of the top housing.

  4. Mac mini Model A1176 RAM Replacement: step 4, image 1 of 2 Mac mini Model A1176 RAM Replacement: step 4, image 2 of 2
    • You may need to move the Jimmy along the edge to pry up all of the clips. Be patient and do a little bit at a time.

  5. Mac mini Model A1176 RAM Replacement: step 5, image 1 of 2 Mac mini Model A1176 RAM Replacement: step 5, image 2 of 2
    • Keep working around the perimeter, freeing the clips along the final edge.

  6. Mac mini Model A1176 RAM Replacement: step 6, image 1 of 2 Mac mini Model A1176 RAM Replacement: step 6, image 2 of 2
    • Flip the Mac mini back over and lift the top housing off of the lower housing.

  7. Mac mini Model A1176 RAM Replacement, Internal Frame: step 7, image 1 of 3 Mac mini Model A1176 RAM Replacement, Internal Frame: step 7, image 2 of 3 Mac mini Model A1176 RAM Replacement, Internal Frame: step 7, image 3 of 3
    • Later in this guide you will remove several recessed Phillips screws. Bit drivers are generally too large to fit in the recesses, so be sure to have a thin shafted Phillips screwdriver on hand.

    • First remove the AirPort antenna (the larger of the two), located near the power button.

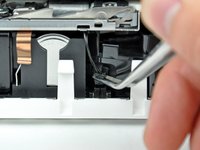
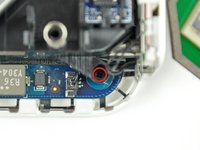
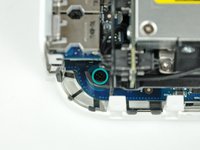
    • Slightly squeeze the two retaining arms toward each other and lift the AirPort antenna off its post.

    • Squeezing the two posts excessively will surely break them off the internal frame. Work delicately.

    • During reinstallation, you will have to slightly squeeze the two posts together so they fit into the openings on the AirPort antenna board.

  8. Mac mini Model A1176 RAM Replacement: step 8, image 1 of 2 Mac mini Model A1176 RAM Replacement: step 8, image 2 of 2
    • Use the tip of a spudger to slightly lift the left side of the ZIF cable lock up from its socket.

    • The ZIF cable lock will lift about 1 mm and stop. Do not try to completely remove the ZIF cable lock.

  9. Mac mini Model A1176 RAM Replacement: step 9, image 1 of 1
    • Lift the audio board ribbon cable up out of its socket.

    • If it refuses to lift from its socket, the ZIF cable lock is not fully released. Make sure it is evenly lifted about 1 mm from the socket on the interconnect board.

  10. Mac mini Model A1176 RAM Replacement: step 10, image 1 of 2 Mac mini Model A1176 RAM Replacement: step 10, image 2 of 2
    • Rotate the mini so that the SuperDrive slot loading mechanism is facing you.

    • Use a pair of tweezers to lift the hard drive thermal sensor cable connector up off its socket on the logic board.

    • Use tweezers to grab the connector (as seen in the picture), not the wires.

    • The connector is located under the optical drive opening, next to the PRAM battery.

  11. Mac mini Model A1176 RAM Replacement: step 11, image 1 of 2 Mac mini Model A1176 RAM Replacement: step 11, image 2 of 2
    • In the next few steps, you will remove the four Phillips screws securing the internal frame to the bottom case. Included in each step is an overview picture showing the general location and a closeup showing the actual screw.

    • Remove the recessed Phillips screw near the power button securing the internal frame to the bottom housing.

  12. Mac mini Model A1176 RAM Replacement: step 12, image 1 of 2 Mac mini Model A1176 RAM Replacement: step 12, image 2 of 2
    • Remove the recessed Phillips screw near the sleep light securing the internal frame to the bottom housing.

    • This screw is the longest of the four screws securing the internal frame to the bottom case.

  13. Mac mini Model A1176 RAM Replacement: step 13, image 1 of 2 Mac mini Model A1176 RAM Replacement: step 13, image 2 of 2
    • Remove the Phillips screw from the internal frame near the Bluetooth antenna.

  14. Mac mini Model A1176 RAM Replacement: step 14, image 1 of 2 Mac mini Model A1176 RAM Replacement: step 14, image 2 of 2
    • Remove the Phillips screw near the audio ports securing the internal frame to the bottom case.

  15. Mac mini Model A1176 RAM Replacement: step 15, image 1 of 2 Mac mini Model A1176 RAM Replacement: step 15, image 2 of 2
    • Gently lift the internal frame up from the bottom housing, minding the AirPort antenna and any other cables that may get caught.

    • It may be necessary to pull up near the interconnect board to separate it from the logic board.

  16. Mac mini Model A1176 RAM Replacement, RAM: step 16, image 1 of 2 Mac mini Model A1176 RAM Replacement, RAM: step 16, image 2 of 2
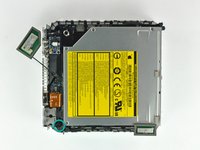
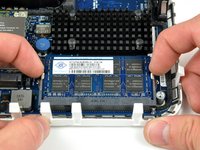
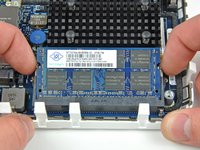
    • Simultaneously pull the tabs on each side of the RAM chip away from the center of the chip. These tabs lock the chip in place and releasing them will cause the chip to "pop" up.

  17. Mac mini Model A1176 RAM Replacement: step 17, image 1 of 1
    • Pull the RAM chip directly out from its connector.

    • If there are two RAM chips installed, repeat the above procedure for the second chip.

Conclusion

To reassemble your device, follow these instructions in reverse order.

307 other people completed this guide.

19 Comments

As a quick warning for noobs (that'd be me before I attempted this repair :P ), you need a matching pair of RAM (two chips the same size and spec). Otherwise, the computer won't boot up. ^_^

Skylar MacDonald - Reply

There were 2x 1GB chips in my 2007 mini. I bought 1x 2GB chip, because I read somewhere that model only would allow 3GB. After replacing a 1GB chip with the new 2GB chip, the system is only showing 1GB RAM installed. Is this what you’re talking about? If I buy another 2GB chip, will it work? PC2-5300 2 GB RAM Chip

Jeff Box -

That is not always true. Often, perhaps…60/40, ish? My 2007 mac mini 2,1 is running one 1gb stick and one 2gb stick, a 500gb Kingston SSD and a salvaged superdrive from a MBP. I am tempted to try a core 2 quad or Xeon in it. For no particular reason than to see if it runs. anyone tried that one? I also had a 2008 mac pro 3,1 running four 2gb and four 4gb of under spec ram without issues.

In the 25 years i’ve been hanging out in server rooms, the client side of the working guidelines for ram matching has become less strict., but still, I believe, the ability to mix is in the manufacturing process. there’s no way but experience to be able to confirm that different makes, speed or size will function together. Unless of course stated in manufacturers documentation. The quality of the individual components will decide.

It will either work or it wont.

If you don’t have ram laying about, then your 100% right, buy matching pairs. otherwise, try it 'till it fires!

Stu Blair -

I successfully run 3GB in my A1176 Minis. When I put the 2GB chip in the bottom slot with the 1GB chip in the top slot, the machine would not boot and the power LED would blink continuously. When I put the 1GB chip in the bottom slot with the 2GB chip in the top slot, the machine works perfectly and sees all 3GB of RAM. (I don’t know if this is a rule or not, this is strictly my anecdotal experience.) I have *not* experienced installing 3GB and having the Mini run and only report 1GB. If you do that, I’d recommend checking to assure that the 2GB stick is seated properly.

I’ve also used 4GB without any trouble in A1176 Minis, but this model can only address a maximum of 3GB RAM. I have run performance comparisons between one equipped with 4GB and equipped with 3GB RAM and they measured identically. If you’re upgrading an A1176 from 2GB (equipped with a pair of 1GB chips) to 3GB, you can save a few dollars by just buying a single PC2-5300 2GB stick.

Mark B -

Thanks a lot, 1Gb -> 4Gb is done !

Eric Seigne - Reply

Add Comment

View Statistics:

Past 24 Hours: 6

Past 7 Days: 33

Past 30 Days: 142

All Time: 189,590