
Motorola Moto X Rear Facing Camera Replacement

What you need

Video Overview

  1. Motorola Moto X Rear Facing Camera Replacement, SIM Card: step 1, image 1 of 3 Motorola Moto X Rear Facing Camera Replacement, SIM Card: step 1, image 2 of 3 Motorola Moto X Rear Facing Camera Replacement, SIM Card: step 1, image 3 of 3
    • Insert the SIM card eject tool into the hole in the side of the SIM card tray and push to eject the tray.

    • Remove the SIM card tray.

    • If the SIM card does not fall free from the tray on its own, simply remove it with your fingers.

  2. Motorola Moto X Rear Facing Camera Replacement, Back Cover Assembly: step 2, image 1 of 3 Motorola Moto X Rear Facing Camera Replacement, Back Cover Assembly: step 2, image 2 of 3 Motorola Moto X Rear Facing Camera Replacement, Back Cover Assembly: step 2, image 3 of 3
    • In the following steps you will be releasing the clips holding the phone's cases together. However, the back case is also secured with an adhesive pad. After separating the clips you will use an iOpener to allow the case to fully open. Do not attempt to fully open the phone before loosening the adhesive.

    • Insert a plastic opening tool into the seam between the front and rear covers near the SIM card slot.

    • Slide the plastic opening tool along the seam toward the upper corner.

  3. Motorola Moto X Rear Facing Camera Replacement: step 3, image 1 of 2 Motorola Moto X Rear Facing Camera Replacement: step 3, image 2 of 2
    • Carefully slide the plastic opening tool around the corner, freeing it from clips.

  4. Motorola Moto X Rear Facing Camera Replacement: step 4, image 1 of 2 Motorola Moto X Rear Facing Camera Replacement: step 4, image 2 of 2
    • Pry around the top right corner of the phone between the two covers.

  5. Motorola Moto X Rear Facing Camera Replacement: step 5, image 1 of 3 Motorola Moto X Rear Facing Camera Replacement: step 5, image 2 of 3 Motorola Moto X Rear Facing Camera Replacement: step 5, image 3 of 3
    • Run the opening tool along the seam around all four sides, separating the remaining clips holding the cover on.

    • The plastic on the front cover is thinner near the buttons, and the buttons may move around. Go slowly to avoid damaging the buttons or the front cover.

    • Do not push the opening tool deep into phone, or you may damage internal components.

  6. Motorola Moto X Rear Facing Camera Replacement: step 6, image 1 of 1
    • Heat an iOpener and lay it over the phone for approximately 90 seconds to loosen the adhesive securing the back cover.

  7. Motorola Moto X Rear Facing Camera Replacement: step 7, image 1 of 3 Motorola Moto X Rear Facing Camera Replacement: step 7, image 2 of 3 Motorola Moto X Rear Facing Camera Replacement: step 7, image 3 of 3
    • Starting from the SIM slot side, carefully peel the back cover off of the phone.

    • The back cover is very flexible, but you don't want to damage any internal components by being too hasty.

    • There is a chance that the NFC coil may remain stubbornly adhered to the back cover. If that's the case, stop peeling the cover and reapply a heated iOpener to the back cover.

    • Do not separate the back cover entirely; it is still connected to the phone by the camera flash cable.

    • The flash cable is attached on the power/volume button side of the phone.

  8. Motorola Moto X Rear Facing Camera Replacement: step 8, image 1 of 1
    • Gently set the back cover down in a way that exposes the camera flash cable connector, but does not put strain on it.

  9. Motorola Moto X Rear Facing Camera Replacement: step 9, image 1 of 3 Motorola Moto X Rear Facing Camera Replacement: step 9, image 2 of 3 Motorola Moto X Rear Facing Camera Replacement: step 9, image 3 of 3
    • Use the tip of a spudger to flip up the retaining flap on the flash cable ZIF connector.

    • Be sure to pry only on the flap itself, not on the connector.

    • Pull the flash cable straight out of its socket.

  10. Motorola Moto X Rear Facing Camera Replacement: step 10, image 1 of 1
    • Separate the back cover from the phone.

  11. Motorola Moto X Rear Facing Camera Replacement, Lower Antenna Assembly: step 11, image 1 of 1
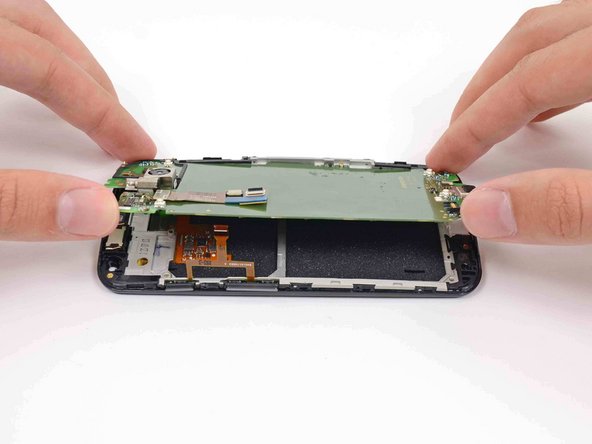
    • Remove the four 3 mm T3 Torx screws securing the lower antenna assembly to the phone.

  12. Motorola Moto X Rear Facing Camera Replacement: step 12, image 1 of 3 Motorola Moto X Rear Facing Camera Replacement: step 12, image 2 of 3 Motorola Moto X Rear Facing Camera Replacement: step 12, image 3 of 3
    • Use the flat end of a spudger to pry up the lower antenna assembly and free it from the phone.

    • Remove the antenna assembly.

  13. Motorola Moto X Rear Facing Camera Replacement, Battery: step 13, image 1 of 3 Motorola Moto X Rear Facing Camera Replacement, Battery: step 13, image 2 of 3 Motorola Moto X Rear Facing Camera Replacement, Battery: step 13, image 3 of 3
    • Insert the tip of a spudger under the battery cable near the connector to lift it straight up from its socket.

    • Use the flat end of a spudger to disconnect the NFC antenna cable connector.

  14. Motorola Moto X Rear Facing Camera Replacement: step 14, image 1 of 3 Motorola Moto X Rear Facing Camera Replacement: step 14, image 2 of 3 Motorola Moto X Rear Facing Camera Replacement: step 14, image 3 of 3
    • Use the tip of a spudger to flip up the ZIF retaining flap from the button assembly cable connector.

    • Slide the tip of the spudger under the button assembly cable near the connector to pull the cable straight out of its socket.

  15. Motorola Moto X Rear Facing Camera Replacement: step 15, image 1 of 2 Motorola Moto X Rear Facing Camera Replacement: step 15, image 2 of 2
    • Insert the flat end of a spudger under the interconnect cable to free it from the adhesive holding it to the battery.

  16. Motorola Moto X Rear Facing Camera Replacement: step 16, image 1 of 2 Motorola Moto X Rear Facing Camera Replacement: step 16, image 2 of 2
    • Use the flat end of a spudger to peel the adhesive pull-tab off the top of battery.

  17. Motorola Moto X Rear Facing Camera Replacement: step 17, image 1 of 3 Motorola Moto X Rear Facing Camera Replacement: step 17, image 2 of 3 Motorola Moto X Rear Facing Camera Replacement: step 17, image 3 of 3
    Tool used on this step:
    Tesa 61395 Tape
    $5.99
    Buy
    • Use the adhesive pull-tab to lift the battery from its recess.

    • The battery is secured to the motherboard with mild adhesive. Peel slowly, and be careful not to bend or puncture the battery.

    • Remove the battery from the phone.

    • When reassembling your phone secure the battery with double-sided tape or pre-cut adhesive strips.

  18. Motorola Moto X Rear Facing Camera Replacement, Motherboard Assembly: step 18, image 1 of 1
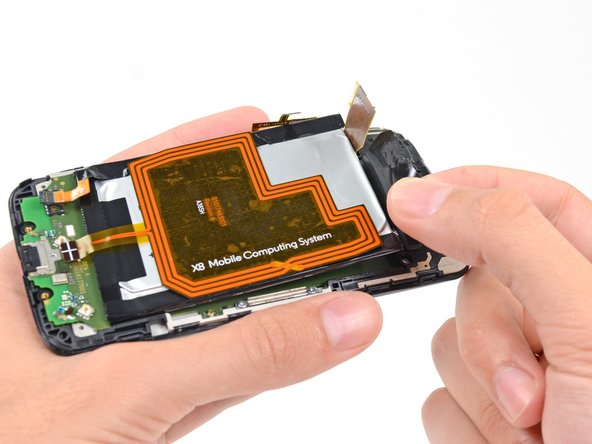
    • Remove the five 3 mm T3 Torx screws from the headphone jack/speaker assembly.

  19. Motorola Moto X Rear Facing Camera Replacement: step 19, image 1 of 3 Motorola Moto X Rear Facing Camera Replacement: step 19, image 2 of 3 Motorola Moto X Rear Facing Camera Replacement: step 19, image 3 of 3
    • Insert a spudger under the panhandle of the headphone jack/speaker assembly and pry it up from its recess.

    • Remove the headphone jack/speaker assembly.

  20. Motorola Moto X Rear Facing Camera Replacement: step 20, image 1 of 2 Motorola Moto X Rear Facing Camera Replacement: step 20, image 2 of 2
    • Push the tip of a spudger under the microphone assembly clip to free it from the earpiece speaker.

    • If the assembly clip seems to be missing, check the speaker assembly that was removed from the previous step.

  21. Motorola Moto X Rear Facing Camera Replacement: step 21, image 1 of 2 Motorola Moto X Rear Facing Camera Replacement: step 21, image 2 of 2
    • Use the flat end of a spudger to free the microphone assembly cable connector.

    • Use tweezers to remove the microphone assembly.

  22. Motorola Moto X Rear Facing Camera Replacement: step 22, image 1 of 2 Motorola Moto X Rear Facing Camera Replacement: step 22, image 2 of 2
    • Disconnect the front-facing camera cable connector.

    • Remove the front-facing camera from its recess with a pair of tweezers.

  23. Motorola Moto X Rear Facing Camera Replacement: step 23, image 1 of 1
    • Remove the final two 3 mm T3 Torx screws from the SIM slot bracket.

  24. Motorola Moto X Rear Facing Camera Replacement: step 24, image 1 of 1
    • Remove the SIM slot bracket from the motherboard.

  25. Motorola Moto X Rear Facing Camera Replacement: step 25, image 1 of 2 Motorola Moto X Rear Facing Camera Replacement: step 25, image 2 of 2
    • Insert the flat end of a spudger under the motherboard above the button assembly cable, and pry it out of the phone.

    • Be careful not to snag any cables.

    • The buttons may pop out of their recesses; take care not to lose them.

  26. Motorola Moto X Rear Facing Camera Replacement: step 26, image 1 of 2 Motorola Moto X Rear Facing Camera Replacement: step 26, image 2 of 2
    • Gently lift the motherboard out of the phone, rotating it from the SIM slot edge of the phone.

    • Do not attempt to separate the motherboard entirely; it is still connected to the display by the display cable.

  27. Motorola Moto X Rear Facing Camera Replacement: step 27, image 1 of 3 Motorola Moto X Rear Facing Camera Replacement: step 27, image 2 of 3 Motorola Moto X Rear Facing Camera Replacement: step 27, image 3 of 3
    • Lay the motherboard down to allow access to the display cable connector.

    • Use the flat end of a spudger to flip the retaining tab on the display cable ZIF connector.

    • Carefully pull the display cable out of its connector as you remove the motherboard from the display assembly.

  28. Motorola Moto X Rear Facing Camera Replacement, Rear Facing Camera: step 28, image 1 of 3 Motorola Moto X Rear Facing Camera Replacement, Rear Facing Camera: step 28, image 2 of 3 Motorola Moto X Rear Facing Camera Replacement, Rear Facing Camera: step 28, image 3 of 3
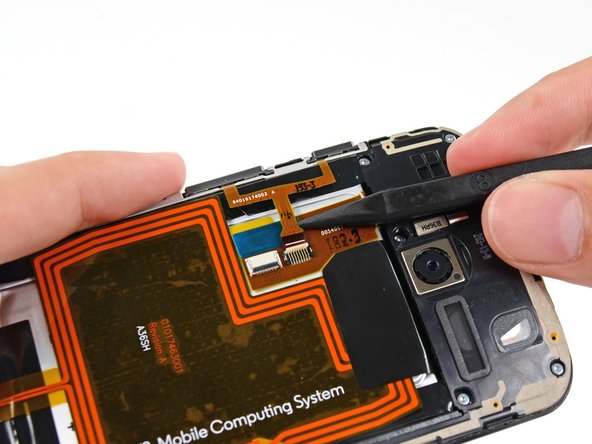
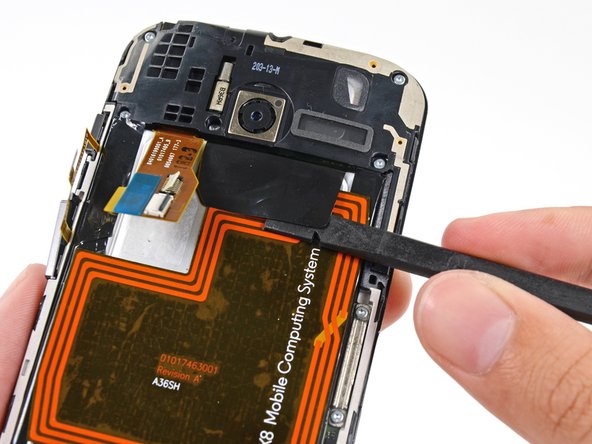
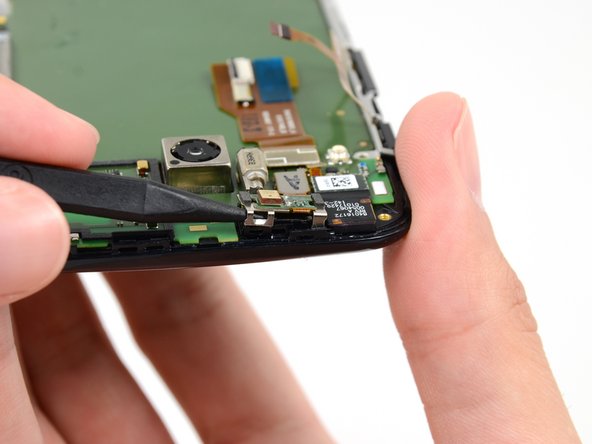
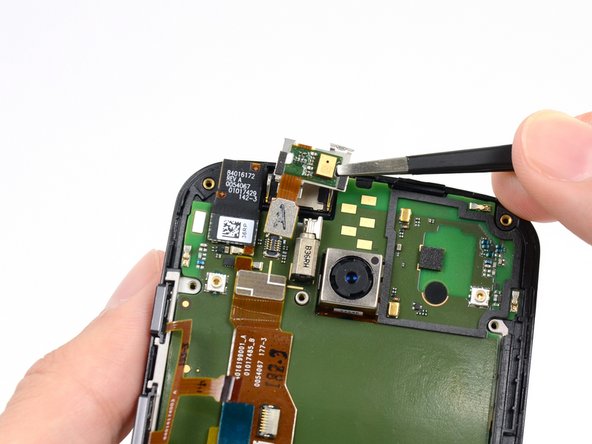
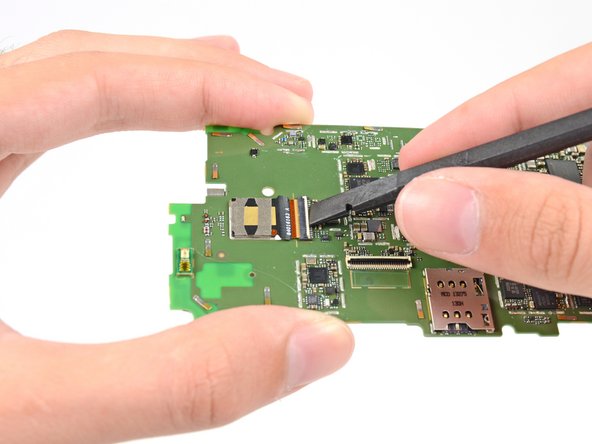
    • Use the flat end of a spudger to flip up the retaining tab on the rear-facing camera ZIF cable connector.

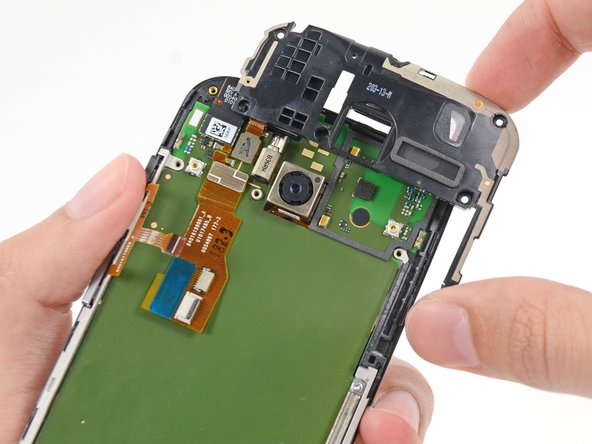
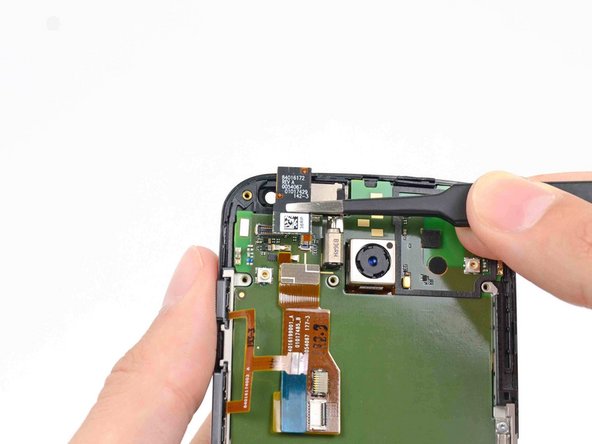
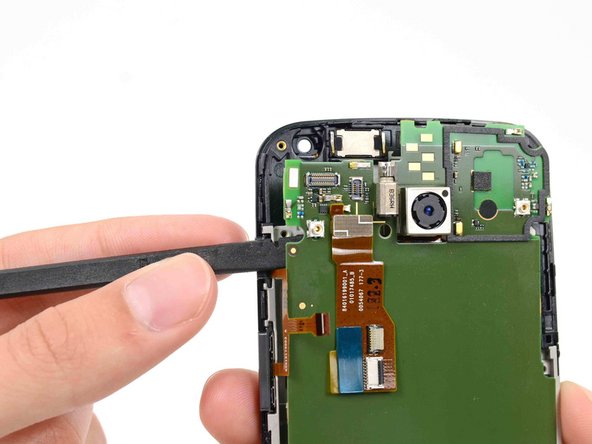
    • Remove the rear-facing camera from the motherboard.

Conclusion

To reassemble your device, follow these instructions in reverse order.

10 other people completed this guide.

Sam Goldheart

Member since: 10/18/12

465,119 Reputation

538 Guides authored

Team

iFixit Member of iFixit

Staff

135 Members

16,476 Guides authored

4 Comments

This took me about an hour or so to do after I got the right tools. I ordered the iOpener "kit" and stupid me thinking that ifixit would directly link you from this page to a kit that works with it, so I didn't read that the kit comes with a T5 torx bit and not a T3. Also no tweezers. Other than that this guide works perfect. The only tricky parts really were getting the battery out; "mild adhesive" my !@#. I used the black tool to slowly pry the battery out. Be patient and the adhesive will give. The other tricky part was getting the motherboard plugged back in. I thought I had it in the first time but apparently didn't. If you get it all back together and all the phone does when you turn it on is do a 1-2sec vibrate every 10 sec or so then check the connection on the motherboard. Great guide for getting your phone DOD ready. Or any job that doesn't allow camera phones on site!

joeracke - Reply

I was successful replacing both my non-functioning camera, a battery getting on the weak side, and a new back cover (went for one of those colorful back covers sold on eBay). The two things that tripped me up were 1) dealing with that sticky gasket between the antenna and the noise-canceling mic (Step 20), and 2) getting the cover glass to stay put on the new back cover. For 2), I ended up fashioning my own adhesive with 2-sided scotch tape.

*ALSO* You really don't need to do Step 35. Leave the motherboard plugged in, and simply remove and re-attach the camera in place.

Rad Mod - Reply

I went through each step methodically and only had problems removing the top black cover in step #28. The assembly came off with the ear speaker attached to it, nonetheless was able to put it back. Just be wary that it might not be as easy as pictured.

When putting it all back together though I got an unwelcome surprise... somehow instead of getting the phone turning on and loading android, I got the symbol of the battery reading 80% and a large battery outline icon in the middle of the screen against white background with a light blue indicator reflecting visually that 80% charge. Anyone got a similar issue? I couldn't get android to start as it usually would. What gives? (Thanks for any help! :)

sfanara - Reply

First I just want to say thank you for putting together this wonderful guide.

I've replaced the camera and it works but the camera has a problem focusing and all the pictures are blurry. Do you think it's the new camera or a software issue. This is the second camera I got from Phone Parts USA that has done this. Any suggestions or advice would be greatly appreciated!

Robert Raney - Reply

Add Comment

View Statistics:

Past 24 Hours: 0

Past 7 Days: 1

Past 30 Days: 6

All Time: 12,203