Motorola Moto X Headphone Jack Replacement

What you need

  1. Motorola Moto X Headphone Jack Replacement, SIM Card: step 1, image 1 of 3 Motorola Moto X Headphone Jack Replacement, SIM Card: step 1, image 2 of 3 Motorola Moto X Headphone Jack Replacement, SIM Card: step 1, image 3 of 3
    • Insert the SIM card eject tool into the hole in the side of the SIM card tray and push to eject the tray.

    • Remove the SIM card tray.

    • If the SIM card does not fall free from the tray on its own, simply remove it with your fingers.

  2. Motorola Moto X Headphone Jack Replacement, Back Cover Assembly: step 2, image 1 of 3 Motorola Moto X Headphone Jack Replacement, Back Cover Assembly: step 2, image 2 of 3 Motorola Moto X Headphone Jack Replacement, Back Cover Assembly: step 2, image 3 of 3
    • In the following steps you will be releasing the clips holding the phone's cases together. However, the back case is also secured with an adhesive pad. After separating the clips you will use an iOpener to allow the case to fully open. Do not attempt to fully open the phone before loosening the adhesive.

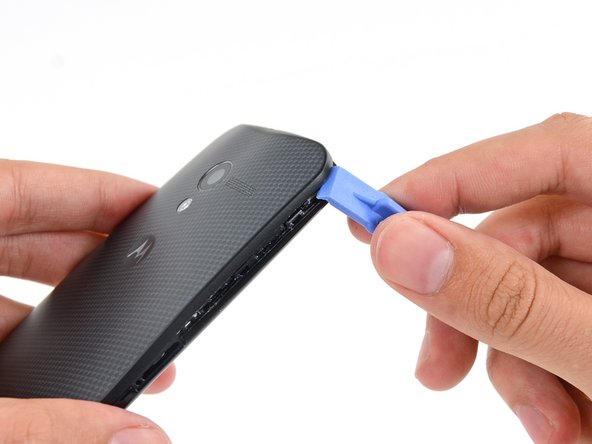
    • Insert a plastic opening tool into the seam between the front and rear covers near the SIM card slot.

    • Slide the plastic opening tool along the seam toward the upper corner.

  3. Motorola Moto X Headphone Jack Replacement: step 3, image 1 of 2 Motorola Moto X Headphone Jack Replacement: step 3, image 2 of 2
    • Carefully slide the plastic opening tool around the corner, freeing it from clips.

  4. Motorola Moto X Headphone Jack Replacement: step 4, image 1 of 2 Motorola Moto X Headphone Jack Replacement: step 4, image 2 of 2
    • Pry around the top right corner of the phone between the two covers.

  5. Motorola Moto X Headphone Jack Replacement: step 5, image 1 of 3 Motorola Moto X Headphone Jack Replacement: step 5, image 2 of 3 Motorola Moto X Headphone Jack Replacement: step 5, image 3 of 3
    • Run the opening tool along the seam around all four sides, separating the remaining clips holding the cover on.

    • The plastic on the front cover is thinner near the buttons, and the buttons may move around. Go slowly to avoid damaging the buttons or the front cover.

    • Do not push the opening tool deep into phone, or you may damage internal components.

  6. Motorola Moto X Headphone Jack Replacement: step 6, image 1 of 1
    • Heat an iOpener and lay it over the phone for approximately 90 seconds to loosen the adhesive securing the back cover.

  7. Motorola Moto X Headphone Jack Replacement: step 7, image 1 of 3 Motorola Moto X Headphone Jack Replacement: step 7, image 2 of 3 Motorola Moto X Headphone Jack Replacement: step 7, image 3 of 3
    • Starting from the SIM slot side, carefully peel the back cover off of the phone.

    • The back cover is very flexible, but you don't want to damage any internal components by being too hasty.

    • There is a chance that the NFC coil may remain stubbornly adhered to the back cover. If that's the case, stop peeling the cover and reapply a heated iOpener to the back cover.

    • Do not separate the back cover entirely; it is still connected to the phone by the camera flash cable.

    • The flash cable is attached on the power/volume button side of the phone.

  8. Motorola Moto X Headphone Jack Replacement: step 8, image 1 of 1
    • Gently set the back cover down in a way that exposes the camera flash cable connector, but does not put strain on it.

  9. Motorola Moto X Headphone Jack Replacement: step 9, image 1 of 3 Motorola Moto X Headphone Jack Replacement: step 9, image 2 of 3 Motorola Moto X Headphone Jack Replacement: step 9, image 3 of 3
    • Use the tip of a spudger to flip up the retaining flap on the flash cable ZIF connector.

    • Be sure to pry only on the flap itself, not on the connector.

    • Pull the flash cable straight out of its socket.

  10. Motorola Moto X Headphone Jack Replacement: step 10, image 1 of 1
    • Separate the back cover from the phone.

  11. Motorola Moto X Headphone Jack Replacement, Headphone Jack/Speaker Assembly: step 11, image 1 of 1
    • Remove the five 3 mm T3 Torx screws from the headphone jack/speaker assembly.

  12. Motorola Moto X Headphone Jack Replacement: step 12, image 1 of 3 Motorola Moto X Headphone Jack Replacement: step 12, image 2 of 3 Motorola Moto X Headphone Jack Replacement: step 12, image 3 of 3
    • Insert a spudger under the panhandle of the headphone jack/speaker assembly and pry it up from its recess.

    • Remove the headphone jack/speaker assembly.

  13. Motorola Moto X Headphone Jack Replacement, Headphone Jack: step 13, image 1 of 3 Motorola Moto X Headphone Jack Replacement, Headphone Jack: step 13, image 2 of 3 Motorola Moto X Headphone Jack Replacement, Headphone Jack: step 13, image 3 of 3
    • Insert the tip of a spudger into the headphone jack and lift upwards to pry the headphone jack out of the display assembly.

    • Remove the headphone jack.

Conclusion

To reassemble your device, follow these instructions in reverse order.

7 other people completed this guide.

Sam Goldheart

Member since: 10/18/12

465,116 Reputation

538 Guides authored

Team

iFixit Member of iFixit

Staff

135 Members

16,475 Guides authored

3 Comments

Getting the back of this thing was scary. I had to use iOpener (or equivalent) device. Work on the back. Reheat it and let it sit for 90 seconds again. Work on the back some more. I did that 3 or 4 times. I still felt like I was going to break the back, the plastic is MUCH more flexible than I though, and MUCH thinner.

Take your time! Once you get the back off, the rest is a snap!

mathan1234 - Reply

The instructions are very precise and the pictures clear and sharp! Thanks for writing the instructions!

Nils Faltin - Reply

Great, everything is working perfectly now. I enjoyed this moment to clean speaker and lens which were so dirty. The only hard step is to remove the back. I advice not using a tool when you’ll unstick this thing, you might damage some component. Separate the back from the phone using your fingers and be very careful to not tear off the mobile computing system. It may remain sticked to the back. Finally, don’t throw away your former head jack before installing the new one. You may have to re-use its flexible platic cover if the one provided with your new headphone jack doesn’t fit in the compartment.

Thanks to the author of this guide which gave me the courage to execute this replacement by myself!

flo_la_star - Reply

Add Comment

View Statistics:

Past 24 Hours: 0

Past 7 Days: 4

Past 30 Days: 8

All Time: 13,676