Introduction
Replacing the upper case requires the removal of nearly every component in your MacBook Pro. You will also need to transfer your old trackpad over to your new upper case.
What you need
Video Overview
-
-
Remove the following ten screws:
-
Three 14.4 mm Phillips #00 screws
-
Three 3.5 mm Phillips #00 screws
-
Four 3.5 mm shouldered Phillips #00 screws
-
-
-
Use the edge of a spudger to pry the battery connector upwards from its socket on the logic board.
-
-
-
Use the edge of a spudger to gently pry the fan connector up and out of its socket on the logic board.
-
-
-
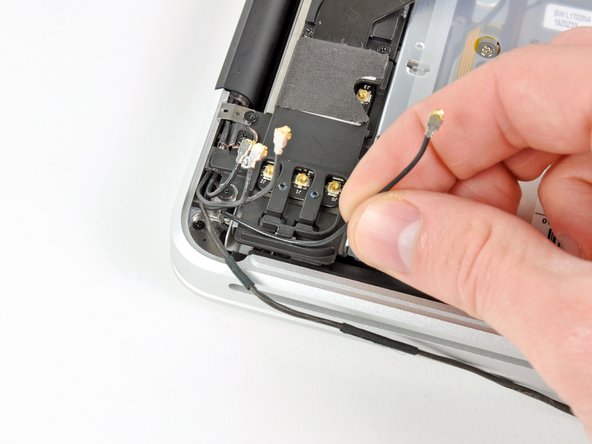
Use the tip of a spudger to pull the right speaker/subwoofer cable out from under the retaining finger molded into the upper case.
-
Pull the right speaker/subwoofer cable upward to lift the connector out of its socket on the logic board.
-
-
-
-
Remove the following two screws:
-
One 5.6 mm Tri-point screw
-
One 13 mm Tri-point screw
-
-
-
Grab the upper case with your right hand and rotate it slightly toward the top of the display so the upper display bracket clears the edge of the upper case.
-
Rotate the display slightly away from the upper case.
-
Lift the display up and away from the upper case, minding any brackets or cables that may get caught.
-
Upper case remains.
-
-
-
Carefully insert the cable from your old trackpad through its slot cut into your new upper case.
-
Use one hand to hold the trackpad cable in place as you insert the two retaining tabs on the outer edge of the trackpad under the lip on the upper case.
-
Pull the trackpad cable as you seat the trackpad into its void in your new upper case.
-
-
-
Tighten the outer two screws along the inner edge of the trackpad and check the alignment of it on the outer side of the upper case.
-
If its alignment looks good, install the rest of the Phillips screws along the inner edge of the trackpad.
-
Before reassembling your machine, verify that the set screw is still installed in a position so the mouse will click correctly.
-


To reassemble your device, follow these instructions in reverse order.
To reassemble your device, follow these instructions in reverse order.
Cancel: I did not complete this guide.
78 other people completed this guide.

3 Comments
Great stuff. I could replace a keyboard in my son's MBP (2011) without any problem. However, later I found the laptop not going to sleep when the lid is closed. Moving a small magnet around the screen bezel does the trick. I found the sleep sensor/battery indicator connector broken. I also replaced that but the problem persists. I must also add that I could replace a wifi card in a friends Macbook Air. Thank you very much for these documents and the pictorial guide.
I am currently typing on my repaired macbook pro, it took awhile and the a-stock replacement case had a few problems like missing foam bits, metal spacers, the electrical part under the disk drive opening and a broken off screw in one of the two power button locations but with some careful removal of the items from the old case and placement with a bit of superglue in the purchased case, it all went back together. And works which is what counts. It was a mid 2011 that suffered a coffee spill when only 2 months old put away until now. (in other words the new used case had been stripped clean which should be mentioned in the sales description) Otherwise a great instructional guide.
Great walk-thru. Be sure to check out the step’s comments. Many tips are there, especially for the reassembly. Some tricks there help. Be sure to check the comments on the keyboard ribbon. The tape trick is the only way I think you will get it back in that slot.