Introduction
MacBook Pro not reading CDs? Use this guide to replace a burned-out optical drive.
What you need
-
-
Remove the following ten screws securing the lower case to the upper case:
-
Three 13.5 mm (14.1 mm) Phillips screws.
-
Seven 3 mm Phillips screws.
-
-
-
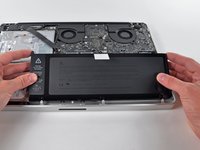
Remove the two 7.4 mm Tri-point screws securing the battery to the upper case.
-
Note: For certain repairs (e.g. hard drive), removing the battery is not necessary but it prevents any accidental shorting of electronics on the motherboard. If you do not remove the battery, please be careful as parts of the motherboard might be electrified.
-
-
-
-
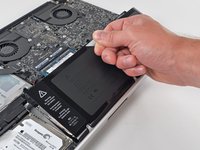
Tilt the battery away from the logic board enough to access the battery cable connector.
-
Pull the battery cable connector away from its socket on the logic board and remove the battery from the upper case.
-
Charge it to 100%, and then keep charging it for at least 2 more hours. Next, unplug and use it normally to drain the battery. When you see the low battery warning, save your work, and keep your laptop on until it goes to sleep due to low battery. Wait at least 5 hours, then charge your laptop uninterrupted to 100%.
-
If you notice any unusual behavior or problems after installing your new battery, you may need to reset your MacBook's SMC.
-
-
-
Use the flat end of a spudger to pry the AirPort/Bluetooth ribbon cable connector up off the logic board.
-
-
-
Pull the optical drive cable out of the optical drive.
-
Optical drive remains.
-
-
-
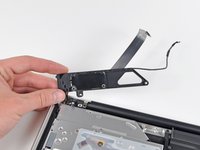
Remove the two black Phillips #0 screws securing the small metal mounting bracket. Transfer this bracket to your new optical drive or hard drive enclosure.
-


To reassemble your device, follow these instructions in reverse order.
Cancel: I did not complete this guide.
47 other people completed this guide.

5 Guide Comments
Used this guide to replaced optical with ssd with caddy. Perfect! :-)
Used this in combination with the disc/foreign object removal guide to clear some junk from my optical drive. It finally accepts discs again! Great guide, thank you!
The 3 screws that secure our drive (Step 11) are hex screws
Hi Ronnie and Sandy! Are you sure you correctly identified your MacBook Pro? Starting with the Early 2011 Model, those screws are Torx T6 instead of Phillips. Check out our ID your Mac tool to double-check: https://www.ifixit.com/Info/ID-your-Mac