
MacBook Air 15" 2024 Headphone Jack Replacement

What you need

  1. MacBook Air 15" 2024 Headphone Jack Replacement, Prepare your Macbook Air for disassembly: step 1, image 1 of 3 MacBook Air 15" 2024 Headphone Jack Replacement, Prepare your Macbook Air for disassembly: step 1, image 2 of 3 MacBook Air 15" 2024 Headphone Jack Replacement, Prepare your Macbook Air for disassembly: step 1, image 3 of 3
    • Allow your MacBook's battery to drain below 25% before starting this repair—a charged battery may catch fire if damaged.

    • Unplug all cables and fully power off your MacBook.

    • Close the display and lay your MacBook upside down. Keep your laptop closed until you've physically disconnected the battery.

  2. MacBook Air 15" 2024 Headphone Jack Replacement, Unfasten the lower case: step 2, image 1 of 2 MacBook Air 15" 2024 Headphone Jack Replacement, Unfasten the lower case: step 2, image 2 of 2
    Tool used on this step:
    FixMat
    $36.95
    Buy
    • Use a P5 pentalobe screwdriver to remove the four 6.4 mm‑long screws securing the lower case.

    • Throughout this repair, keep track of each screw and make sure it goes back exactly where it came from.

  3. MacBook Air 15" 2024 Headphone Jack Replacement, Insert an opening pick: step 3, image 1 of 3 MacBook Air 15" 2024 Headphone Jack Replacement, Insert an opening pick: step 3, image 2 of 3 MacBook Air 15" 2024 Headphone Jack Replacement, Insert an opening pick: step 3, image 3 of 3
    • Apply a suction handle to the center of the lower case's front edge.

    • Pull up on the suction handle to create a gap between the lower case and the frame.

    • Insert an opening pick into the gap.

  4. MacBook Air 15" 2024 Headphone Jack Replacement, Release the snapping clips: step 4, image 1 of 3 MacBook Air 15" 2024 Headphone Jack Replacement, Release the snapping clips: step 4, image 2 of 3 MacBook Air 15" 2024 Headphone Jack Replacement, Release the snapping clips: step 4, image 3 of 3
    • During the next two steps you'll feel and hear six snapping clips release. If a clip doesn't release, insert your opening pick farther and try again.

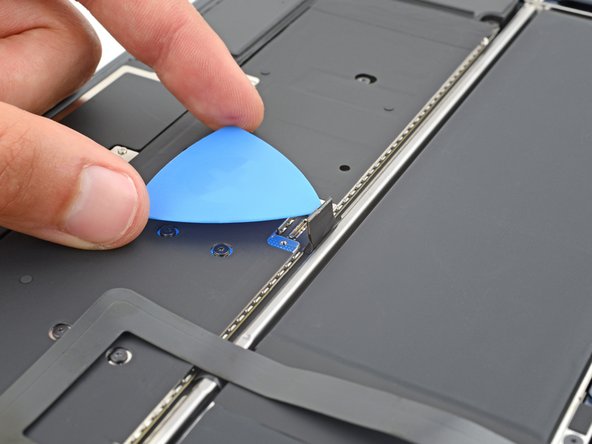
    • Slide the pick to the bottom right corner to release the first clip.

    • Slide the pick around the corner and up the right edge to release the next two clips.

  5. MacBook Air 15" 2024 Headphone Jack Replacement: step 5, image 1 of 3 MacBook Air 15" 2024 Headphone Jack Replacement: step 5, image 2 of 3 MacBook Air 15" 2024 Headphone Jack Replacement: step 5, image 3 of 3
    • Insert the opening pick in the original gap created with the suction handle.

    • Slide the opening pick to the bottom left corner and up the left edge to release the three remaining snapping clips.

  6. MacBook Air 15" 2024 Headphone Jack Replacement, Release the sliding tabs: step 6, image 1 of 3 MacBook Air 15" 2024 Headphone Jack Replacement, Release the sliding tabs: step 6, image 2 of 3 MacBook Air 15" 2024 Headphone Jack Replacement, Release the sliding tabs: step 6, image 3 of 3
    • Four sliding tabs along the back edge of the MacBook firmly secure the lower case. Separating these tabs requires a lot of force—consider using gloves to protect your hands from the sharp edges of the lower case.

    • Keep the lower case flat and firmly pull it straight away from the back edge, one corner at a time, to disengage the sliding tabs.

    • Don't pull up until the cover is completely separated.

  7. MacBook Air 15" 2024 Headphone Jack Replacement, Remove the lower case: step 7, image 1 of 3 MacBook Air 15" 2024 Headphone Jack Replacement, Remove the lower case: step 7, image 2 of 3 MacBook Air 15" 2024 Headphone Jack Replacement, Remove the lower case: step 7, image 3 of 3
    • Remove the lower case.

    • During reassembly:

    • Set the lower case in place and align the sliding tabs with the screw heads they slide over. Press down and slide the lower case toward the back edge to engage the tabs—it'll stop sliding as the tabs engage.

    • When one side is engaged, it may push the other out of alignment. Check both sides as you push, there should be no gap along the back edge.

    • Once the lower case is flush with the frame, press down firmly along the perimeter to engage the six snapping clips.

    • You'll hear and feel a distinct click as each clip snaps into place.

  8. MacBook Air 15" 2024 Headphone Jack Replacement, Remove the battery connector cover tape: step 8, image 1 of 3 MacBook Air 15" 2024 Headphone Jack Replacement, Remove the battery connector cover tape: step 8, image 2 of 3 MacBook Air 15" 2024 Headphone Jack Replacement, Remove the battery connector cover tape: step 8, image 3 of 3
    Tool used on this step:
    Tweezers
    $4.99
    Buy
    • Use blunt nose tweezers or your fingers to remove the piece of tape covering the battery connector cover.

    • During reassembly, use the leftover adhesive to secure the tape to the cover.

  9. MacBook Air 15" 2024 Headphone Jack Replacement, Remove the battery connector cover: step 9, image 1 of 3 MacBook Air 15" 2024 Headphone Jack Replacement, Remove the battery connector cover: step 9, image 2 of 3 MacBook Air 15" 2024 Headphone Jack Replacement, Remove the battery connector cover: step 9, image 3 of 3
    • Use a T3 Torx screwdriver to remove the two 1.5 mm‑long screws securing the battery connector cover.

    • Due to screw variances, you may need to use a T4 Torx instead. Keep this in mind whenever you encounter T3 Torx screws during this repair.

    • Remove the cover.

  10. MacBook Air 15" 2024 Headphone Jack Replacement, Disconnect the battery: step 10, image 1 of 2 MacBook Air 15" 2024 Headphone Jack Replacement, Disconnect the battery: step 10, image 2 of 2
    • Use an opening pick to pry up and disconnect the battery connector.

    • To reconnect a press connector, align it over the socket and gently press down on one side until it clicks into place, then press down on the other side. It might take a few tries to align the connector.

  11. MacBook Air 15" 2024 Headphone Jack Replacement, Unfasten the speaker cable and hinge covers: step 11, image 1 of 2 MacBook Air 15" 2024 Headphone Jack Replacement, Unfasten the speaker cable and hinge covers: step 11, image 2 of 2
    • The right speaker will be on your left-hand side when working on the MacBook, as it's laying upside down.

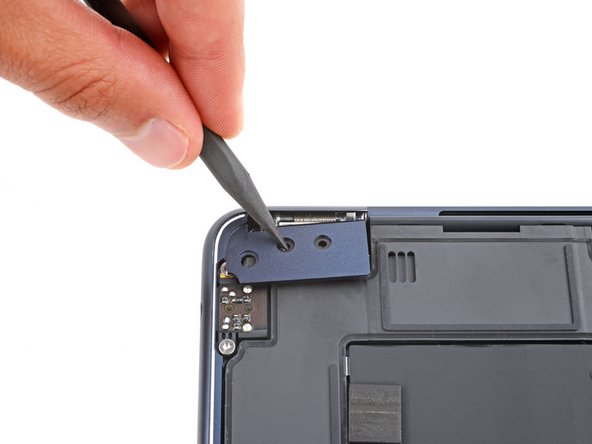
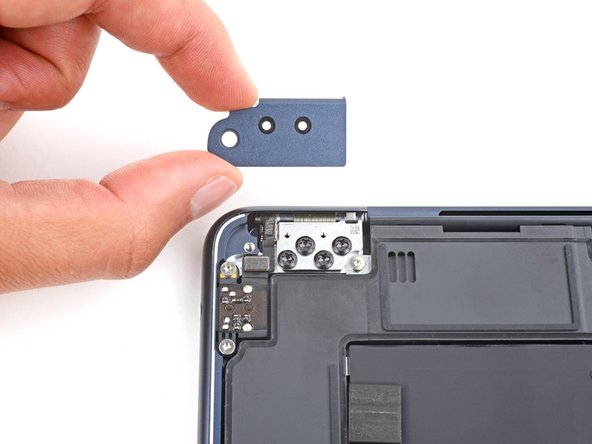
    • Use a T3 Torx screwdriver to remove the following screws:

    • Two 2.6 mm‑long screws securing the left hinge cover

    • Two 1.5 mm‑long screws securing the speaker cable cover

  12. MacBook Air 15" 2024 Headphone Jack Replacement, Remove the covers: step 12, image 1 of 1
    • Remove the speaker cable cover.

  13. MacBook Air 15" 2024 Headphone Jack Replacement: step 13, image 1 of 3 MacBook Air 15" 2024 Headphone Jack Replacement: step 13, image 2 of 3 MacBook Air 15" 2024 Headphone Jack Replacement: step 13, image 3 of 3
    • Insert the point of a spudger into one of the left hinge cover's screw holes.

    • Push the hinge cover away from the back edge to dislodge it.

    • Remove the hinge cover.

  14. MacBook Air 15" 2024 Headphone Jack Replacement, Disconnect the right speaker: step 14, image 1 of 3 MacBook Air 15" 2024 Headphone Jack Replacement, Disconnect the right speaker: step 14, image 2 of 3 MacBook Air 15" 2024 Headphone Jack Replacement, Disconnect the right speaker: step 14, image 3 of 3
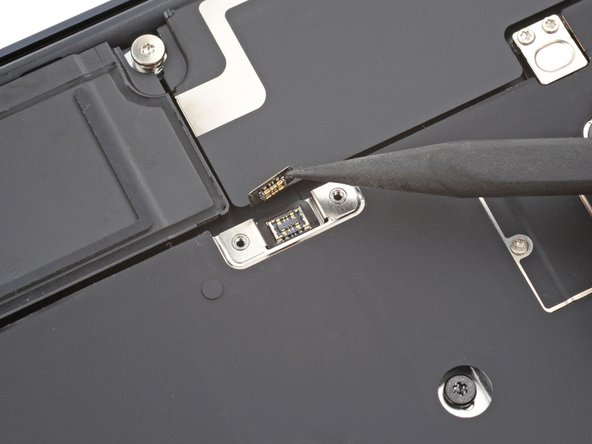
    • Use the point of a spudger to pry up and disconnect the right speaker press connector.

  15. MacBook Air 15" 2024 Headphone Jack Replacement, Unfasten the right speaker: step 15, image 1 of 2 MacBook Air 15" 2024 Headphone Jack Replacement, Unfasten the right speaker: step 15, image 2 of 2
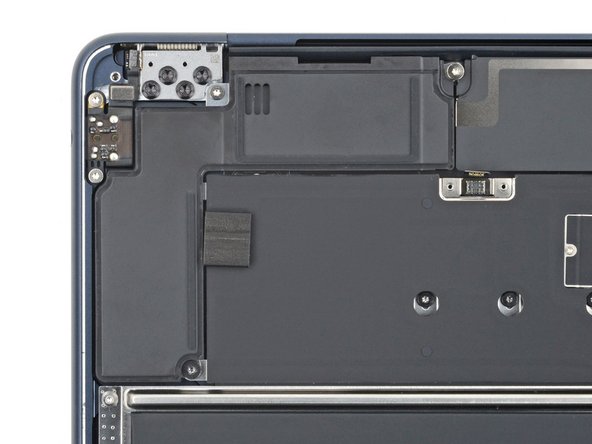
    • Use a T5 Torx screwdriver to remove the two screws securing the top edge of the right speaker:

    • One 2.7 mm‑long screw

    • One 5.5 mm‑long screw

    • Use a T6 Torx screwdriver to remove the 3.5 mm‑long screw securing the bottom edge of the speaker.

  16. MacBook Air 15" 2024 Headphone Jack Replacement, Remove the right speaker: step 16, image 1 of 3 MacBook Air 15" 2024 Headphone Jack Replacement, Remove the right speaker: step 16, image 2 of 3 MacBook Air 15" 2024 Headphone Jack Replacement, Remove the right speaker: step 16, image 3 of 3
    • Make sure the cable on the top right edge of the speaker doesn't get caught on the logic board, as it may tear.

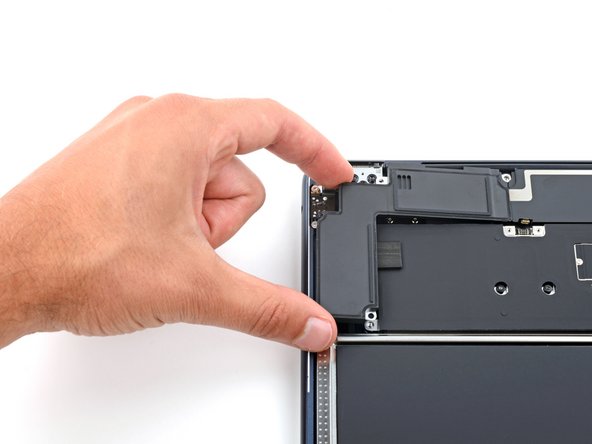
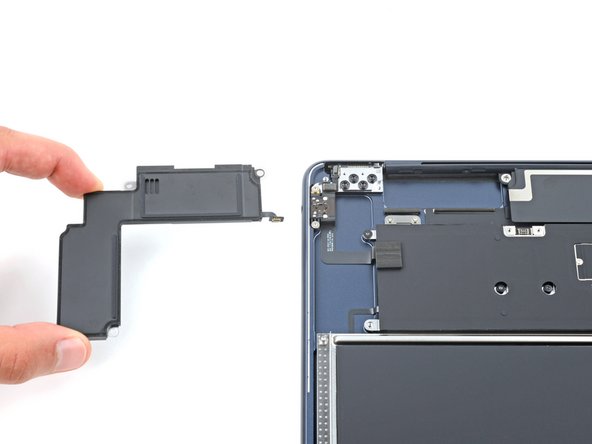
    • Lift the speaker's left edge over the frame and slide it to the left to remove it.

    • During reassembly, slide the speaker cable under the left edge of the antenna bar assembly before laying the speaker in its recess.

  17. MacBook Air 15" 2024 Headphone Jack Replacement, Remove the foam pad: step 17, image 1 of 2 MacBook Air 15" 2024 Headphone Jack Replacement, Remove the foam pad: step 17, image 2 of 2
    Tool used on this step:
    Tesa 61395 Tape
    $2.99
    Buy
    • Use tweezers or your fingers to remove the foam pad from the headphone jack press connector cover on the left edge of the logic board.

    • During reassembly, use the leftover adhesive to secure the foam pad. If the pad doesn't stick, use double-sided tape to secure it.

  18. MacBook Air 15" 2024 Headphone Jack Replacement, Remove the press connector cover: step 18, image 1 of 3 MacBook Air 15" 2024 Headphone Jack Replacement, Remove the press connector cover: step 18, image 2 of 3 MacBook Air 15" 2024 Headphone Jack Replacement, Remove the press connector cover: step 18, image 3 of 3
    • Use a T3 Torx screwdriver to remove the 1.5 mm‑long screw securing the headphone jack press connector cover.

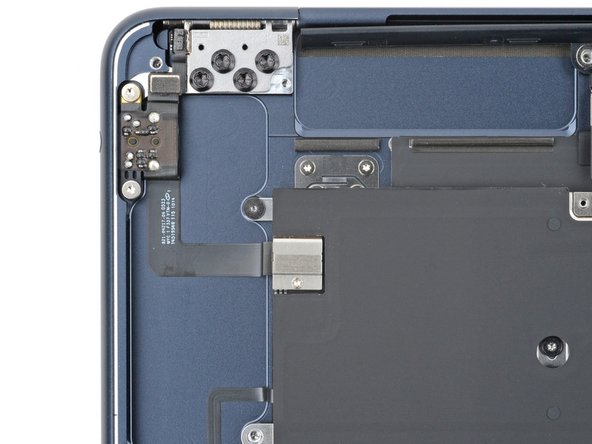
    • Remove the headphone jack press connector cover.

  19. MacBook Air 15" 2024 Headphone Jack Replacement, Disconnect the headphone jack: step 19, image 1 of 2 MacBook Air 15" 2024 Headphone Jack Replacement, Disconnect the headphone jack: step 19, image 2 of 2
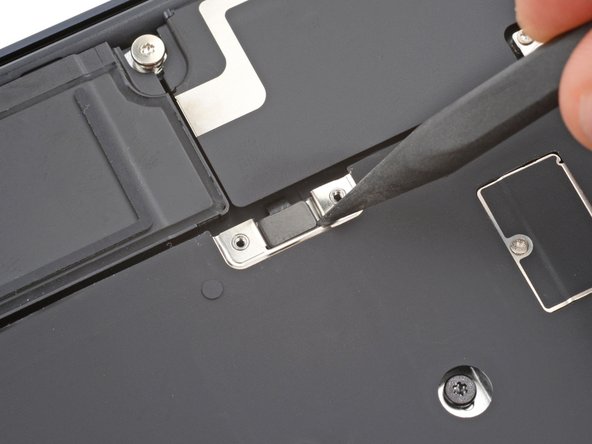
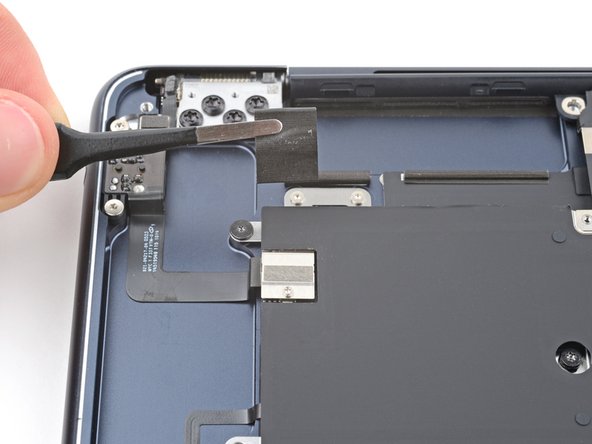
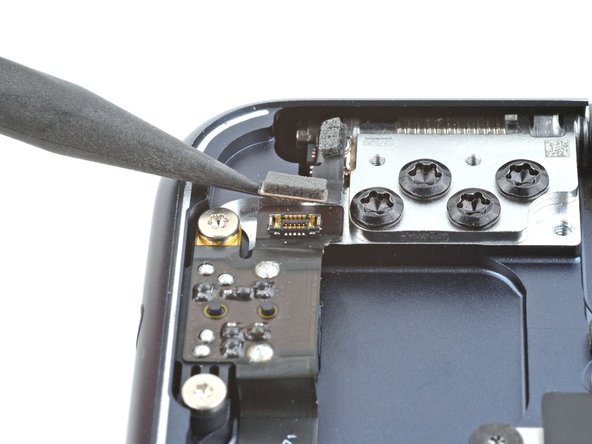
    • Use the flat end of a spudger to pry up and disconnect the headphone jack press connector.

  20. MacBook Air 15" 2024 Headphone Jack Replacement, Disconnect the lid angle sensor: step 20, image 1 of 2 MacBook Air 15" 2024 Headphone Jack Replacement, Disconnect the lid angle sensor: step 20, image 2 of 2
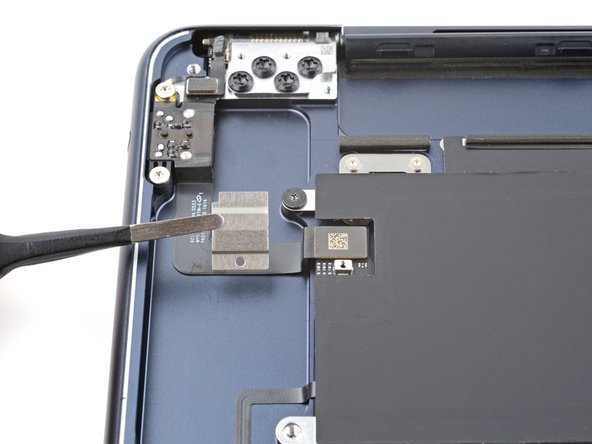
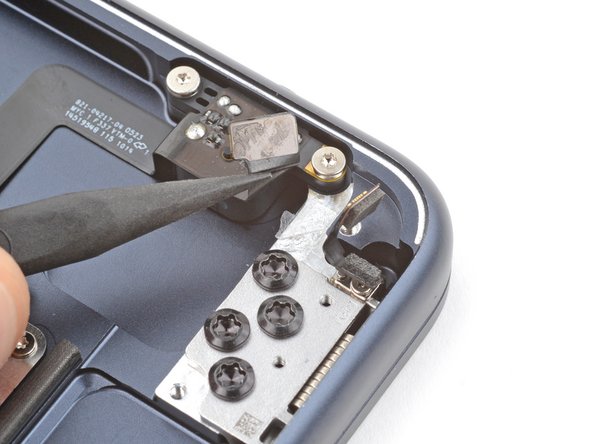
    • Use the point of a spudger to pry up and disconnect the lid angle sensor press connector from the headphone jack's upper cable.

  21. MacBook Air 15" 2024 Headphone Jack Replacement, Separate the upper and lower cable adhesive: step 21, image 1 of 2 MacBook Air 15" 2024 Headphone Jack Replacement, Separate the upper and lower cable adhesive: step 21, image 2 of 2
    • Light adhesive secures the headphone jack's upper and lower cables to the frame.

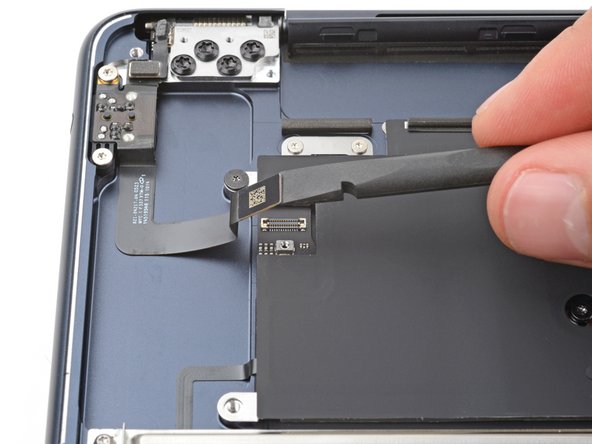
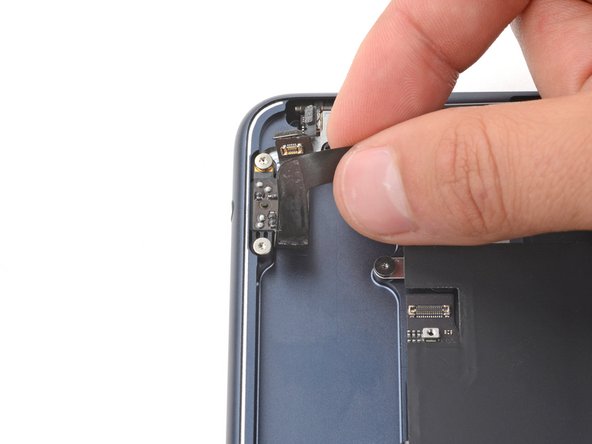
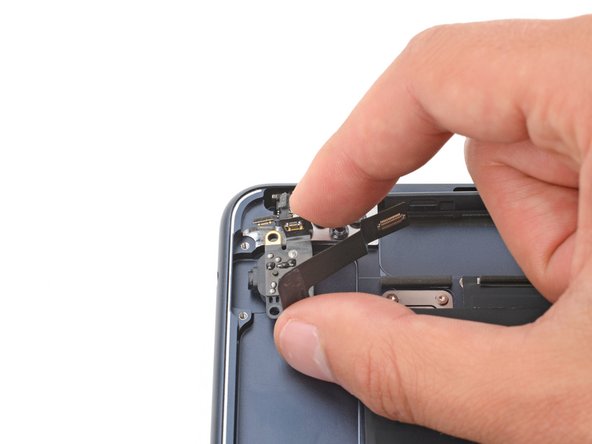
    • Insert the point of a spudger under the headphone jack's upper cable.

    • Gently lift the cable to separate the adhesive securing it.

  22. MacBook Air 15" 2024 Headphone Jack Replacement: step 22, image 1 of 2 MacBook Air 15" 2024 Headphone Jack Replacement: step 22, image 2 of 2
    Tool used on this step:
    Tesa 61395 Tape
    $2.99
    Buy
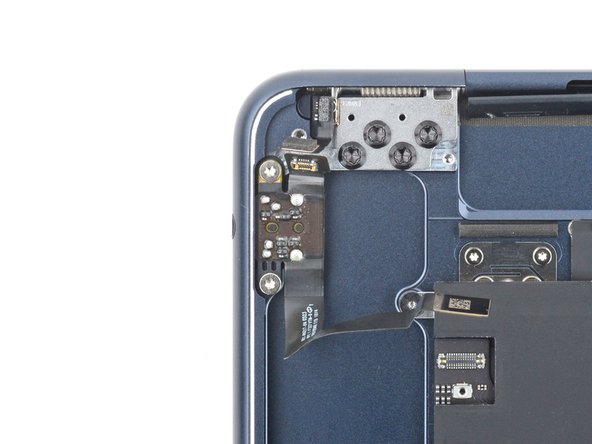
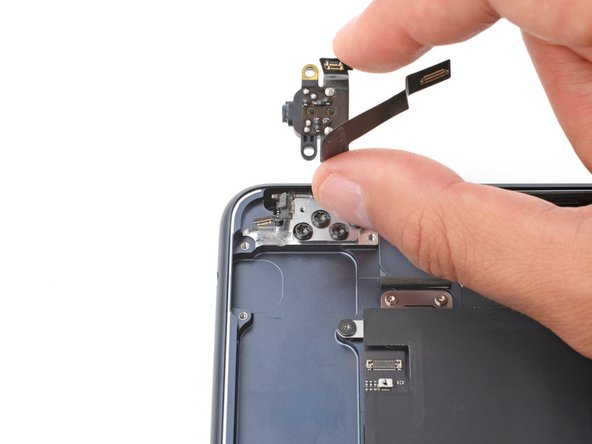
    • Gently peel the headphone jack's lower cable from the frame.

    • During reassembly:

    • If your new headphone jack's cables come with adhesive, remove the plastic backings and press the cables into place on the frame.

    • If the cables don't have adhesive, use strips of double-sided tape to secure them to the frame.

  23. MacBook Air 15" 2024 Headphone Jack Replacement, Unfasten the headphone jack: step 23, image 1 of 2 MacBook Air 15" 2024 Headphone Jack Replacement, Unfasten the headphone jack: step 23, image 2 of 2
    • Use a T5 Torx screwdriver to remove the two 4.8 mm‑long screws securing the headphone jack.

  24. MacBook Air 15" 2024 Headphone Jack Replacement, Remove the headphone jack: step 24, image 1 of 3 MacBook Air 15" 2024 Headphone Jack Replacement, Remove the headphone jack: step 24, image 2 of 3 MacBook Air 15" 2024 Headphone Jack Replacement, Remove the headphone jack: step 24, image 3 of 3
    • Slide the headphone jack out of its recess and remove it.

Conclusion

To reassemble your device, follow these instructions in reverse order.

Take your e-waste to an R2 or e-Stewards certified recycler.

Repair didn’t go as planned? Try some basic troubleshooting, or ask our Answers community for help.

Spencer Day

Member since: 09/14/22

58,593 Reputation

430 Guides authored

Team

iFixit Member of iFixit

Staff

137 Members

17,524 Guides authored

0 Comments

Add Comment

View Statistics:

Past 24 Hours: 0

Past 7 Days: 5

Past 30 Days: 25

All Time: 27