Kobo Libra Colour Front Cover Replacement

What you need

  1. Kobo Libra Colour Front Cover Replacement, Before you begin: step 1, image 1 of 3 Kobo Libra Colour Front Cover Replacement, Before you begin: step 1, image 2 of 3 Kobo Libra Colour Front Cover Replacement, Before you begin: step 1, image 3 of 3
    • Drain your eReader's battery as much as possible before starting your repair. Ideally, it should be fully discharged.

    • Optionally, to drain the battery faster, navigate to MoreSettingsEnergy saving and privacy and set Automatically go to sleep after and Automatically power off after to Never.

    • When working on or near the battery, don't use sharp metal tools to avoid puncturing and shorting the battery.

    • Unplug all cables and fully shut down your eReader.

    • Your screen should be black and say Powered off.

  2. Kobo Libra Colour Front Cover Replacement, Insert an opening pick: step 2, image 1 of 3 Kobo Libra Colour Front Cover Replacement, Insert an opening pick: step 2, image 2 of 3 Kobo Libra Colour Front Cover Replacement, Insert an opening pick: step 2, image 3 of 3
    • Flip your eReader over so the screen is facing down.

    • Angle an opening pick straight down, and insert its tip under the top right corner of the back cover, near the power button.

    • Push downward and pry up with the pick until you feel it slide between one of the clips and the frame.

    • You may have to test a few spots along the corner until the pick slides between one of the clips.

  3. Kobo Libra Colour Front Cover Replacement, Release the right clips: step 3, image 1 of 3 Kobo Libra Colour Front Cover Replacement, Release the right clips: step 3, image 2 of 3 Kobo Libra Colour Front Cover Replacement, Release the right clips: step 3, image 3 of 3
    • Slide the pick toward the bottom right corner to release the clips along the right edge.

  4. Kobo Libra Colour Front Cover Replacement: step 4, image 1 of 2 Kobo Libra Colour Front Cover Replacement: step 4, image 2 of 2
    • Angle the pick flat under the back cover and rotate it around the bottom right corner to release its clips.

    • If you're having trouble, try twisting the pick to lift the corner clips out of their slots.

  5. Kobo Libra Colour Front Cover Replacement, Release the bottom clips: step 5, image 1 of 3 Kobo Libra Colour Front Cover Replacement, Release the bottom clips: step 5, image 2 of 3 Kobo Libra Colour Front Cover Replacement, Release the bottom clips: step 5, image 3 of 3
    • Slide the pick toward the bottom left corner to release the clips along the bottom edge.

  6. Kobo Libra Colour Front Cover Replacement, Remove the back cover: step 6, image 1 of 3 Kobo Libra Colour Front Cover Replacement, Remove the back cover: step 6, image 2 of 3 Kobo Libra Colour Front Cover Replacement, Remove the back cover: step 6, image 3 of 3
    • At this point, you should be able to grip the back cover and release its remaining clips. If not, slide a pick under the perimeter of the back cover until you can grip an edge.

    • Grip the right edge of the back cover and lift it away from the eReader to release the remaining clips.

    • Remove the back cover.

    • During reassembly, align the back cover over the eReader and press along the perimeter until all its clips snap back into place.

  7. Kobo Libra Colour Front Cover Replacement, Coating information: step 7, image 1 of 3 Kobo Libra Colour Front Cover Replacement, Coating information: step 7, image 2 of 3 Kobo Libra Colour Front Cover Replacement, Coating information: step 7, image 3 of 3
    • The entire surface of the eReader's internals is covered in a thin, plastic-like waterproof coating. Keep the following in mind as you continue disassembly:

    • While this won't hurt your device, removing the coating compromises the device to potential water damage.

    • The coating is brittle and can flake into many small pieces. Heating the coating helps, but working with it is still a time-consuming process.

    • Depending on your repair, you might have to remove the coating from ZIF connectors and their cables.

  8. Kobo Libra Colour Front Cover Replacement, Disconnect the battery: step 8, image 1 of 2 Kobo Libra Colour Front Cover Replacement, Disconnect the battery: step 8, image 2 of 2
    • Use a spudger to pry up and disconnect the battery press connector.

    • Don't pry against the motherboard, as you risk breaking small, surface-mounted components.

    • Your E-ink screen will continue to say Powered off even after disconnection—this is normal!

  9. Kobo Libra Colour Front Cover Replacement, Remove the front cover screws: step 9, image 1 of 2 Kobo Libra Colour Front Cover Replacement, Remove the front cover screws: step 9, image 2 of 2
    • Use a Phillips screwdriver to remove the two 3.9 mm‑long screws securing the front cover.

    • You don't need to remove the screw next to the charging port.

  10. Kobo Libra Colour Front Cover Replacement, Heat the front cover: step 10, image 1 of 3 Kobo Libra Colour Front Cover Replacement, Heat the front cover: step 10, image 2 of 3 Kobo Libra Colour Front Cover Replacement, Heat the front cover: step 10, image 3 of 3
    • The front cover is secured with clips and adhesive.

    • Flip your eReader over so the screen is facing up.

    • Heat an iOpener and lay it on the top edge of the front cover for 90 seconds to soften the adhesive underneath.

    • Alternatively, you can use a hair dryer or a heat gun.

  11. Kobo Libra Colour Front Cover Replacement, Unclip the front cover: step 11, image 1 of 3 Kobo Libra Colour Front Cover Replacement, Unclip the front cover: step 11, image 2 of 3 Kobo Libra Colour Front Cover Replacement, Unclip the front cover: step 11, image 3 of 3
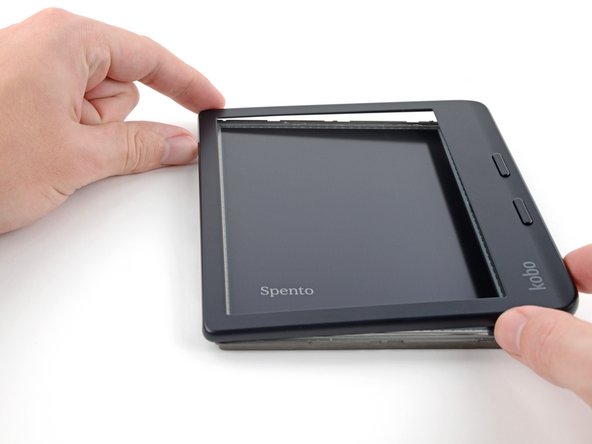
    • Hold the eReader so your thumbs can push the underside of the front cover off its clips while your other fingers can pull the screen in the opposite direction.

    • Push the top left corner of the front cover while pulling the screen in the opposite direction to release the clips and separate the adhesive.

    • You'll hear and feel the adhesive slowly separate as you push on the front cover.

    • If you're having trouble, reheat the top edge for one minute before trying again.

  12. Kobo Libra Colour Front Cover Replacement: step 12, image 1 of 3 Kobo Libra Colour Front Cover Replacement: step 12, image 2 of 3 Kobo Libra Colour Front Cover Replacement: step 12, image 3 of 3
    • While keeping the corner of the front cover separated with one hand, use your other hand to peel the left edge of the front cover off the screen.

  13. Kobo Libra Colour Front Cover Replacement: step 13, image 1 of 3 Kobo Libra Colour Front Cover Replacement: step 13, image 2 of 3 Kobo Libra Colour Front Cover Replacement: step 13, image 3 of 3
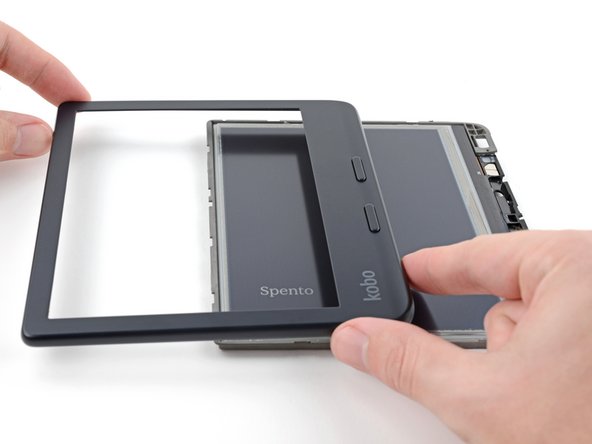
    • Continue working around the perimeter of the front cover until all of the clips release and the adhesive is completely separated.

    • Heat the edges of the front cover when necessary.

    • The larger, rounded corners take more force to release their clips.

  14. Kobo Libra Colour Front Cover Replacement, Remove the front cover: step 14, image 1 of 3 Kobo Libra Colour Front Cover Replacement, Remove the front cover: step 14, image 2 of 3 Kobo Libra Colour Front Cover Replacement, Remove the front cover: step 14, image 3 of 3
    Tool used on this step:
    Tesa 61395 Tape
    $2.99
    Buy
    • Lift the front cover off the screen and remove it.

    • During reassembly:

    • If your replacement front cover comes with pre‑installed adhesive, remove the liner. Otherwise, use a thin double-sided tape like Tesa tape to replace the adhesive.

    • Align the front cover over the frame and press down around the perimeter until the clips snap back into place.

Conclusion

To reassemble your device, follow these instructions in reverse order.

Compare your new replacement part to the original part—you may need to transfer remaining components or remove adhesive backings from the new part before you install it.

Make sure each of your device's main functions still work, e.g., LED backlight, touch, page-turn buttons, Wi-Fi, etc.

Repair didn’t go as planned? Try some basic troubleshooting, or ask our Answers Community for help.

Alex Diaz-Kokaisl

Member since: 01/16/22

124,298 Reputation

581 Guides authored

Team

iFixit Member of iFixit

Staff

135 Members

17,204 Guides authored

0 Comments

Add Comment

View Statistics:

Past 24 Hours: 13

Past 7 Days: 151

Past 30 Days: 211

All Time: 288