
Kärcher K3.86 Cylinder Head Replacement

  1. Kärcher K3.86 Cylinder Head Replacement, Remove the high pressure unit from the casing: step 1, image 1 of 3 Kärcher K3.86 Cylinder Head Replacement, Remove the high pressure unit from the casing: step 1, image 2 of 3 Kärcher K3.86 Cylinder Head Replacement, Remove the high pressure unit from the casing: step 1, image 3 of 3
    • Disconnect the hose of the external tank.

    • Unsnap the power cord from the casing.

    • Release the high pressure unit from the housing.

  2. Kärcher K3.86 Cylinder Head Replacement, Pull the metal clip and release the pipes: step 2, image 1 of 3 Kärcher K3.86 Cylinder Head Replacement, Pull the metal clip and release the pipes: step 2, image 2 of 3 Kärcher K3.86 Cylinder Head Replacement, Pull the metal clip and release the pipes: step 2, image 3 of 3
    • Pull the metal clips that hold the pipes in place with pliers.

    • Once released, put the pipes and clips aside. Make sure you don't lose the seals.

  3. Kärcher K3.86 Cylinder Head Replacement, Remove the metal flange and the earth connector: step 3, image 1 of 3 Kärcher K3.86 Cylinder Head Replacement, Remove the metal flange and the earth connector: step 3, image 2 of 3 Kärcher K3.86 Cylinder Head Replacement, Remove the metal flange and the earth connector: step 3, image 3 of 3
    • With the use of a Philips screwdriver release the earth connector from the metal flange.

    • Carefully loosen each of the 4 screws that hold the flange attached to the high-pressure chamber of the pump.

    • Before to completely release the flange and the head of the pump hold the flange firmly with your other hand or ask a friend for help. Springs inside the pump push hard.

  4. Kärcher K3.86 Cylinder Head Replacement, Hold the piston guidance in place: step 4, image 1 of 3 Kärcher K3.86 Cylinder Head Replacement, Hold the piston guidance in place: step 4, image 2 of 3 Kärcher K3.86 Cylinder Head Replacement, Hold the piston guidance in place: step 4, image 3 of 3
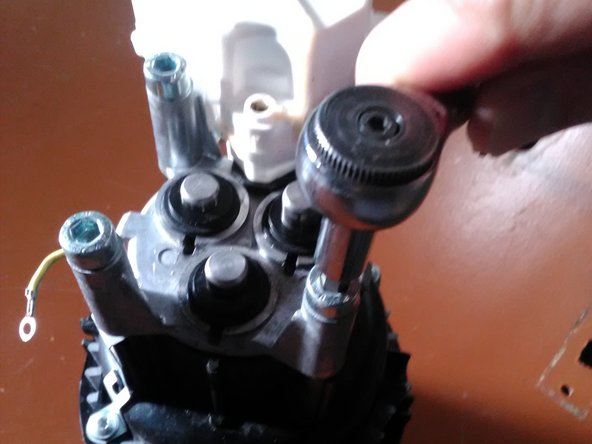
    • Firmly hold the piston guidance.

    • In order to protect the inside of the pump from dust, reposition the 4 screws to hold the piston guidance in place.

  5. Kärcher K3.86 Cylinder Head Replacement, Pick valveset, injectors and seals from the defective part: step 5, image 1 of 3 Kärcher K3.86 Cylinder Head Replacement, Pick valveset, injectors and seals from the defective part: step 5, image 2 of 3 Kärcher K3.86 Cylinder Head Replacement, Pick valveset, injectors and seals from the defective part: step 5, image 3 of 3
    • Carefully pull the seal, injector and valve from the head of the pump.

  6. Kärcher K3.86 Cylinder Head Replacement, Check the parts before assembling: step 6, image 1 of 1
    • Check that you have in hand all these parts before to assemble the new head.

    • The spare part 9.001-216.0 : the head of the high-pressure chamber.

    • The triangle-shaped seal: this part has been previously removed from the to-be-replaced head.

    • The white pipe to connect the pump to the external tank: this part has been removed from the head to be replaced.

    • The control piston and its spring picked from the head to be replaced. The control piston acts on an external switch which electrically commands the start of the washer.

    • The red suction part retrieved from the head to be replaced.

    • The injector removed from the head to be replaced.

  7. Kärcher K3.86 Cylinder Head Replacement, Assemble the control piston and the cleaning material: step 7, image 1 of 2 Kärcher K3.86 Cylinder Head Replacement, Assemble the control piston and the cleaning material: step 7, image 2 of 2
    • Insert the control piston into the hole circled in red.

    • Place the cleaning material after inserting the control piston. The white pipe must be placed exactly in the same position as shown in the picture.

  8. Kärcher K3.86 Cylinder Head Replacement, Insert the suction pipe into the head: step 8, image 1 of 1
    • Mount the suction pipe into the head as shown in the picture.

  9. Kärcher K3.86 Cylinder Head Replacement, Mount the injector into the head: step 9, image 1 of 2 Kärcher K3.86 Cylinder Head Replacement, Mount the injector into the head: step 9, image 2 of 2
    • Mount the injector into the head as shown in the picture.

  10. Kärcher K3.86 Cylinder Head Replacement, Place the seal of the head: step 10, image 1 of 1
    • Place the seal. If the seal is dry add some silicone grease.

  11. Kärcher K3.86 Cylinder Head Replacement, Put the metal flange on top of the head: step 11, image 1 of 2 Kärcher K3.86 Cylinder Head Replacement, Put the metal flange on top of the head: step 11, image 2 of 2
    • Put the metal flange on the head.

    • Retrieve the four screws that hold the pistons in place. The springs of the piston push hard outward: firmly hold them in place while you bring and put the head in place.

    • Start mounting two diagonally opposite screws.

    • Finish mounting the two other screws

  12. Kärcher K3.86 Cylinder Head Replacement, Ensure the control piston actuate the electrical switch: step 12, image 1 of 2 Kärcher K3.86 Cylinder Head Replacement, Ensure the control piston actuate the electrical switch: step 12, image 2 of 2
    • Jiggle the electrical unit of the pump.

    • Stop jiggling the electrical unit after you hear a 'click'.

  13. Kärcher K3.86 Cylinder Head Replacement, Reconnect the earth wire: step 13, image 1 of 1
    • Make sure that the earth connection is screwed to the metal flange of the head BEFORE any electrical testing.

    • Only after that you may briefly test the start of the pump.

  14. Kärcher K3.86 Cylinder Head Replacement, Remount the internal of the high-pressure pipe: step 14, image 1 of 2 Kärcher K3.86 Cylinder Head Replacement, Remount the internal of the high-pressure pipe: step 14, image 2 of 2
    • Make sure you did not lose the small-sized seal of the high-pressure pipe.

    • Remount the seal inside the pipe before remounting the pipe on the high-pressure unit.

  15. Kärcher K3.86 Cylinder Head Replacement, Remount the high-pressure pipe and the water supply pipe: step 15, image 1 of 3 Kärcher K3.86 Cylinder Head Replacement, Remount the high-pressure pipe and the water supply pipe: step 15, image 2 of 3 Kärcher K3.86 Cylinder Head Replacement, Remount the high-pressure pipe and the water supply pipe: step 15, image 3 of 3
    • Place the pipes in the same position as shown in the pictures.

    • Push the metal clips to hold the pipes in place.

  16. Kärcher K3.86 Cylinder Head Replacement, Put the high-pressure unit back into the casing: step 16, image 1 of 1
    • Carefully reposition the high-pressure unit into the casing of the washer.

    • It must fit gently into the casing . No need to force the fitting.

Conclusion

To reassemble your device, follow the instructions of the casing tear-down in the reverse order.

One other person completed this guide.

Attached Documents

David

Member since: 05/23/14

1,523 Reputation

5 Guides authored

0 Comments

Add Comment

View Statistics:

Past 24 Hours: 2

Past 7 Days: 20

Past 30 Days: 124

All Time: 1,926