
Jura Capresso IMPRESSA J5 Flowmeter exchange/replacement

What you need

  1. Jura Capresso IMPRESSA J5 Flowmeter exchange/replacement, Jura Capresso IMPRESSA J5  opening procedure: step 1, image 1 of 1
    • Unplug the power cord!

    • Remove the water tank and the drip tray. Remove all coffee beans from the storage container.

  2. Jura Capresso IMPRESSA J5 Flowmeter exchange/replacement: step 2, image 1 of 3 Jura Capresso IMPRESSA J5 Flowmeter exchange/replacement: step 2, image 2 of 3 Jura Capresso IMPRESSA J5 Flowmeter exchange/replacement: step 2, image 3 of 3
    • Flip open the lid of the bean compartment.

    • Unscrew the two slotted screws inside the bean compartment. The screws have a rubber washer and will not come out completely.

    • Remove the bean compartment.

  3. Jura Capresso IMPRESSA J5 Flowmeter exchange/replacement: step 3, image 1 of 3 Jura Capresso IMPRESSA J5 Flowmeter exchange/replacement: step 3, image 2 of 3 Jura Capresso IMPRESSA J5 Flowmeter exchange/replacement: step 3, image 3 of 3
    Tool used on this step:
    iFixit Precision 4 mm Screwdriver Bit
    $2.99
    Buy
    • The top cover is fastened with oval head screws. Unscrew them.

    • These screws have an oval head that makes them look like rivets (picture 2). You need to use a special bit - also available at iFixit - for their removal. Here a DIY guide. If the right bit is not available, it could be done with a pair of needle nose pliers. Jura wants to keep us out of our own machines!!!

  4. Jura Capresso IMPRESSA J5 Flowmeter exchange/replacement: step 4, image 1 of 1
    • Also remove the two oval head screws underneath the ground coffee compartment lid.

  5. Jura Capresso IMPRESSA J5 Flowmeter exchange/replacement: step 5, image 1 of 1
    • Now you can pry up the top cover all around.

    • Remove the top cover. This often requires a little force.

    • Use plastic tools to avoid scratching your device.

  6. Jura Capresso IMPRESSA J5 Flowmeter exchange/replacement: step 6, image 1 of 2 Jura Capresso IMPRESSA J5 Flowmeter exchange/replacement: step 6, image 2 of 2
    • Turn the device with the back facing you.

    • Turn the Jura label a few degrees counterclockwise. If it's hard to do, use a small suction cup.

    • Remove the Jura label.

  7. Jura Capresso IMPRESSA J5 Flowmeter exchange/replacement: step 7, image 1 of 3 Jura Capresso IMPRESSA J5 Flowmeter exchange/replacement: step 7, image 2 of 3 Jura Capresso IMPRESSA J5 Flowmeter exchange/replacement: step 7, image 3 of 3
    • Underneath the label you will find two Torx T15 screws. Remove them.

    • Carefully pull the top of the chrome cover slightly outwards, then push it down and put it aside.

  8. Jura Capresso IMPRESSA J5 Flowmeter exchange/replacement: step 8, image 1 of 1
    • Remove the Torx T15 screw on the side panel with the water tank.

  9. Jura Capresso IMPRESSA J5 Flowmeter exchange/replacement: step 9, image 1 of 2 Jura Capresso IMPRESSA J5 Flowmeter exchange/replacement: step 9, image 2 of 2
    • Pull the right side panel slightly towards the back.

    • Remove the side panel.

  10. Jura Capresso IMPRESSA J5 Flowmeter exchange/replacement: step 10, image 1 of 1
    • Pull the left side panel slightly towards the back and remove it.

  11. Jura Capresso IMPRESSA J5 Flowmeter exchange/replacement, Jura J5 Magnetic Drainage Valve: step 11, image 1 of 1
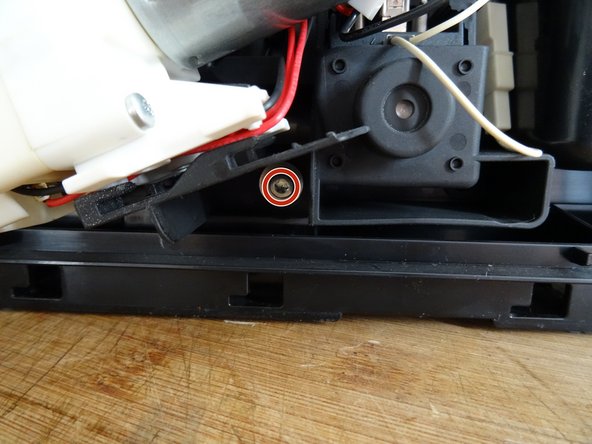
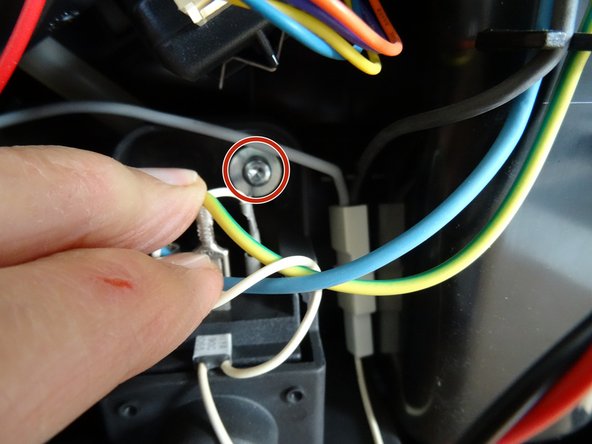
    • The motor for the drainage valve is located in the lower side of the unit near the center. It is fastened with three screws and connected with several flat plugs. In the picture, the ceramic valve has already been pushed off.

    • Note: models from J6 onwards have a motor installed and not a magnet.

  12. Jura Capresso IMPRESSA J5 Flowmeter exchange/replacement: step 12, image 1 of 3 Jura Capresso IMPRESSA J5 Flowmeter exchange/replacement: step 12, image 2 of 3 Jura Capresso IMPRESSA J5 Flowmeter exchange/replacement: step 12, image 3 of 3
    • Unscrew the three Torx T15 screws on the motor for the drain valve. Pay attention to the washers underneath.

    • Carefully pull out the motor.

    • If you want to replace it, you still have to disconnect the flat connectors. Note where the connectors are connected.

  13. Jura Capresso IMPRESSA J5 Flowmeter exchange/replacement, Flowmeter: step 13, image 1 of 2 Jura Capresso IMPRESSA J5 Flowmeter exchange/replacement, Flowmeter: step 13, image 2 of 2
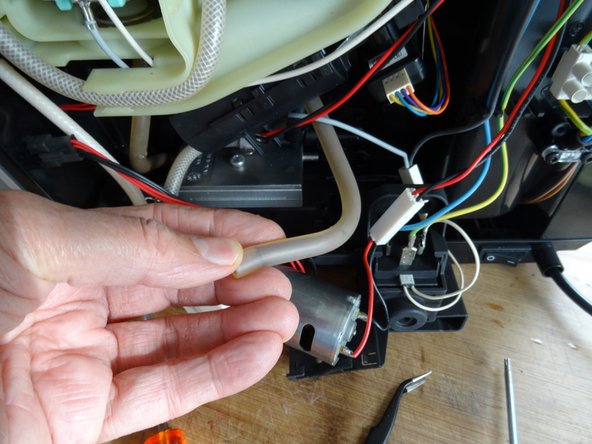
    • The flowmeter is inserted in the front area of the device next to the brewing group. The inlet on the front is easy to see and can be carefully pushed off.

  14. Jura Capresso IMPRESSA J5 Flowmeter exchange/replacement: step 14, image 1 of 2 Jura Capresso IMPRESSA J5 Flowmeter exchange/replacement: step 14, image 2 of 2
    • The drain at the back is not so easily accessible. Turn the machine over so the heat exchanger is in front of you.

    • Pull the hose off the heat exchanger. It leads directly to the flow meter.

    • Now the drain hose from the flow meter is free, just detach it from its guides.

  15. Jura Capresso IMPRESSA J5 Flowmeter exchange/replacement: step 15, image 1 of 1
    • Turn the machine over again.

    • Carefully remove the flowmeter.

  16. Jura Capresso IMPRESSA J5 Flowmeter exchange/replacement: step 16, image 1 of 2 Jura Capresso IMPRESSA J5 Flowmeter exchange/replacement: step 16, image 2 of 2
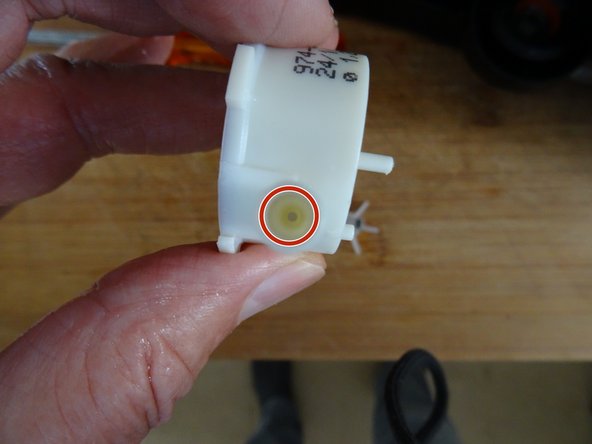
    • Blow into the lower inlet nozzle of the flow meter. You should hear the turbine whirring nicely.

    • The flowmeter can be opened easily. Twist the top clockwise a little and take it off. Pay attention to the gasket when assembling.

    • The inlet channel is very thin, this is where most of the dirt settles. Take a needle and poke the opening.

    • Clean the flowmeter well and put it back together

Conclusion

Work through the steps in reverse order to reassemble your device.

One other person completed this guide.

Special thanks to these translators:

de en

100%

shingle is helping us fix the world! Want to contribute?
Start translating ›

VauWeh

Member since: 10/19/15

203,187 Reputation

246 Guides authored

Team

Repair is War on Entropy Member of Repair is War on Entropy

Community

25 Members

1,120 Guides authored

One Comment

In meinem Fall funktionierte das neue Flowmeter nach dem Tausch gar nicht, habe dann das alte gereinigt und wieder montiert. Das hat auch geklappt. Im Grunde kann an dem Bauteil nichts kaputt gehen, also eine Reinigung sollte in der Regel ausreichen. Wenn man dann hineinbläst muss erkennbar sein das sich das Flügelrat dreht. Dann sollte es wieder funktional sein.

Michael - Reply

Add Comment

View Statistics:

Past 24 Hours: 2

Past 7 Days: 15

Past 30 Days: 63

All Time: 2,062