Introduction
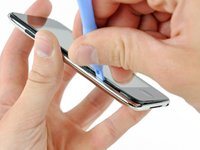
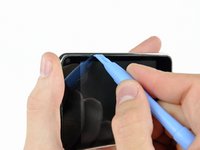
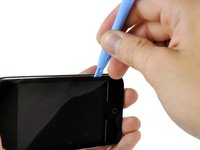
Remove the glass front panel to access your Touch's internals.
What you need
Video Overview
-
-
The picture at left (front panel already removed) shows the locations of the metal clips (shown in red) that snap on to the plastic frame. In the next few steps, try to pry the front panel up from the gaps between these clips.
-
-


To reassemble your device, follow these instructions in reverse order.
Cancel: I did not complete this guide.
97 other people completed this guide.

6 Guide Comments
When prying up - make sure that you lift the black plastic frame. I got trouble because on side I managed to lift the glass of the plastic frame on one side, and lifted the plastic frame out of the clips on the other sides, making it very hard to get the panel out. When I at last succeeded it was because the plastic frame broke in the lower right corner – when I had lifted the panel off the right side of the plastic frame was still attached (it needed to break at the top too before I could lift of the panel completely).
will i because to put the panel back on easily?
Patience and a can of compressed air are mandatory. The inside of my iPod Touch was pretty dusty after two years in my pocket. Before putting on the new digitizer, everything needs to be clean.
Also, I used my spudger to pry half the broken frame out of the left gutter (see Michael above). Doing that without damaging the screen was the hardest part.
I'm getting ready to do this and have the old screen partially off to let things dry out. I am, however, unclear on what to pry on to release the ribbon. From past experience with other iPod products, I'm thinking it is a small clamp that needs to be pried up. Is that the case and, if so, is it located where the picture indicates? I think the clamp is under the small grey plastic cover.