Introduction
Use this guide to upgrade or replace the solid-state drive in a MacBook Air 13” Mid 2011. This MacBook Air uses a proprietary storage drive connector, and is therefore not compatible with common M.2 drives without the use of an adapter.
Before you perform this repair, if at all possible, back up your existing SSD. Then, either familiarize yourself with internet recovery or create a bootable external drive so you’ll be ready to install macOS onto your new drive and migrate your data to the new SSD.
Finally, we strongly recommend installing macOS 10.13 High Sierra (or a later macOS) before replacing the original SSD from your MacBook Air. Most new SSDs require updated storage drivers not found in versions of macOS prior to High Sierra.
What you need
-
Tool used on this step:P5 Pentalobe Screwdriver Retina MacBook Pro and Air$5.99
-
Use a P5 Pentalobe driver to remove ten screws securing the lower case, of the following lengths:
-
Two 9 mm screws
-
Eight 2.6 mm screws
-
-
-
-
Grab the clear plastic pull tab attached to the battery connector and pull it toward the front edge of the Air to disconnect the battery from the logic board.
-
-
-
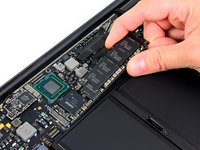
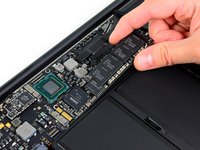
Remove the single 2.9 mm T5 Torx screw securing the SSD to the logic board.
-


Cancel: I did not complete this guide.
88 other people completed this guide.

8 Guide Comments
If I replace the SSD with another one purchased from iFixit, will it appear as an external or internal drive?
At my job, it's standard to encrypt drives. I purchased an SSD from another vendor and because it showed as external, couldn't be encrypted. I just want to avoid this problem before purchasing one from here.
Muito bom o roteiro, deu certinho.
This should really be rated as easy. Took less than 5 minutes thanks to this excellent guide.
Absolutely spot on. Thanks Andrew! The only potential pitfall in this job is getting the right replacement SSD (or, if you're extracting the SSD to use elsewhere, getting the right caddy.)
anybody knows if exist any hdd to replace the ssd?
I have a mb air 13 mid 2011 in my hands and it has behaviour a mac(/pc) with a hdd damaged? same noise, same latencies, same way to damage files…
and over the top “informations about this mac” says it is a macbook pro 13
never seen in my life…