
Installing iMac Intel 20" EMC 2266 Dual Drive

What you need

  1. Installing iMac Intel 20" EMC 2266 Dual Drive, Access Door: step 1, image 1 of 1
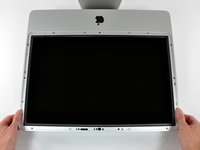
    • Lay your iMac front side down on a table with the lower edge facing yourself.

    • Loosen the single Phillips screw in the center of the access door.

    • This screw is captive in the access door.

    • Remove the access door from your iMac.

  2. Installing iMac Intel 20" EMC 2266 Dual Drive, Glass Panel: step 2, image 1 of 2 Installing iMac Intel 20" EMC 2266 Dual Drive, Glass Panel: step 2, image 2 of 2
    Tool used on this step:
    Heavy-Duty Suction Cups (Pair)
    $14.95
    Buy
    • The glass panel is fixed onto the front bezel with fourteen magnets around its perimeter.

    • Stick two suction cups to opposing corners of the glass panel.

    • To attach the suction cups we sell, first position the suction cup with the movable handle parallel to the face of the glass panel. While lightly holding the suction cup against the glass, raise the movable handle until it is parallel with the other handle.

    • If your suction cups refuse to stick, try cleaning both the glass panel and the suction cup with a mild solvent.

  3. Installing iMac Intel 20" EMC 2266 Dual Drive: step 3, image 1 of 1
    • Gently pull the glass panel straight up off the iMac.

    • The glass panel has several positioning pins around its perimeter. To avoid shearing these pins off the glass panel, be sure to only pull straight up during removal.

    • Be meticulous about cleaning the LCD and the inside face of the glass panel before reinstallation, as any fingerprints or dust trapped inside will be annoyingly visible when the display is on.

    • When replacing the glass, be sure there's nothing between the glass and the frame. Stray cables could be damaged or crack the glass.

  4. Installing iMac Intel 20" EMC 2266 Dual Drive, Front Bezel: step 4, image 1 of 1
    • Remove the following 12 screws securing the front bezel to the rear case:

    • Eight 13 mm T8 Torx.

    • Four 25 mm T8 Torx.

    • On the 24" iMac Intel Model A1225, the bottom center two screws are long (26mm), four on sides (two left, two right) are medium (18mm), and the remaining 6 (four top, two bottom corners) are short (14mm).

  5. Installing iMac Intel 20" EMC 2266 Dual Drive: step 5, image 1 of 2 Installing iMac Intel 20" EMC 2266 Dual Drive: step 5, image 2 of 2
    • The front bezel is still attached to the iMac by the microphone cable.

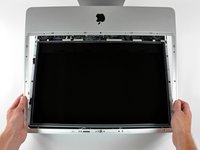
    • Gently lift the front bezel from its top edge off the rear case.

    • Once the top edge of the front bezel has cleared the rear case, rotate the front bezel toward the stand and lift it off the rear case.

    • Rotate the front bezel away from the rest of the device and lay it above the top edge of the iMac.

    • When reinstalling the front bezel, start at the lower edge and make sure it is flush with the rear case before lowering the top edge onto the iMac.

  6. Installing iMac Intel 20" EMC 2266 Dual Drive: step 6, image 1 of 1
    • Disconnect the microphone cable connector, removing tape as necessary.

    • For the front bezel to sit properly, be sure to tuck the microphone cable and connector into the void next to the camera board.

  7. Installing iMac Intel 20" EMC 2266 Dual Drive, Display Panel: step 7, image 1 of 1
    • Pull the LCD temperature sensor connector straight up off its socket on the logic board.

    • (located at the top of the logic board on the 24")

  8. Installing iMac Intel 20" EMC 2266 Dual Drive: step 8, image 1 of 2 Installing iMac Intel 20" EMC 2266 Dual Drive: step 8, image 2 of 2
    • Remove the two T6 Torx screws securing the display data cable to the logic board.

    • Use the attached black tab to pull the display data cable connector straight away from the logic board.

  9. Installing iMac Intel 20" EMC 2266 Dual Drive: step 9, image 1 of 2 Installing iMac Intel 20" EMC 2266 Dual Drive: step 9, image 2 of 2
    • Remove the eight T8 Torx screws securing the display panel to the rear case.

    • Lift the display panel from its left edge and rotate it toward the right edge of the iMac.

  10. Installing iMac Intel 20" EMC 2266 Dual Drive: step 10, image 1 of 2 Installing iMac Intel 20" EMC 2266 Dual Drive: step 10, image 2 of 2
    • With the display panel still lifted, disconnect the four inverter cables.

    • During reinstallation, place the four inverter cable connectors in voids between components attached to the rear panel so the display panel will sit flush on the edges of the rear case.

    • (combined into one plug in on the 24")

    • Be sure to keep track of the cables, as they do not have proprietary sockets. Mismatched cables can cause screen issues.

  11. Installing iMac Intel 20" EMC 2266 Dual Drive, Optical Drive: step 11, image 1 of 2 Installing iMac Intel 20" EMC 2266 Dual Drive, Optical Drive: step 11, image 2 of 2
    • Peel the strip of EMI tape off the edge of the rear case.

  12. Installing iMac Intel 20" EMC 2266 Dual Drive: step 12, image 1 of 1
    • Remove the two T10 Torx screws securing the optical drive to the rear case.

  13. Installing iMac Intel 20" EMC 2266 Dual Drive: step 13, image 1 of 1
    • If necessary, remove the piece of tape holding the thermal sensor wires to the hard drive.

  14. Installing iMac Intel 20" EMC 2266 Dual Drive: step 14, image 1 of 1
    • Pull the optical drive thermal sensor connector straight away from its socket on the logic board.

    • When removing this connector, it is helpful use your thumbnails to push the ears on either side of the connector toward the top of your iMac.

  15. Installing iMac Intel 20" EMC 2266 Dual Drive: step 15, image 1 of 1
    • Lift the left edge of the optical drive slightly and pull it away from the right side of the rear case.

  16. Installing iMac Intel 20" EMC 2266 Dual Drive: step 16, image 1 of 1
    • Insert a spudger between the optical drive connector and the optical drive.

    • Twist the spudger to slightly separate the optical drive connector from the optical drive, then use your fingers to pull the connector away from the drive.

  17. Installing iMac Intel 20" EMC 2266 Dual Drive, Optical Drive: step 17, image 1 of 1
    • Remove the piece of foam tape covering the optical drive thermal sensor.

  18. Installing iMac Intel 20" EMC 2266 Dual Drive: step 18, image 1 of 1
    • To remove the optical drive thermal sensor, use the tip of a spudger to lift the center finger of the thermal sensor bracket while applying slight tension to the thermal sensor cable.

    • If the thermal sensor is stuck to the optical drive, skip to the next step.

  19. Installing iMac Intel 20" EMC 2266 Dual Drive: step 19, image 1 of 1
    • Use the flat end of a spudger to pry the optical drive thermal sensor bracket up off the adhesive securing it to the optical drive.

    • If the adhesive gets dirty or will not stick to your new optical drive, place some double-sided tape under the two semicircular ears of the thermal sensor bracket.

  20. Installing iMac Intel 20" EMC 2266 Dual Drive: step 20, image 1 of 1
    • Use a spudger to remove the small piece of EMI foam from the bottom of the optical drive.

    • Don't forget to transfer this to your new drive.

  21. Installing iMac Intel 20" EMC 2266 Dual Drive: step 21, image 1 of 1
    • Peel the EMI tape off the optical drive.

    • Don't forget to transfer this to your new optical drive.

  22. Installing iMac Intel 20" EMC 2266 Dual Drive: step 22, image 1 of 2 Installing iMac Intel 20" EMC 2266 Dual Drive: step 22, image 2 of 2
    • Remove the two T10 Torx screws from both sides of the optical drive (four screws total).

  23. Installing iMac Intel 20" EMC 2266 Dual Drive: step 23, image 1 of 1
    • Use the tip of a spudger to press each of the optical drive bracket tabs out of their slots on the bottom of the optical drive.

  24. Installing iMac Intel 20" EMC 2266 Dual Drive: step 24, image 1 of 2 Installing iMac Intel 20" EMC 2266 Dual Drive: step 24, image 2 of 2
    • Rotate the optical drive bracket slightly away from the optical drive.

    • Pull the optical drive bracket away from the open end of the optical drive, minding any tabs that may get caught.

    • If you have a disk or anything else stuck inside your optical drive, we have a guide to fix it.

  25. Installing iMac Intel 20" EMC 2266 Dual Drive, Optical Drive Enclosure Faceplate: step 25, image 1 of 1
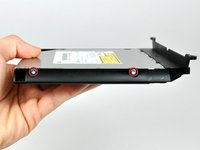
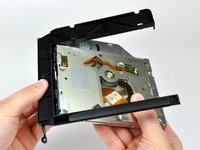
    • Remove the three 3.0 mm Phillips screws from the optical bay enclosure.

  26. Installing iMac Intel 20" EMC 2266 Dual Drive: step 26, image 1 of 3 Installing iMac Intel 20" EMC 2266 Dual Drive: step 26, image 2 of 3 Installing iMac Intel 20" EMC 2266 Dual Drive: step 26, image 3 of 3
    • Starting from the left edge, gently pull open the optical bay enclosure.

    • Continue to pull open the two halves of the enclosure until they separate.

  27. Installing iMac Intel 20" EMC 2266 Dual Drive: step 27, image 1 of 1
    • Remove the two 3.0 mm Phillips screws securing the faceplate to the optical bay enclosure.

  28. Installing iMac Intel 20" EMC 2266 Dual Drive: step 28, image 1 of 3 Installing iMac Intel 20" EMC 2266 Dual Drive: step 28, image 2 of 3 Installing iMac Intel 20" EMC 2266 Dual Drive: step 28, image 3 of 3
    • Lift the black plastic faceplate out of the optical bay enclosure.

    • You will no longer need the faceplate or the two Phillips screws that held it in place. Set those parts aside if you ever wish to put the faceplate back into the enclosure.

    • Reassemble the optical bay enclosure without the faceplate, reusing the original three 3.0 mm Phillips screws to keep it intact.

  29. Installing iMac Intel 20" EMC 2266 Dual Drive, Dual Hard Drive: step 29, image 1 of 2 Installing iMac Intel 20" EMC 2266 Dual Drive, Dual Hard Drive: step 29, image 2 of 2
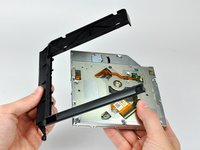
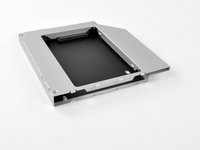
    • Remove the plastic positioner from the optical bay hard drive enclosure by pressing in on one of the clips on either side and lifting it up and out of the enclosure.

  30. Installing iMac Intel 20" EMC 2266 Dual Drive: step 30, image 1 of 3 Installing iMac Intel 20" EMC 2266 Dual Drive: step 30, image 2 of 3 Installing iMac Intel 20" EMC 2266 Dual Drive: step 30, image 3 of 3
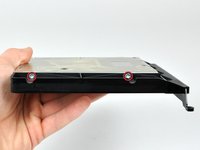
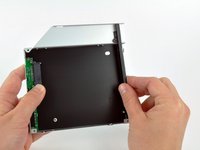
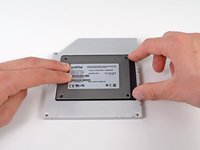
    • Make sure that the hard drive connectors are facing down before placing it into the enclosure.

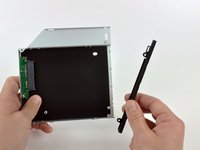
    • Gently place the hard drive into the enclosure's hard drive slot.

    • While firmly holding the enclosure in place with one hand, use your other hand to press the hard drive into the enclosure connectors.

  31. Installing iMac Intel 20" EMC 2266 Dual Drive: step 31, image 1 of 2 Installing iMac Intel 20" EMC 2266 Dual Drive: step 31, image 2 of 2
    • Once the hard drive is snug, reinsert the plastic positioner while holding the hard drive against the bottom of the enclosure.

    • Reconnect any cables you have removed from the original optical drive onto the optical bay enclosure.

Conclusion

To reassemble your device, follow these instructions in reverse order.

18 other people completed this guide.

Brittany McCrigler

Member since: 03/05/12

88,913 Reputation

131 Guides authored

Team

iFixit Member of iFixit

Staff

136 Members

16,586 Guides authored

One Comment

Hello

what is the bandwith of the ODD "connector" ?

MacTracker doesn't give info. about this …

I suppose it is a SATA II 3Gb/s (300 Mo/s) because this article talks about SSD … but i want to be sure …

Thanks

Sebastien

Sébastien - Reply

Add Comment

View Statistics:

Past 24 Hours: 0

Past 7 Days: 6

Past 30 Days: 38

All Time: 24,119