What you need
-
-
Unscrew Bluetooth Sensor Puck from your bottle (obviously)
-
Remove three Philips 1 screws and place them somewhere where you will not accidentally loose.
-
-
-
Now, when you've removed those screws, you can easily pop the lid of your puck
-
The battery cable itself has a small white connector.
-
Disconnect battery cable by holding a puck (side with motherboard) in one hand and pulling white connector using the other hand. No tweezers necessary here, use your fingernails and grab the upper part of a connector, which has small bumps on both left and right side for that purpose.
-
-
-
-
Use something plastic to remove the battery, or cut the adhesive using dental floss.
-
-
-
After you connect a new battery, your puck will flash a few times, this is expected
-
You will have to recalibrate the sensor puck after full reassembly. In fact, the application on your phone will remind you of this.
-
-
-
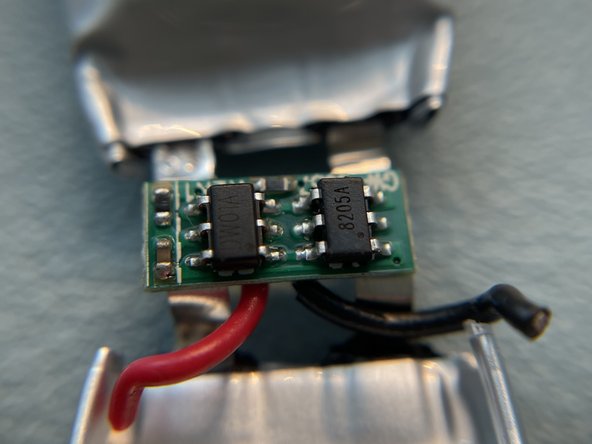
An original 3.7V battery consists of two batteries stitched together in parallel and a protection board
-
Protection board itself has two chips:
-
8205A — a Dual N-Channel MOSFET
-
DW01A — a "lifetime" battery protection IC (over-charge, over-discharge, over-current). Funny, the datasheet on this states that it is designed for a single cell, but we do see that here it is connected to two of them. I presume this has implications on a life time in the long run.
-
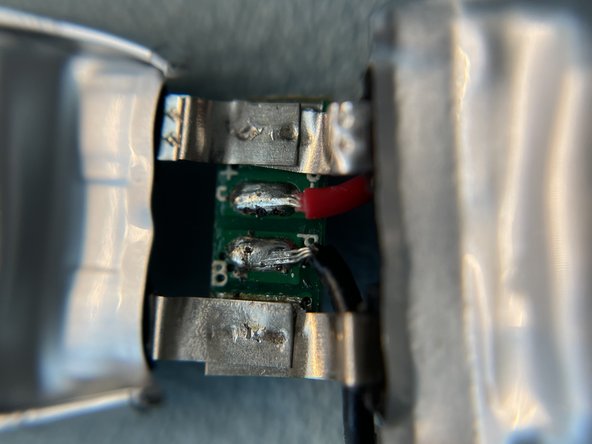
The battery leads are not welded, they're soldered — so you can detach the BMS board from cells easily by clipping out the leads first, to avoid any possibility of short-circuit, heating those leftovers a bit and pushing them to side. Thus you wll have a clean spot to solder a new battery leads to.
-
-
-
You can use a few smaller batteries like the original did.
-
You can use a smaller battery, or a bigger battery like I did
-
I ended up using a rechargeable 3.7V battery from a disposable vape (Elfbar 800).
-
This battery did not fit the puck case without modification, thus, I had to remove some plastics that held the original battery in place
-


To reassemble your device, follow these instructions in reverse order.
To reassemble your device, follow these instructions in reverse order.
Cancel: I did not complete this guide.
3 other people completed this guide.

9 Comments
Hello, I have not been able to find a replacement battery for my puck. I have checked online and was able to find some, but required purchasing a quantity of 500 to 1000 pieces.
If you have any info that would help me in this matter it would be greatly appreciated.
Thank you
The HidrateSpark actually uses two smaller batteries stitched together via a small circuit with overcharge protection.
So one can either do the same or find a similarly sized battery.
Technically, any 3.7v lithium-ion/polymer battery should work.
I myself have used a battery from a small Elfbar 800 (single-use vape). All of those contain a rechargeable LiPol battery.
We do recycle those in Ukraine to make power banks for the army.
This battery almost fits in a puck, but since it is a bit longer, I have had to cut a bit of plastic which held an original rectangular battery.
However, since I have not disassembled my pack completely, I am not sure that the PCB of the puck itself has any kind of overcharge protection. So this might be not a good idea to connect a new battery without ensuring either the puck or battery has overcharge protection.
Why couldn't you solder the protection circuit to the battery you replaced the old one with?
My bf gave me one of these bottles but without a charger. I realized my old Pebble watch charger fit perfectly & tried charging the puck with it but it didn't do anything.
The battery reads 0.00v with multimeter. Since you said the battery has over discharge protection, that likely means the battery needs replacing huh?
Well, I am no battery expert, so I advise you to ask someone else to be sure.
Though I can say I remember there was a method of reviving batteries by de-soldering them from BMS and charging those "manually" with lover voltage for some time, to gradually restore its internal chemisty and bring back to life.
You don't have to charge battery, really, just give it some boost for BMS to work.
This will gift you some additional time and contribute to waste reducing, however, once the degradation process started, it will only accelerate.
Did you check the voltage output from BMS or directly from battery leads?
BMS giving out 0V is expected, since it cuts out battery before it dies.
Should still charge though. Did not in my case, when my battery have died.
Anyway, I did not solder the protection circuit simply because I had no soldering iron at that time.
I will get one soon, so I might try putting the BMS back and publishing the results here, after some testing.
I'm just now seeing your response. It's actually been awhile since I tested the battery voltage, so I'm not sure where I placed the leads to measure voltage. Thanks for replying cuz I hadn't considered the BMS possibly causing the voltage appear to be 0.
I'm no battery expert either, but I was under the impression lipo batteries cannot be allowed to discharge completely or they can't be revived. I did know the older chemistry rechargeable batteries could be revived. Can't think of what they're called right now.
Thx again for taking the time to respond. Ill check back into my battery when I've got some time & see whether its actually dead or not and try reviving it if so.
Awesome of you to post this DIY. There's hardly any info online regarding the batteries in this bottle.