
Ecovacs Deebot 900 Wheel Replacement

What you need

  1. Ecovacs Deebot 900 Wheel Replacement, Battery: step 1, image 1 of 1
    • Remove all the brushes from the Deebot.

  2. Ecovacs Deebot 900 Wheel Replacement: step 2, image 1 of 1
    • Using a Phillips #0 screwdriver, remove the two 12.25 mm screws holding the battery cover in place.​

  3. Ecovacs Deebot 900 Wheel Replacement: step 3, image 1 of 1
    • Remove the battery cover.

  4. Ecovacs Deebot 900 Wheel Replacement: step 4, image 1 of 1
    • Using the two white straps on the sides of the battery, gently remove the battery. ​

    • Be careful not to rip out the battery cable.

  5. Ecovacs Deebot 900 Wheel Replacement: step 5, image 1 of 1
    • Carefully disconnect the battery cable by pulling near the connector at the bottom of the battery compartment.

  6. Ecovacs Deebot 900 Wheel Replacement, Front Bumper: step 6, image 1 of 2 Ecovacs Deebot 900 Wheel Replacement, Front Bumper: step 6, image 2 of 2
    • Using a Phillips #00 screwdriver, remove the eight screws on the bottom edge of the bumper. ​

  7. Ecovacs Deebot 900 Wheel Replacement: step 7, image 1 of 1
    • Remove the black strip on the bottom of the bumper.

  8. Ecovacs Deebot 900 Wheel Replacement: step 8, image 1 of 2 Ecovacs Deebot 900 Wheel Replacement: step 8, image 2 of 2
    • Carefully lift up the bumper untill it pops out of place.​

  9. Ecovacs Deebot 900 Wheel Replacement: step 9, image 1 of 2 Ecovacs Deebot 900 Wheel Replacement: step 9, image 2 of 2
    • Disconnect the two cables connecting the bumper to the body of the Deebot.

    • Remove the front bumper from the device.

  10. Ecovacs Deebot 900 Wheel Replacement, Bottom Case: step 10, image 1 of 2 Ecovacs Deebot 900 Wheel Replacement, Bottom Case: step 10, image 2 of 2
    • Using a Phillips #00 screwdriver, take out the six screws around the perimeter of the bottom case.

  11. Ecovacs Deebot 900 Wheel Replacement: step 11, image 1 of 2 Ecovacs Deebot 900 Wheel Replacement: step 11, image 2 of 2
    • Insert a Jimmy into the seam and work all the way around the robot.

    • Disconnect the two cables and remove the bottom case from the device.

  12. Ecovacs Deebot 900 Wheel Replacement, Motherboard: step 12, image 1 of 1
    • Using a Phillips #00 screwdriver, remove the two black screws holding the motherboard in place.​

  13. Ecovacs Deebot 900 Wheel Replacement: step 13, image 1 of 1
    • Carefully remove the ribbon cables connected to the top of motherboard.

    • Keep track of where the cables connect to the motherboard.

  14. Ecovacs Deebot 900 Wheel Replacement: step 14, image 1 of 1
    • Remove the last three ribbon cables on the underside of the motherboard.​

  15. Ecovacs Deebot 900 Wheel Replacement: step 15, image 1 of 1
    • Lift the motherboard out of the Deebot and remove it from the device.

  16. Ecovacs Deebot 900 Wheel Replacement, Wheel: step 16, image 1 of 1
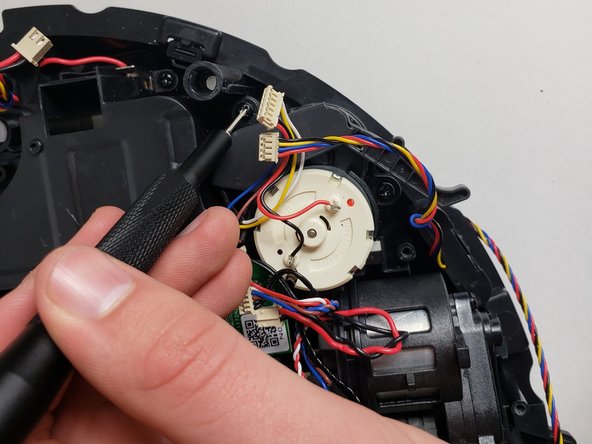
    • Using a screwdriver or tweezers, remove the spring by lifting the spring and pulling it off one side.

  17. Ecovacs Deebot 900 Wheel Replacement: step 17, image 1 of 2 Ecovacs Deebot 900 Wheel Replacement: step 17, image 2 of 2
    • Using a Phillips #00 screwdriver, remove the four screws holding the wheel assembly in place.

  18. Ecovacs Deebot 900 Wheel Replacement: step 18, image 1 of 1
    • Remove the wheel cover.

  19. Ecovacs Deebot 900 Wheel Replacement: step 19, image 1 of 3 Ecovacs Deebot 900 Wheel Replacement: step 19, image 2 of 3 Ecovacs Deebot 900 Wheel Replacement: step 19, image 3 of 3
    • Using the Phillips #00 screwdriver, remove the three screws holding the side brush motor in place and lift the brush motor up.

  20. Ecovacs Deebot 900 Wheel Replacement: step 20, image 1 of 2 Ecovacs Deebot 900 Wheel Replacement: step 20, image 2 of 2
    • Lift up and remove the wheel assembly and the attached sensor (black cable).

Conclusion

To reassemble your device, follow these instructions in reverse order.

6 other people completed this guide.

6 Comments

Thanks, it helps a lot

Agoston David - Reply

I have an OZMO 930 that the left driver wheel is stuck. I tried to follow the above instruction, but I can’t go beyond step 10, I can’t take out the cover. Any help will be greatly appreciated,

OldManInChicago - Reply

do you have place to buy ecovac_deebot_900_54_gear ?? I thinking on printing it but after my printed gear to papper shreder I have no hopes it will last.

Plewu Gracz - Reply

Thanks for the guide on the Deebot 900 wheel replacement. Though it has partially helps to resolve the problems, but unable to find a wheel replacement. Hope you can help too.

wong CS - Reply

The rubber tires on my Deebot have worn through. Does anybody have a source for rubber tire replacement? The company wants to sell me two entire wheel assemblies. I find that unreasonable.

akobelan - Reply

Add Comment

View Statistics:

Past 24 Hours: 15

Past 7 Days: 178

Past 30 Days: 735

All Time: 43,102