
Apple iPod Hi-Fi iPod Dock Inserts Replacement

What you need

  1. Apple iPod Hi-Fi iPod Dock Inserts Replacement, Grille: step 1, image 1 of 1
    • Warm up the glue by using the hair dryer on the grille for 5-10 minutes.

    • You can skip this step if you don't have access to a hair dryer. However, if you skip this step, the next step will take longer and will be harder.

  2. Apple iPod Hi-Fi iPod Dock Inserts Replacement: step 2, image 1 of 1
    • Take one spudger and fit it under the grille.

    • Use your first spudger to pry up and make room to insert a second one.

    • Sever the glue connections between the grille and the device by moving one spudger around, cutting through the glue.

    • Use the other spudger to raise the grille, allowing you to see where you're working.

    • Since you're cutting the glue, the grille may not stick as well when reassembled.

  3. Apple iPod Hi-Fi iPod Dock Inserts Replacement: step 3, image 1 of 1
    • Pull the grille off the Apple iPod Hi-Fi with your hands.

  4. Apple iPod Hi-Fi iPod Dock Inserts Replacement, Front Panel and Speaker Connections: step 4, image 1 of 2 Apple iPod Hi-Fi iPod Dock Inserts Replacement, Front Panel and Speaker Connections: step 4, image 2 of 2
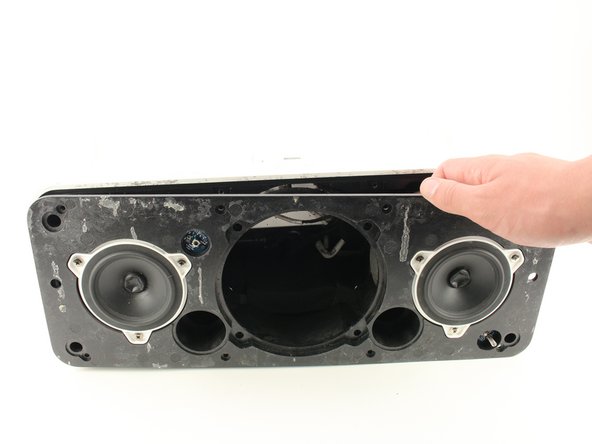
    • Remove all eight 3.3mm JIS #1 screws holding the front panel in place by placing the screwdriver in the head of the screw and rotating counterclockwise.

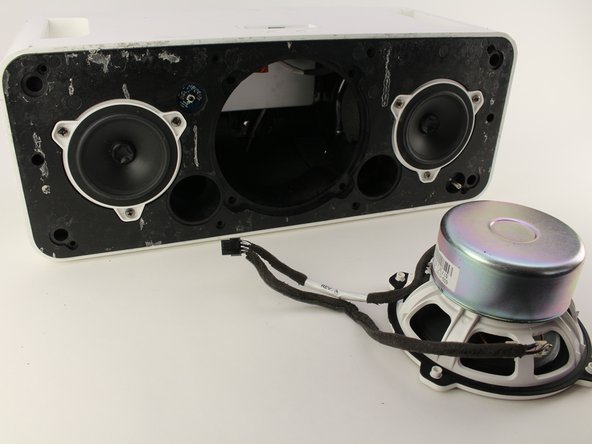
    • Remove the four 3.3mm JIS #1 screws holding the large speaker in place by placing the screwdriver in the head of the screw and rotating counterclockwise.

  5. Apple iPod Hi-Fi iPod Dock Inserts Replacement: step 5, image 1 of 2 Apple iPod Hi-Fi iPod Dock Inserts Replacement: step 5, image 2 of 2
    • Pry out the large speaker with a metal spudger around the edge.

    • Remove the speaker slowly from its socket with your hands.

    • Turning the speaker on its side will make this step much easier.

    • The speaker is still attached by several connections at this point so the speaker will not be able to be removed completely at this step.

  6. Apple iPod Hi-Fi iPod Dock Inserts Replacement: step 6, image 1 of 2 Apple iPod Hi-Fi iPod Dock Inserts Replacement: step 6, image 2 of 2
    • Press down on the tab and pull out with your hands to remove the cable connecting the large speaker from the rest of the unit.

    • Pull the large speaker completely out and set aside.

  7. Apple iPod Hi-Fi iPod Dock Inserts Replacement: step 7, image 1 of 1
    • Remove the sensor connection by pulling it straight out with your hand.

  8. Apple iPod Hi-Fi iPod Dock Inserts Replacement: step 8, image 1 of 3 Apple iPod Hi-Fi iPod Dock Inserts Replacement: step 8, image 2 of 3 Apple iPod Hi-Fi iPod Dock Inserts Replacement: step 8, image 3 of 3
    • Pull the entire front assembly off by prying it up with the spudger and lifting the assembly off with your hands towards the top of the Hi-Fi.

    • There are still connections attached at this stage so the front assembly will not completely disconnect from the rest of the device .

  9. Apple iPod Hi-Fi iPod Dock Inserts Replacement: step 9, image 1 of 2 Apple iPod Hi-Fi iPod Dock Inserts Replacement: step 9, image 2 of 2
    • Remove the clips for the remaining two speakers by repeating step 6.

    • Remove the last connection that connects the speakers to the power box.

    • Remove the front panel completely.

    • When reassembling, the ports are labeled "right" and "left" to help you plug in the right speaker to the right port.

  10. Apple iPod Hi-Fi iPod Dock Inserts Replacement, iPod Dock Inserts: step 10, image 1 of 1
    • Place the speaker on its back with the dock facing away from you.

  11. Apple iPod Hi-Fi iPod Dock Inserts Replacement: step 11, image 1 of 1
    • Remove the cable connected to the dock insert by pulling the cable straight out.

  12. Apple iPod Hi-Fi iPod Dock Inserts Replacement: step 12, image 1 of 2 Apple iPod Hi-Fi iPod Dock Inserts Replacement: step 12, image 2 of 2
    • Remove the gold tape attaching the insert to the unit.

    • Remove the three 2mm Phillips #1 screws holding the dock inserts in by placing the screwdriver in the head of the screw and rotating counterclockwise.

  13. Apple iPod Hi-Fi iPod Dock Inserts Replacement: step 13, image 1 of 1
    • Remove the dock insert with your hands.

Conclusion

To reassemble your device, follow these instructions in reverse order.

5 other people completed this guide.

Timothy Scheuermann

Member since: 04/18/18

710 Reputation

3 Guides authored

Team

Cal Poly, Team S16-G1, Livingston Spring 2018 Member of Cal Poly, Team S16-G1, Livingston Spring 2018

CPSU-LIVINGSTON-S18S16G1

5 Members

16 Guides authored

One Comment

If I need broken part of Apple iPod Hi-Fi iPod Dock were to get and how to get it part

wyzman nyawo - Reply

Add Comment

View Statistics:

Past 24 Hours: 6

Past 7 Days: 22

Past 30 Days: 83

All Time: 4,819